Now that I've received all of those new shiny bones I needed a method of "fixing" or tweaking them to a desired position. In the packaging of all miniature models there are always the occasional bent swords, figures, staff, etc. as the miniature gets smooshed into the packaging (one website I read remarks that his miniatures need some viagra). With metal figures it's a simple pinch with the hobby pliers and it's easy to repose or straighten out a bent item.
Pulling, twisting or some other manipulation doesn't do a dang thing to the plastic models as the plastic has "memory" and contorts back to it's undesired state. Off to Google I went and I found lots and lots of advice and information. I found a good site that provided accurate information as well as a youtube video. The white plastic is some sort of pvc mixture that when heated goes back to its original memory state (ie - a straight sword). To get it to stay in that original memory state or to manipulate into a different pose the trick is to rapidly cool it down.
I was extremely successful following these steps:
Step 1: Have a pot of boiling water
Step 2: Have a big bowl (I used a big plastic popcorn bowl) of ice water
Step 3: Dunk miniature or part of the miniature (such as only the sword, staff, wing, base, etc.) into boiling water for about 10-20 seconds depending upon the thickness of the miniature
Step 4: Take miniature out of boiling water and while warm form to desired shape
Step 5: Quickly dunk into ice water (physics is so cool - I feel like I'm on Mythbusters) and the miniature immediately hardens into the desired shape
===
7/28/2013 update: if you have a one off Bone and you don't want to go through the entire process of boiling a pot of water and dipping into ice water - then the use of the bathroom sink with the temp turned to maximum hot water and a nearby cup of cold tap water will do the trick. It takes a little longer - you definitely need to work at it a bit more (the plastic doesn't get to the goo state) - and dunking into cold tap water isn't as instant hard as ice water, but it does the trick.
===
Its a bit different than dealing with metal miniatures but no less taxing - in some ways it's easier. I was able to straighten out the base of the miniature, the angle of the miniature, swords, staffs, wings, etc. as well as repose as desired.
My recommended websites that I found most useful:
Castles and Cooks - a well detailed explanation of the process with pictures
Fixing Reaper Bones - a decent video explanation whereby he shows and tells to the audience
Hope that helps everyone else out there!
Wednesday, July 17, 2013

My Reaper Bones are Here
Wow! Can't believe it's been since September 2012 that I last posted - time flies when you're having fun and coaching an 18u fastpitch softball team.
I haven't been not painting - I've actually painted a couple of models in 2013 - one was a Reaper Bones model and the other an old Games Workshop model. They're sitting on my desk waiting for picture taking. I've also been re-basing/tweaking some really old models that I wanted to update and I'm just about done with those. Additionally I've been basing lots and lots of models - one of my goals this year was to take small limited opportunities to unpackage and base my entire line of Reaper Dark Heaven Legends - which for the most part I've done.
The big news is.... I received my Reaper Bones! I ordered the Vampire level Kickstarter campaign as well as all the additional options. Hundreds and hundreds of miniatures came in a 14.5 pound box about 10 months after the Kickstarter. The wait was well worth it and here is what I received (there is an old Larry Leadhead cartoon about living as long as you have miniatures to paint - I've definitely broken the century mark with this purchase)...


Here is what they look like after opening and laying out on the table - there are four significant pieces I didn't lay out because they are huge - three dragons and Cthulu "miniatures" - they're absolutely huge.


So there it is in all of it's glory - now to start painting during what remains of 2013!
I haven't been not painting - I've actually painted a couple of models in 2013 - one was a Reaper Bones model and the other an old Games Workshop model. They're sitting on my desk waiting for picture taking. I've also been re-basing/tweaking some really old models that I wanted to update and I'm just about done with those. Additionally I've been basing lots and lots of models - one of my goals this year was to take small limited opportunities to unpackage and base my entire line of Reaper Dark Heaven Legends - which for the most part I've done.
The big news is.... I received my Reaper Bones! I ordered the Vampire level Kickstarter campaign as well as all the additional options. Hundreds and hundreds of miniatures came in a 14.5 pound box about 10 months after the Kickstarter. The wait was well worth it and here is what I received (there is an old Larry Leadhead cartoon about living as long as you have miniatures to paint - I've definitely broken the century mark with this purchase)...


Here is what they look like after opening and laying out on the table - there are four significant pieces I didn't lay out because they are huge - three dragons and Cthulu "miniatures" - they're absolutely huge.


So there it is in all of it's glory - now to start painting during what remains of 2013!
Tuesday, September 04, 2012
Reaper's Male Human Warrior - 77008


Here's the traditional side views...


More Bones! Gotta love them Bones by Reaper - this is my second test model (first was the ghost) with the new plastic Bones from Reaper. Again, I placed him on a plastic base from Fortress Figures. These figures look great - forget about the mold line - just go with it - paint 'em up and play with the 'em. This is the second Bones figure I cranked out on the same day. I named him Sir Jacks as a tribute to one of my favorite sculptors - Bobby Jackson and yes, this is one of his sculpts
I used Vallejo game color paints directly without a primer - unlike the Reaper paint (I only have one bottle of the Reaper paints - Clouded Sea - which I used on the ghost), any significant watering down of the paint caused it to run and not stick to the plastic. However, I had heard when doing some research that using it full strength out of the bottle worked very well. Indeed - ditto the same results - full strength without dilution (or very minor - just a wet brush - enough to make it flow) worked very well. Again, I banged and bounced the mini around while and after painting with no ill effect to the paintjob - like the ghost, I did hit it up with a very light coat of dull coat just to take the shine off the surface.
Painting Instructions for Male Human Warrior:
Step 01: Use Chaos Black on all armored areas
Step 02: Use Regal Blue on robe
Step 03: Use Scab Red on shield face
Step 04: Use Scorched Brown on leather and back of shield
Step 05: Drybrush Boltgun Metal on all armored areas
Step 06: Drybrush Chainmail highlights on all armored areas
Step 07: Use Enchanted Blue as highlights on robe
Step 08: Use Lightning Blue as final highlights on robe
Step 09: Use Bestial Brown as highlights on leather
Step 10: Use Bubonic Brown as final highlights on leather
Step 11: Use Bubonic Brown as wooden planks on back of shield
Step 12: Use Bestial Brown to fill in wooden planks on back of shield
Step 13: Use Blood Red on top half of shield
Step 14: Use Space Wolves Gray on shield/shirt pattern
Step 15: Use Skull White as highlights for shield/shirt pattern
Step 16: Use Dwarf Bronze on sword handle
Step 17: Drybrush Codex Grey on base
Step 18: Drybrush Fortress Grey on base
Step 19: Drybrush final highlight Skull White on base
Monday, September 03, 2012
Reaper's Ghost - 77007


I love Reaper's new Bones line of miniatures - essentially the same figures as their Legends and Warlord line but cast in a new plastic resin (end result is a miniature that's very similar to the Wizards D&D line of figures - the plastic is soft and somewhat bendable). The first miniature I painted was the ghost - it is a Julie Guthrie sculpt and used in three of Reaper's lines - it's a $1.99 in Bones, $4.29 in Legendary Encounters (pre-painted 20017), and $5.99 in the metal Warlord (14148). All the same figure but at different price point - Bones gives you a $4 savings over the same metal figure in the Warlord line!
I based mine with a $0.50 plastic base from Fortress Figures (see earlier blog posting on plastic bases from Fortress Figures). Added a bit of drywall compound to fill in the base and then tossed in some tiny rocks and lichen.
I used Reaper Master Series Clouded Sea as the base color right from the bottle. It took directly onto the plastic without any prior prep/primer (as advertised). A note about Bones, there is a small amount of mold line - I tried all sorts of methods from files to knife and there's really no getting it off - the plastic is too soft and squishy for it to be effective - these are designed to paint and play - not as your next masterpiece - and I'm ok with that!
I then added Skull White to the mix and drybrushed the ghost - I kept at it - adding more white - then another drybrush layer until I was happy with the result. Some Chaos Black for the tombstone with a drybrush of Fortress Grey. The whole thing from start to finish took me a couple of hours.
During each painted layer (and when finished) I bounced the miniature on the desk; off the desk and onto the floor, and gave it a couple severe beatings. To my surprise not a scratch or a dent - the soft plastic just absorbs and the paint stays stuck on. Never-the-less I gave the miniature a quick shot of dull coat when I was finished - if nothing else it's just to dull off the shine of the paint.
I'm quite pleased with the new bones line - an awesome price savings over the metal - the detail looks very close to it's metal counterpart and certainly won't be noticeable on the gaming table. The flexibility to grab a handful of these and throw them down on the gaming table without damaging the mini or the paint job is remarkable - add in the cost savings and you get to have your cake and eat it too!
I named this one Ghost Ralor - the Warlord figure is named Railor - but I was running out of room and therefore took out the I in the name so I could fit it all on.
Plastic Bases from Fortress Figures
What's great about the hobby of miniature painting is that everyone within the hobby treats your interest more like family - from conventions, to group get togethers, and even the vendors themselves.
Earlier in the year I was at my local gaming store and happened to come across an old box of bases by Fortress Figures (I had to blow some dust off it). They were 1" square bases - the type that had a recess where the figure could be placed (good for Reaper, Ral Partha, RAFM, etc. - putting them on a base helps stabilize them during in-game use). Many of the older figures from Fortress Figures came with this type of basing prior to the more popular slotta base.
I love the 1" square base with recess as I have for years purchased the Reaper base 74006 - 1" square bases from metal so that my figures didn't fall over during an rpg session. Unfortunately, as much as I love them, the price of metal has skyrocketed and Reaper reduced the number of bases in the package from 4 to 3 while the price has gone up to $8 - that's almost $3 a base - add that to every figure in my collection and it becomes quite costly.
I tried out those plastic bases by Fortress Figures and you can see the results with my Mushroom Men and Skeletons. The plastic base sits a little taller than the metal base, but I've found since that using a nice gritty sand paper (T2) can reduce that down a bit while making sure the plastic is level on the bottom (the plastic bases have a tendency to be a bit more warped out of the box than the metal).

The above sample picture shows a Reaper figure in a metal base, and then another in a plastic base. The third is after I fill the base with drywall compound (I let that dry and then carve my dungeon path) and the fourth is the new Reaper Bones mini in a filled in plastic base.
I went back to my local gaming store and I couldn't find another package - as mentioned, the one there had quite a bit of dust on it. So I contacted Fortress Figures directly - showed them some pictures - and asked if they had any more of those plastic bases. I received a reply from Jeff Rodman (owner of Fortress Figures) that it had been several years and he'd dig out the mold for me and see if it was still viable. It was and he made me a batch of 50 for $25 - that's $0.50 each - a heck of a lot better than $3 for metal. Particularly for the new Bones miniatures by Reaper - there's absolutely no reason to put a $3 metal base on a $2 plastic figure! Plus, it gives that plastic Bones figure a solid base so it won't get knocked over during game play!
Nice to know that there's great customer service with folks who care. With all those new Reaper Bones (I pledged at the Vampire level), I'm sure that I'll be ordering another 50 -100 bases from Jeff and Fortress Figures.
Earlier in the year I was at my local gaming store and happened to come across an old box of bases by Fortress Figures (I had to blow some dust off it). They were 1" square bases - the type that had a recess where the figure could be placed (good for Reaper, Ral Partha, RAFM, etc. - putting them on a base helps stabilize them during in-game use). Many of the older figures from Fortress Figures came with this type of basing prior to the more popular slotta base.
I love the 1" square base with recess as I have for years purchased the Reaper base 74006 - 1" square bases from metal so that my figures didn't fall over during an rpg session. Unfortunately, as much as I love them, the price of metal has skyrocketed and Reaper reduced the number of bases in the package from 4 to 3 while the price has gone up to $8 - that's almost $3 a base - add that to every figure in my collection and it becomes quite costly.
I tried out those plastic bases by Fortress Figures and you can see the results with my Mushroom Men and Skeletons. The plastic base sits a little taller than the metal base, but I've found since that using a nice gritty sand paper (T2) can reduce that down a bit while making sure the plastic is level on the bottom (the plastic bases have a tendency to be a bit more warped out of the box than the metal).

The above sample picture shows a Reaper figure in a metal base, and then another in a plastic base. The third is after I fill the base with drywall compound (I let that dry and then carve my dungeon path) and the fourth is the new Reaper Bones mini in a filled in plastic base.
I went back to my local gaming store and I couldn't find another package - as mentioned, the one there had quite a bit of dust on it. So I contacted Fortress Figures directly - showed them some pictures - and asked if they had any more of those plastic bases. I received a reply from Jeff Rodman (owner of Fortress Figures) that it had been several years and he'd dig out the mold for me and see if it was still viable. It was and he made me a batch of 50 for $25 - that's $0.50 each - a heck of a lot better than $3 for metal. Particularly for the new Bones miniatures by Reaper - there's absolutely no reason to put a $3 metal base on a $2 plastic figure! Plus, it gives that plastic Bones figure a solid base so it won't get knocked over during game play!
Nice to know that there's great customer service with folks who care. With all those new Reaper Bones (I pledged at the Vampire level), I'm sure that I'll be ordering another 50 -100 bases from Jeff and Fortress Figures.
Tuesday, April 03, 2012
Human Thug - 23-017


Another ZN Games figure that I slapped together this past weekend. I have a handful of these (two more to go) - they're a bunch of fun as I use these as a "speed paint" session where I try to get them complete from start to finish within a couple of hours. That forces me to keep the paint scheme simple and helps me when I paint my other figs. Again, you'll see that all figures from the unearthed hyperborean age are two dimensional - they have a front and back but no real side pose to the figure.
Again, it would be much appreciated if anyone with information as to who sculpted this or any of the other ZN Games would ping me by leaving a message below or sending me an email to my gmail account of rickajr.
Sorry - no step by step painting instructions on this one - it was rather basic - Bronzed flesh to Elf Flesh on the skin with a wash in between. The leather armor was Scorched Brown through Bubonic Brown. All metal was a wet dry-brush of Boltgun Metal (wet dry-brush is where I thin down the metallic paint with water and then paint as normal with a dry-brush - it makes for a smoother paint technique). Hair was Scab Red to Blood Red. The base was standard drybrushing of codex grey, fortress grey, and skull white.
Sunday, March 11, 2012
All Boys Love Planes - Twin Mustang F-82
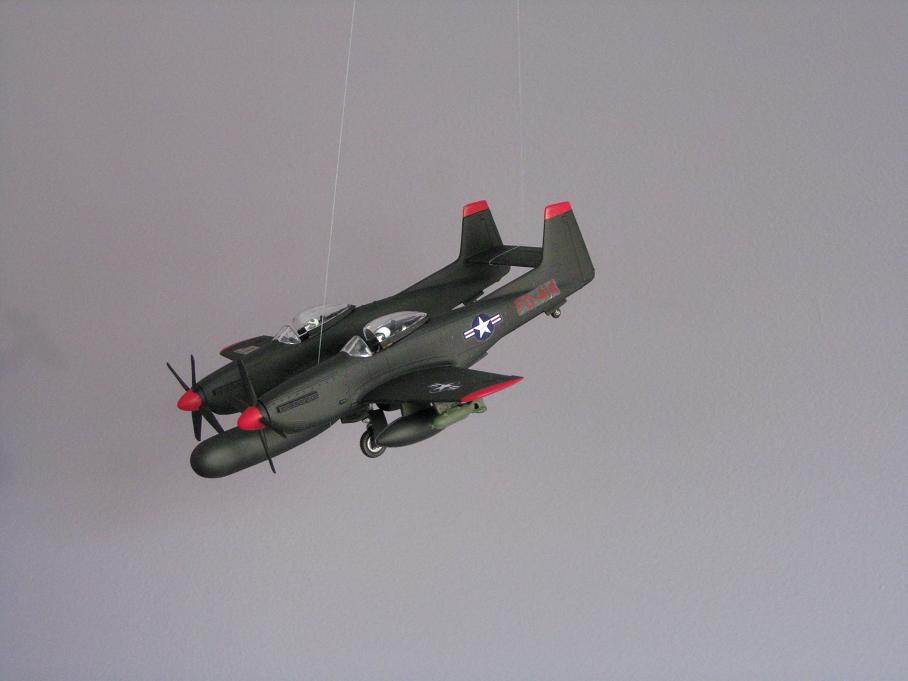
Now for something different - a Monogram Twin Mustang F-82G kit 85-5257 - 1:72 scale model airplane.
At some point in time I've purchased a couple of different model planes for Matthew. We built a Navy Corsair F4U a few years ago and hung that up in his room. So this weekend the Twin Mustang F-82G came out of the box. There were two options - one was an aluminum skinned plane which last saw service in Alaska or the all weather version (essentially a night and bad weather fighter used during the Korean War). I really liked the pitch black and red trim - plus the local hobby shop was out of aluminum spray so black and red was chosen!
Here's the finished product on the hobby table. I've come to the conclusion that I'm not very good with putting on decals. I'm sure there's an artform to it, but to me it looks like a piece of tape with writing on it.


All little boys need planes hanging from their ceiling - so out came the step ladder, some twine, and a thumbtack. He now has the two planes hanging side by side.


At some point in time I've purchased a couple of different model planes for Matthew. We built a Navy Corsair F4U a few years ago and hung that up in his room. So this weekend the Twin Mustang F-82G came out of the box. There were two options - one was an aluminum skinned plane which last saw service in Alaska or the all weather version (essentially a night and bad weather fighter used during the Korean War). I really liked the pitch black and red trim - plus the local hobby shop was out of aluminum spray so black and red was chosen!
Here's the finished product on the hobby table. I've come to the conclusion that I'm not very good with putting on decals. I'm sure there's an artform to it, but to me it looks like a piece of tape with writing on it.


All little boys need planes hanging from their ceiling - so out came the step ladder, some twine, and a thumbtack. He now has the two planes hanging side by side.

Wednesday, February 29, 2012
Reaper's Mushroom Men - 2679

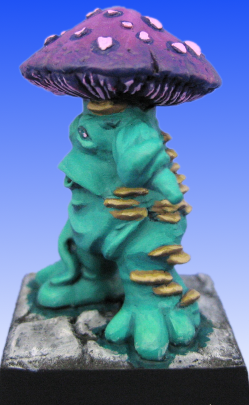


I'll update more tomorrow with additional views and painting instructions - just running out of time tonight - so here's the front side view of the mushroom man that I painted.
Tuesday, February 28, 2012
Father and Daughter Paint Session
Presenting Reaper's 2679 Mushroom Men...


Just like with the hounds, Elizabeth declared she wanted to paint something. So I found the 2 item Mushroom Men pack from Reaper Miniatures. Instead of doing both figures like the hounds, she did the little figure and asked me to do the bigger figure. The paint scheme was her idea!
Another Jason Wiebe sculpted miniature figure - I do like his stuff.
I'll post up pictures of the larger of the two tomorrow when I get a bit more time as well as the step by step directions. So stop by again a little later tomorrow night.


Just like with the hounds, Elizabeth declared she wanted to paint something. So I found the 2 item Mushroom Men pack from Reaper Miniatures. Instead of doing both figures like the hounds, she did the little figure and asked me to do the bigger figure. The paint scheme was her idea!
Another Jason Wiebe sculpted miniature figure - I do like his stuff.
I'll post up pictures of the larger of the two tomorrow when I get a bit more time as well as the step by step directions. So stop by again a little later tomorrow night.
Sunday, February 12, 2012
Reaper's Skel W/2 Hand Swds Army Pack - 5009

As a unit, they came out rather well. They're all the same figure, I twisted the head a bit and mounted the model in the base differently for each one to give them some semblance of uniqueness - yet a unified whole.
The paint scheme obviously was the same as the first posted and therefore I won't post the instructions again - see Reaper Miniatures Skeleton 2129 post for step by step instructions.
Saturday, January 21, 2012
Reaper's Skeleton 2 Handed - 2129


I met with bunch of mini-painters from around the northern and central Virginia at Huzzah Hobbies in Ashburn, VA (a quick thanks and shout out to the owner and team at Huzzah Hobbies - its a great wargaming hobby shop and they provided a good size area for us to get together and paint). I brought along a handful of finished miniatures from the past year as well as a couple of projects I'm working on including a special limited cast Reaper I'm painting for a friend. Besides that, I brought a couple of Reaper skeletons based and black coated ready to go. I figured that a skeleton was something easy to paint so that I could talk and interact with everyone. I did get a good percentage of the skeleton completed there and finished him up at home.
Painting Instructions for Skeleton 2 Handed:
Step 01: Undercoat model with black primer
Step 02: Use Vomit Brown on Bones
Step 03: Mix Bleached Bone into Vomit Brown on bones
Step 04: Use Bleached Bone on bones as highlights
Step 05: Mix Skull White into Bleached Bone on bones as final highlights
Step 06: Use Regal Blue on tattered shirt
Step 07: Use Enchanted Blue as highlights on tattered shirt
Step 08: Use Lightning Blue as highlights on tattered shirt
Step 09: Use Bestial Brown on leather strap
Step 10: Use Snakebite Leather on leather strap
Step 11: Mix Snakebite Leather and Bleached Bone as final highlight on leather strap
Step 12: Use Blazing Orange on hair
Step 13: Use Fiery Orange as hair highlight
Step 14: Use Beaten Copper on sword hilt
Step 15: Use Boltgun Metal on sword blad
Step 16: Use Chainmail for sword highlights
Step 17: Drybrush Codex Grey on base
Step 18: Drybrush Fortress Grey on base
Step 19: Drybrush final highlight Skull White on base
Saturday, January 07, 2012
Phil Comes to Visit

What an ugly dude, but wow is he HOT!
Updated: 01/21/2012: Let me explain this post a bit - Phil, from the DC area mini painter group, and I had talked about getting together as we've both been on/off painters during the past decade based upon kids, work, school, etc. On this particular Saturday Phil braved leaving DC for surburbia and met up at my place. We talked about digital macro photography, using Gimp to cut the image and place the background, and then posting to blogger for sharing.
Saturday, August 20, 2011
ZN Games Wild Satricon - 23-020


I'm a bit giddy about this miniature - not because it's going to win any awards - but because I had a Friday night with some free time and was able to start and finish a complete miniature in a single night by keeping the paint scheme simple and using a lot of drybrush and wash techniques.
Looking on my shelf I found this Wild Satricon from ZN Games and their Unearthed Hyperborean Age line of miniatures. As are the other models, this miniature is very 2d in appearance (which is why the pictures only show front and back) and sits on an octogonal base. Like the other ZN Games models, I've swiped the base with a bit of drybrushing.
2014/12/30 - discovered the sculptor as Phil Lewis.
As to the pictures - they're not too bad - having a lot of painted metal on the miniature freaks the camera out - too much light is reflected off the model and trying to adjust contrast and brightness either darkens the other details or completely washes the metal out. So the end result is some ok looking pictures - I actually think the model looks better in my hand than what I can present here in picture form.
Lately I've started to put down the sculptor to each of my painted miniatures (and even started a sculptors page) - however, I can't find any data on the internet about ZN Games and their miniatures. If anyone has any further information then please leave a comment or send me an email to my gmail account which is rickajr.
Painting Instructions for Wild Satricon:
Step 01: Undercoat model with Black primer
Step 02: Use Boltgun Metal on all armor
Step 03: Use a heavy dousing of Devlan Mud as a wash over all armor
Step 04: Highlight with Boltgun Metal on all armor
Step 05: Wash all armor with a watered down mix of Chaos Black and Devlan Mud
Step 06: Final highlight all armor with Boltgun Metal
Step 07: Use Scorched Brown on legs
Step 08: Drybrush Bestial Brown on legs
Step 09: Drybrush mix of Bestial Brown and Bubonic Brown as highlights on legs
Step 10: Use Terracotta on plume
Step 11: Wash plume with watered down black
Step 12: Drybrush Terracotta on plume
Step 13: Drybrush Blood Red on plume
Step 14: Use Bleached Bone on hooves and horn
Step 15: Wash hooves and horn with Devlan Mud
Step 16: Highlight hooves and horn with Bleached Bone
Step 17: Use Snakebite Leather on gloves
Step 18: Highlight gloves with Desert Yellow
Step 19: Use mix of Snakebite Leather and Bestial Brown on axe grip
Step 20: Wash axe grip with Devlan Mud
Step 21: Highlight axe grip with Snakebite Leather
Step 22: Final highlight axe grip with Desert Yellow
Step 23: Use Terracotta on axe wood
Step 24: Wash axe wood with Chaos Black
Step 25: Use Shining Gold on all ornaments
Step 26: Wash all ornaments with Devlan Mud
Step 27: Highlight all ornaments with Shining Gold
Step 28: Use Dwarf Flesh on face
Step 29: Wash face with Devlan Mud
Step 30: Drybrush Codex Grey on base
Step 31: Drybrush Fortress Grey on base
Step 32: Drybrush Skull White on base
Saturday, July 30, 2011
Setup and Undercoat a Model
During the summer months I'm typically very busy with the kids sports and therefore don't have a big block of time to paint. So I've been working on prepping and undercoating a whole bunch of miniatures. I have something like 30 ready to go. Another 20 on my desk which have been assembled and cleaned (from mold lines, flash, etc.), but not based and undercoated.
I've been wanting to try a hand at producing a how to video - therefore why not start at undercoating a model. I had a bit of time today and had a great time making a video on how to setup a miniature on a spool and then undercoat with black spray paint. Here's my first mini-painting tutorial...
Well that was a lot of fun! It took a bit of time but I had fun putting the video together. You have to think through all the scenes and the dialog for each. I had a basic idea but did a lot of winging it with the dialog. As always, let me know what you think and I'll try doing this again - maybe something on making the stone base effect - good for an rpg session as most take place in medieval town, castle, dungeon, or cave.
I've been wanting to try a hand at producing a how to video - therefore why not start at undercoating a model. I had a bit of time today and had a great time making a video on how to setup a miniature on a spool and then undercoat with black spray paint. Here's my first mini-painting tutorial...
Well that was a lot of fun! It took a bit of time but I had fun putting the video together. You have to think through all the scenes and the dialog for each. I had a basic idea but did a lot of winging it with the dialog. As always, let me know what you think and I'll try doing this again - maybe something on making the stone base effect - good for an rpg session as most take place in medieval town, castle, dungeon, or cave.
Sunday, May 15, 2011
Reaper's Labella Demornay - 2105


Another rainy day, another figure! An opportunity to sit down for a few hours and crank out this wonderful sculpt. I've had this one sitting on the shelf for awhile (ok - I have a lot sitting on the shelf for awhile primed and ready to go) and it struck my fancy.
I originally had worked up a purple/pink paint scheme in my mind but I changed it at the last second to use a base of Terracotta and work that up to a mix of Terracotta and Skull White - the end result is more of a deep and dirty pink. I've improved my wet palette setup and that really helped - not only to get the flow of the paints and brush, but also the speed at which I can put down layers has dramatically increased. Here's a picture of the new setup:

What I've used is the plastic tray from a Reaper Miniatures blister pack. I chose this for it's size and that it's square in depth (the GW plastic is sloped on their blister packs). The "sponge" is from a GW blister pack - it is exactly the perfect size to fit inside the Reaper blister pack flat. Then I cut a piece of Wilton parchment paper (which I stole from my wife's kitchen) to fit neatly over the top of the sponge. Wet the sponge and wet the parchment paper on both sides and walla... an easy to create and use wet palette that keeps the paint thin for hours.
What I did was put a couple dabs of Terracotta (shade) on one side and a bit of Terracotta and Skull White mixed (highlight) on the other. Then I brought them together in a mix and blended the two colors so I had my entire spectrum of shade through highlights. The wet palette kept the colors in a prepped state for hours. From there I was able to paint. This is a thousand times easier than trying to mix into the white plastic tray the various colors and have them dry out after 10 minutes.
When I'm finished painting, I throw out the parchment paper and wring the sponge out to let dry. Simple cleanup. I suppose it would be easy enough to make a couple of these wet palettes in the case you wanted to hold different colors for a complex or large piece. I found the single palette had enough room (it's about 3" x 2") for everything used on this project. I haven't tried to save the paint overnight but I'm guessing a bit of plastic wrap over the top would do the trick.
Painting Instructions for Labella Demornay:
Step 01: Undercoat model with black primer
Step 02: Use Terracotta as base coat on dress
Step 03: Wash dress with 50/50 mix of water and Devlan Mud
Step 04: Layer Terracotta up to a 50/50 mix of Terracotta and Skull White
Step 05: Use 50/50 mix of Bronzed Flesh and Pallid Flesh on hands and face
Step 06: Wash hands and face with Devlan Mud
Step 07: Add more Pallid Flesh to mix and highlight hands and face
Step 08: Use Scorched Brown on hair
Step 09: Use Bestial Brown on hair
Step 10: Use Bubonic Brown on hair
Step 11: Use 50/50 mix of Bubonic Brown and Skull White on hair
Step 12: Use Shining Gold on necklace and belt
Step 13: Drybrush Codex Grey on stone base
Step 14: Drybrush Fortress Grey on stone base
Step 15: Drybrush Skull White on stone base
Saturday, April 16, 2011
Games Workshop's Armoured Skeleton With Spear 5


Rainy days are good for something as I was able to paint up another awesome looking GW archive skeleton! Just as before, this skeleton from Games Workshop is circa pre-2000 - I've always liked the strong look of GW's armoured (british spelling) skeletons. Long ago I went to a GW Games Day in Baltimore and picked up some bits including shields with skeletons on them - I used one of these instead of the boring round plastic shield. I also tossed out the tiny base and mounted him on GW's one inch base - then gave it my standard dungeon look.
Painting Instructions for Armoured Skeleton With Spear 5:
Step 01: Undercoat model with black primer
Step 02: Use Vomit Brown on bones
Step 03: Mix Bleached Bone into Vomit Brown on bones
Step 04: Use Bleached Bone on bones as highlights
Step 05: Mix Skull White into Bleached Bone on bones as final highlights
Step 06: Use Snakebite Leather on leather armor
Step 07: Wash leather armor with Devlan Mud
Step 08: Use Terracotta on the halbred shaft
Step 09: Drybrush Blood Red on the halbred shaft
Step 10: Use Boltgun Metal on all armor, studs, and blade
Step 11: Wash all metal 1/4 Asurmen Blue, Devlan Mud, Chaos Black, Water
Step 12: Highlight all metal with Boltgun Metal
Step 13: Final highlight all metal with Chainmail
Step 14: Drybrush Codex Grey on base
Step 15: Drybrush Fortress Grey on base
Step 16: Drybrush final highlight Skull White on base
Monday, March 07, 2011
Reaper's Hell Hounds - 2522

I'll put up some more pictures over time of each individual hound.
These hell hounds came together in a two blister pack from Reaper Miniatures. They had been sitting on my shelf for a long time and about a month ago while I was painting my daughter came into the hobby room and asked what she could paint. It had been several years since the last time she painted a model - so I was quite surprised. I grabbed these two models off the shelf and I asked her to paint these - I figured it was mostly a layer of brown with a few layers of drybrushing.
She asked me about the fire coming from neck and I showed her Laszlo's excellent painting fire tutorial on a miniature - gave her a brief explanation on Laszlo's white to red and not red to white.
She proceeded to paint like mad that afternoon - finished one, and most of the second. A few weeks passed and she told me that I should finish the remainder. So I did the last little bit on the second, touched them both up, added a wash of Ogryn Flesh to the fur and Devlan Mud to base.
Overall I'd say she did amazingly well and now I have two well painted fiery hounds to add to the completed shelf!
Saturday, February 19, 2011
Reaper's Vernicia - 2460


A drow or dark elf - I like the little spider Reaper puts on the base to symbolize the drow miniatures. The picture taking on this miniature was a real pain because of the spear length and the dimension of the spear brings the tip a lot closer to the camera than is the remainder of the figure.
Painting Instructions for Vernicia:
Step 01: Undercoat model with black primer
Step 02: Use Reaper's Cloudy Sea and mix with Chaos Black on skin
Step 03: Use Reaper's Cloudy Sea on skin
Step 04: Use Reaper's Cloudy Sea and mix with Skull White on skin
Step 05: Add more Skull White for final highlights on skin
Step 06: Use Shadow Grey on hair
Step 07: Use Space Wolves Grey on hair
Step 08: Drybrush Ghostly Grey on hair
Step 09: Use a wash of Space Wolved Grey to tone down drybrushing on hair
Step 10: Drybrush Skull White on hair - wash with Ghostly Grey - drybrush with Skull White again
Step 11: Use Imperial Purple on leather armor, gloves, and boots
Step 12: Use Liche Purple on leather armor, gloves and boots
Step 13: Use Warlock Purple to highlight leather armor, gloves, and boots
Step 14: Add a mix of Tentacle Pink to leather armor, gloves and boots for final highlights
Step 15: Wash leather armor, gloves, and boots with Liche Purple
Step 16: Use Scorched Brown on spear handle
Step 17: Use Bubonic Brown on spear handle as a wet drybrush
Step 18: Drybrush Bubonic Brown on spear handle
Step 19: Wash spear handle with Devlan Mud
Step 20: Use Beaten Copper on metal bits
Step 21: Wash metal bits with Ogryn Flesh
Step 22: Highlight metal bits with Dwarf Bronze
Step 23: Use Boltgun Metal on spear tip
Step 24: Wash spear tip with watered down Chaos Black
Step 25: Use Chainmail to highlight spear tip
Step 26: Use Blazing Orange on spider
Step 27: Drybrush base with Codex Grey
Step 28: Dryrbrush highlights on base with Fortress Grey
Step 29: Drybrush final highlights on base with Skull White
Subscribe to:
Posts (Atom)