Saturday, January 31, 2004

Reaper's Barrow Rat - 2544


An example model for the painting class for kids. This was painted using Reaper paints and brushes and following the instructions in the learn to paint kit #1.

Finished January 2004.

Friday, January 30, 2004

Reaper's Mother Hilda - 2418


Another fun model for the gaming group. Completed over a two night stint with a couple hours each night - she really came together quickly.

Finished January 2004.

Painting Instructions for Mother Hilda
Step 01: Undercoat model with black primer
Step 02: Use Boltgun Metal on armor and axe
Step 03: Use Chainmail on armor and axe
Step 04: Use a wash of Sky Blue Ink on armor and axe
Step 05: Use Mithril Silver for highlights on armor and axe
Step 06: Use Shining Gold on runes and patterns
Step 07: Use Space Wolves Grey on hood and top of boots / trim
Step 08: Use wash of Black Ink on hood and top of boots / trim
Step 09: Use Space Wolves Grey to highlight hood and top of boots / trim
Step 10: Use Skull White for final highlight on hood and top of boots / trim
Step 11: Use mix of Dark Flesh and Bronzed Flesh on skin
Step 12: Use Bronzed Flesh on skin
Step 13: Use Elf Flesh on skin
Step 14: Use Pallid Flesh on skin
Step 15: Use mix of Chaos Black and Codex Grey on clothing
Step 16: Use another drop of Codex Grey to mix on clothing
Step 17: Use a drop of Fortress Grey to mix on clothing
Step 18: Use Scorched Brown on wood shaft
Step 19: Use Bestial Brown on wood shaft
Step 20: Use Vomit Brown on wood shaft
Step 21: Use Snakebite Leather on handle
Step 22: Use Bleached Bone on handle
Step 23: Use wash of Chestnut Ink on shaft
Step 24: Drybrush Codex Grey on base
Step 25: Drybrush Fortress Grey on base
Step 26: Drybrush Skull White on base

Sunday, January 18, 2004

Reaper's Sister Candice, Battle Nun - 2403


Every now and then something comes out a bit better than expected and I think this was one of them. Originally starting off as an experiment using Vallejo brand paints (the blue and white). The end result I'm quite pleased with - time was good as well - about 5 hours.

Painting Instructions for Reaper Miniature's Sister Candice, Battle Nun:
Step 01: Undercoat model with black primer
Step 02: Use Vallejo Magic Blue on clothing
Step 03: Use mix of Vallejo Magic Blue and Vallejo Skull White on clothing
Step 04: Continue to add more Vallejo Skull White to mix and repeat
Step 05: Use Space Wolves Grey on hood and top of boots
Step 06: Use careful wash of Black Ink on hood and top of boots
Step 07: Use Space Wolved Grey to re-hight hood and top of boots
Step 08: Use Skull White for final highlight on hood and top of boots
Step 09: Use mix of Dark Flesh and Bronzed Flesh on skin
Step 10: Use Bronzed Flesh on skin
Step 11: Use Elf Flesh on skin
Step 12: Use Pallid Flesh on skin
Step 13: Use Snakebite Leather on the gloves
Step 14: Use Vomit Brown on the gloves
Step 15: Use Botlgun Metal on armor
Step 16: Use Chainmail on armor
Step 17: Use a wash of Sky Blue Ink on armor
Step 18: Use Mithril Silver on armor
Step 19: Use Dwarf Bronze on sword handle and chain
Step 20: Use a wash of Chestnut Ink on sword handle and chain
Step 21: Use Dwarf Bronze on sword handle and chain for highlights
Step 22: Drybrush Codex Grey on base
Step 23: Drybrush Fortress Grey on base
Step 24: Drybrush Skull White on base

Saturday, January 17, 2004

Games Workshop's Skink


This Games Workshop Skink was painted with Reaper pro-paints as test.

I worked up a practice skink for teaching a paint class to kids using Reaper Pro-Paints. The base was a bit of fun copied from the house painter at Dream Wizards.

Painting Instructions for Skink (using Reaper Pro-Paints):
Step 01: Undercoat model with white primer
Step 02: Use Dragon Blue on fin and loincloth
Step 03: Use mix of Dragon White and Dragon Blue on fin and loincloth
Step 04: Use mix 2/3 Dragon White and 1/3 Dragon Blue on fin and loincloth
Step 05: Use mix 3/4 Dragon White and 1/4 Dragon Blue on fin and loincloth
Step 06: Use Kilt Green on body
Step 07: Use Emerald on body
Step 08: Use mix of 2/3 Emerald and 1/3 Dragon White
Step 09: Use mix of 1/2 Emerald and 1/2 Dragon White
Step 10: Use Blood Red on underbelly
Step 11: Use 1/2 Dragon White and 1/2 Blood Red on underbelly
Step 12: Use 2/3 Dragon White and 1/3 Blood Red on underbelly
Step 13: Use Woodland Brown on quiver
Step 14: Use mix of Dragon White and Woodland Brown on quiver
Step 15: Use Walnut on straps, bow, and toenails
Step 16: Use mix of Dragon White and Walnut on straps and bow
Step 17: Use Caucasion on toes

Saturday, January 10, 2004

Games Workshop's Archer


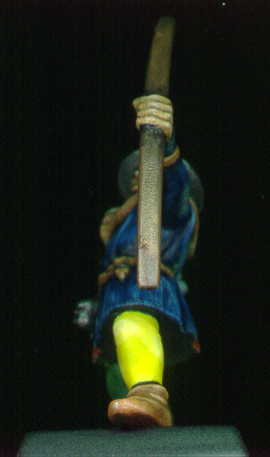
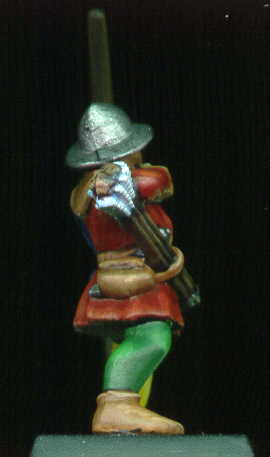
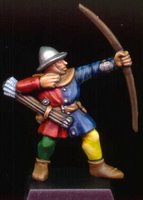
The archer is a test using Reaper Pro-Paints for a class I'm teaching to elementary school age children. In the classroom we are using the paint-kits #1 & #2 by Reaper Miniatures.

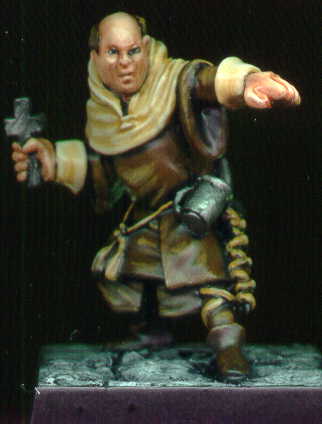
I happened to have a bunch of Games Workshop Brettonian archers on the shelf which I picked up from e-bay cheap. So one of them became my study. I used 16 out of the 17 pots of Reaper paint in my possession.

Painting Instructions for Archer:
Step 01: Undercoat model with grey
Step 02: Use Dragon Black to outline all boundaries and metal
Step 03: Use Ruddy Flesh on face and hands
Step 04: Use watered down Flesh Wash on face and hands
Step 05: Use Caucasion as highlights on face and hands
Step 06: Used Oil Leather on all leather
Step 07: Use a wash of Walnut on all leather
Step 08: Used Oil Leather mixed with Caucasion on all leather
Step 09: Used more Caucasion into mix as highlights on all leather
Step 10: Use Breonne Navy on half of jacket
Step 11: Use mix of Breonne Navy and Dragon Blue on half of jacket
Step 12: Use Dragon Blue on jacket
Step 13: Use mix of Linen White and Dragon Blue as highlights on jacket
Step 14: Use Blood Red on half of jacket
Step 15: Use Firehawk on half of jacket
Step 16: Use mix of Sunlight and Firehawk on half of jacket
Step 17: Use Kilt Green on half of pants
Step 18: Use mix of Emerald and Kilt Green on half of pants
Step 19: Use more Emerald into mix as highlights on half of pants
Step 20: Use Sunlight on half of pants
Step 21: Use mix of Dragon White and Sunlight on half of pants
Step 22: Use more Dragon White into mix as highlights on half of pants
Step 23: Use Walnut on bow and arrow shafts
Step 24: Use mix of Woodland Brown and Walnut on bow and arrow shafts
Step 25: Use more Woodland Brown to mix on bow and arrow shafts
Step 26: Use Woodland Brown on bow and arrow shafts
Step 27: Use Linen White on arrow flights
Step 28: Use much watered down Dragon Blue on arrow flights
Step 29: Use Dragon White on arrow flights
Step 30: Use Truesilver on metal bits
Step 31: Use Dragon Black on base

Monday, January 05, 2004

Reaper's Jon Otterman - 2349


My first miniature for the 2004 painting challenge. Personal goal will be about two a week for a year total of 100 figs. 99 remaining.

Another great Reaper fig - color scheme basic using GW's browns.

Painting Instructions for Jon Otterman:
Step 01: Undercoat model with Chaos Black
Step 02: Use Dwarf Flesh for face and hands
Step 03: Use watered down Flesh Wash on face and hands for shadows
Step 04: Use Dwarf Flesh on face and hands again
Step 05: Use 1/2 Elf Flesh to 1/2 Dwarf Flesh on face and hands as highlight
Step 06: Use 1/3 Pallid Flesh, 1/3 Elf Flesh, and 1/3 Dwarf Flesh for final highlight on face and hands
Step 07: Use Vomit Brown on hood and cuffs
Step 08: Use 1/2 Bleached Bone and 1/2 Vomit Brown on hood and cuffs
Step 09: Use Bleached Bone on hood and cuffs
Step 10: Use 1/2 Bleached Bone and 1/2 Skull White on hood and cuffs
Step 11: Use Scorched Brown on robe
Step 12: Use Bestial Brown on robe
Step 13: Use Bubonic Brown on robe
Step 14: Use a watered down wash of Scorched Brown on robe to darken it
Step 15: Use Vomit Brown on ropes and straps
Step 16: Use Bleached Bone on ropes and straps
Step 17: Use Boltgun Metal on cross, mug, and sword
Step 18: Use Mithril Silver on cross, mug, and sword
Step 19: Drybrush Codex Grey on base
Step 20: Drybrush Fortress Grey on base
Step 21: Drybrush Skull White on base