Tuesday, November 07, 2006

Ral Partha's (Iron Wind Metals) Aerial Servant w/Pizza


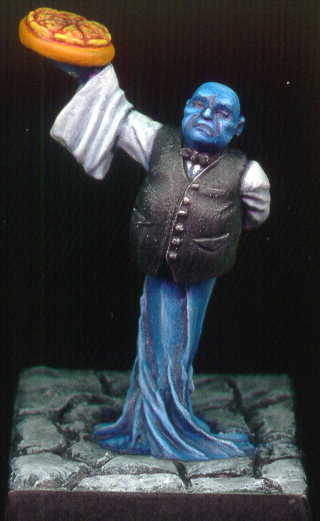
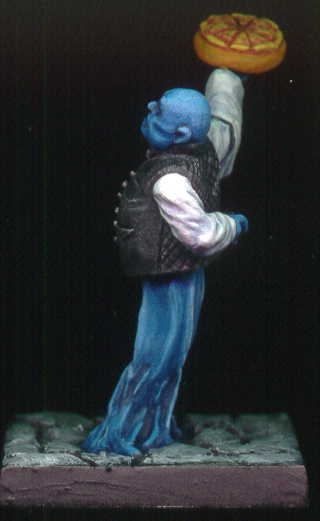
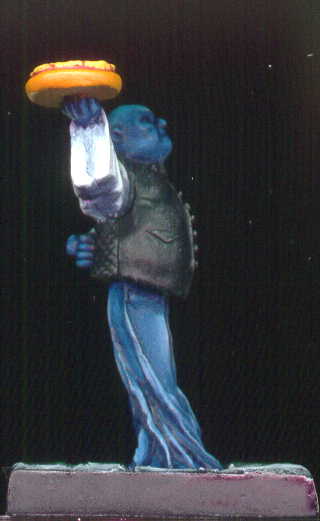
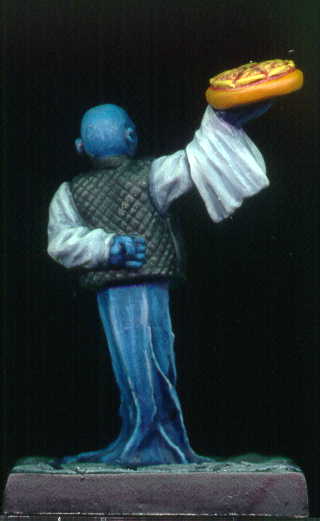
I started this miniature in hopes that I would finish in time for the Ral Partha (miniature molds now owned by Iron Wind Metals) painting contest. The contest was to paint any Ral Partha figure in their very long history (the history of Ral Partha goes back to I believe the 80's). I have a couple and the aerial servant was one that I thought would be fun to paint. Unfortunately the due date was the end of October and I didn't have time to complete the miniature until this weekend.

Painting Instructions for Aerial Servant w/Pizza
Step 01: Undercoat model with black primer
Step 02: Use Regal Blue as a base coat on everything except vest
Step 03: Use light coat of Shadow Grey to highlight shirt and towel
Step 04: Add Skull White to the Shadow Grey and continue highlights
Step 05: Use Leprous Brown on the pizza and stone plate
Step 06: Use watered down Red Gore on pizza slices
Step 07: Use mix of Leprous Brown and Skull White on pizza crust
Step 08: Use mix of Regal Blue and Skull White to highlight air and face
Step 09: Add Skull White to mix and continue highlights
Step 10: Drybrush Skull White on tuxedo for highlights
Step 11: Use a wash of Chaos Black on tuxedo (except for buttons)
Step 12: Drybrush Codex Grey on rocks
Step 13: Drybrush Fortress Grey on rocks
Step 14: Drybrush Skull White on rocks

Friday, September 15, 2006

Heartbreaker's Natural Selection...


A long time ago a small company called Wizards of the Coast made a card game called Magic The Gathering. In 1994 they worked with Heartbreaker Hobbies to cast miniatures of their Deckmaster cards. I picked up a couple of these old miniatures a long time ago (about four years ago) in the discount bin. I then bought the card off of e-bay and copied the original Mark Poole picture onto the miniature. I've been working on/off this miniature for years - I kept tweaking with the highlighting and as of this weekend I'm declaring it finally finished!

Painting Instructions for Natural Selection (works better in a few hours instead of a few years):
Step 01: Undercoat models with white primer
Step 02: Use Chaos Black on base, staff, skirt, and feathered head
Step 03: Use Blazing Orange on beak
Step 04: Use Blood Red on fur
Step 05: Use Chaos Black on stripes and nails
Step 06: Use Scab Red on ball in hand
Step 07: Use Blazing Orange on fur
Step 08: Use mix of Blazing Orange and Fiery Orange on fur
Step 09: Use Fiery Orange on fur for highlight
Step 10: Use mix of Fiery Orange and Skull White on fur for further highlights
Step 11: Use Golden Yellow - add to mix and perform final highlights - repeat 10 and 11 as needed
Step 12: Use Skull White as chest highlights blending into Fiery Orange
Step 13: Use Scorched Brown on bird feathers and staff
Step 14: Wet drybrush Snakebit Leather onto feathers
Step 15: Mix a bit of Fiery Orange, Skull White, and Snakebite Leather for drybrush highlights on feathers
Step 16: Use Bestial Brown on ridges of staff
Step 17: Use Snakebite Leather on ridges of staff
Step 18: Use Vomit Brown as final highlight on ridges of staff
Step 19: Use Chestnut Ink mixed with 60% water and wash staff
Step 20: Use mix of Chaos Black and Fortress Grey to highlight skirt
Step 21: Use Fortress Grey as final highlight on skirt
Step 22: Use Blood Red as highlight on ball in hand
Step 23: Use Blazing Orange to run a highlight stripe on ball in hand
Step 24: Use Skull White to place dot on top highlight of ball in hand

Wednesday, August 02, 2006

Reaper's Templar Knight - 2330


I finally managed to find some time to paint again. I chose to paint the templar knight because I had already done a similar templar knight from Reaper and could replicate the look while using the first miniature as a guide. I figured doing so would be the easiest way to remember once again how to paint.

I use GW's paints and have always taken good care of them. I've never been away from painting for the amount of time as current and knowing GW's reputation for dried paint due to caps with a faulty design; I was a bit worried. Good news and bad news - I did lose 2 paints - Scab Red and Bestial Brown. However, most of the others all made it through the drought alright. The best were GW's newly designed caps - right before my last stopping point GW had re-released their paints with the new cap design. Those paints made it through looking like day one from the hobby store.

Painting Instructions for Templar Knight:
Step 01: Undercoat model with Black primer
Step 02: Drybrush Boltgun Metal on all chainmail and metal bits
Step 03: Use Regal Blue on robes
Step 04: Use mix of Regal Blus and Ultramarines Blue on robes
Step 05: Use Ultramarines Blue on robes
Step 06: Use mix of Ultramarines Blue and Lightning Blue on robes
Step 07: Use Lightning Blue on robes
Step 08: Use Ice Blue on robes
Step 09: Use Skull White on robes
Step 10: Use Scab Red on shield
Step 11: Use Red Gore on shield
Step 12: Use Blood Red on shield
Step 13: Use Blazing Orange on shield
Step 14: Use Ice Blue on cross on shield
Step 15: Use mix of Ice Blue and Skull White on cross on shield
Step 16: Use Skull White on cross on shield
Step 17: Use Scorched Brown on leather bits
Step 18: Use Bestial Brown on leather bits
Step 19: Use Snakebite Leather on leather bits
Step 20: Use Buboninc Brown on leather bits
Step 21: Use mix of Bubonic Brown and Bleached Bone on leather bits
Step 22: Use Scorched Brown on back of shield
Step 23: Use Bestial Brown to make vertical lines on back of shield
Step 24: Use Vomit Brown to make vertical lines on back of shield
Step 25: Use Bleached Bone to make vertical line on back of shield
Step 26: Use Boltgun Metal around outside of and small line around back of shield
Step 27: Use Tin Bitz on sword pommel
Step 28: Mix Tin Bitx and Boltgun Metal for highlights on sword pommel
Step 29: Use Chainmail on metal highlights
Step 30: Use Mithril Silver as final metal highlights
Step 31: Drybrush Codex Grey on stone
Step 32: Drybrush Fortress Grey on stone
Step 33: Drybrush Skull White on stone