

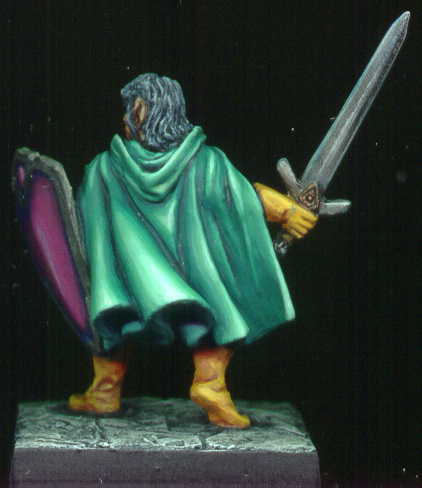
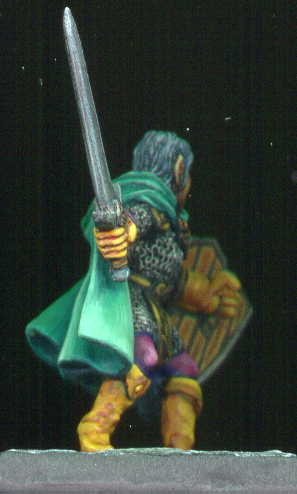
Mellonir Windrunner takes the concepts from the Templar Knight and applies them with just a bit more care - time on this was about 8 hours in total. Again the highlights are to white on the cloak. Not so on the other colors as I think it would take away from the overall appearance. However, they are do span a complete range from dark to light. The wooden shield was a new first - after viewing several other painted shields by well known painters, I approached this one differently. Instead of dark base with different colored lines as in the above Templar - I went with a dark brown base, then a thick light brown, then a medium brown within the light brown (see my painting instructions below). For comparisons - see the 2nd Templar pic or the 3rd Orc picture from below to get a view of the backside of shield and compare to the 2nd and 4th pic of Mellonir Windrunner.
Painting Instructions for Reaper Miniature's Windrunner:
Step 01: Undercoat model with Black primer
Step 02: Use Boltgun Metal on chainmail and sword
Step 03: Use Dark Flesh on face
Step 04: Use mix of Dark Flesh and Bronzed Flesh on face
Step 05: Add more Bronzed Flesh to mix on face
Step 06: Use Bronzed Flesh on face
Step 07: Use a more watered down Elf Flesh on face final highlights
Step 08: Use Scaly Green on cloak
Step 09: Use mix of Scaly Green and Jade Green on cloak
Step 10: Use Jade Green on cloak
Step 11: Use mix of Jade Green and Vile Green on cloak
Step 12: Use Vile Green on cloak
Step 13: Use mix of Vile Green and Skull White on cloak
Step 14: Add more Skull White to mix
Step 15: Use Skull White on cloak as final highlights
Step 16: Use Nauseating Blue on clothing and shield
Step 17: Use Liche Purple on clothing and shield
Step 18: Use Warlock Purple on clothing and shield
Step 19: Use mix of Warlock Purple and Tentacle Pink on clothing and shield
Step 20: Use more Tentacle Pink into mix
Step 21: Use Tentacle Pink on clothing and shield as final highlights
Step 22: Use Leprous Brown on gloves and boots
Step 23: Use wash of Chestnut Ink on gloves and boots
Step 24: Use mix of Leprous Brown and Golden Yellow on gloves and boots
Step 25: Add Skull White to mix for gloves and boots
Step 26: Add more Skull White to mix for gloves and boots final highlights
Step 27: Use Scorched Brown on leather
Step 28: Use Bestial Brown on leather
Step 29: Use mix of Snakebite Leather and Bubonic Brown on leather
Step 30: Use Bubonic Brown on leather as final highlights
Step 31: Use Scorched Brown on back of shield
Step 32: Use Vomit Brown for wide stripes on back of shield
Step 33: Use Bestial Brown to fill in wide stripes on back of shield
Step 34: Use Dwarf Bronze on metal clips
Step 35: Use Shining Gold to highlight metal clips
Step 36: Use Chainmail to highlight chainmail
Step 37: Use Mithril Silver to highlight chainmail and sword
Step 38: Wash sword with watered down Sky Blue Ink
Step 39: Drybrush Shadow Grey on hair
Step 40: Drybrush Space Wolves Grey on hair
Step 41: Drybrush Codex Grey on stone
Step 42: Drybrush Fortress Grey on stone
Step 43: Drybrush Skull White on stone
No comments:
Post a Comment