Friday, December 14, 2001

i-Kore's Male Fighter


This is a science fiction character given to me some time back by Jason Moses (Thanks Jason!) to try out some techniques.

So that's exactly what I did - I went with extreme darks and lows going a shade lighter and a shade darker than what I would normally utilize.

The paint job is also done in thin layers. Starting with the dark colors and moving to the lighter colors. In some areas I think I left too much dark and not enough mid-tones, but it makes the character jump off the table due to the high contrast.

Finished in December 2001.

Sunday, December 09, 2001

Games-Workshop's Dwarf


The dwarf was an interesting experiment in drybrushing as he's mostly hair, feathers, chain armor, and metal. When I drybrushed, the paint was a bit watered down to be more precise. The cloak on the back was blended starting with the medium blue and working down and then up the color scale. The axe handle shows that I need to learn how to make a wood texture when there is none in the mini. Finished in December of 2001.

Painting Instructions for Warhammer Quest Dwarf

Step 1: Undercoat model with White Primer
Step 2: Use Dwarf flesh on face
Step 3: Use Chaos Black on base, steel, beard, and helm feathers
Step 4: Use Scorched Brown on axe handlesword handle, sheeth, and pouch
Step 5: Use Enchanted Blue on cloack
Step 6: Use Golden Yellow on gloves
Step 7: Use mix of Dwarf Flesh and Elf Flesh on cheeks and nose
Step 8: Drybrush Codex Grey on beard and wings
Step 9: Drybrush Fortress Grey on beard and very lightly on wings
Step 10: Drybrush Skull White on beard and extremely lightly on top part of wings
Step 11: Wash beard with Chaos Black
Step 12: Re-drybrush beard lightly with Skull White
Step 13: Use Chainmail on all metal bits
Step 14: Use Mithril Silver on highlights of axe
Step 15: Use Shining Gold on all edges of metal highlights
Step 16: Use watered down Flesh Wash on all metal
Step 17: Use Dark Angels Green on cloth between hands and armor
Step 18: Use a Flesh Wash on the gloves - getting into grooves between fingers
Step 19: Use Golden Yellow on gloves
Step 20: Use Sunburst Yellow on gloves - sides and top
Step 21: Use Bad Moon Yellow on gloves - top
Step 22: Mix Bad Moon Yellow and Skull White - use to highlight gloves
Step 23: Add more Skull White to mix and finish highlights on gloves
Step 24: Add continued highlights on all Scorched Brown of Bestial Brown, Snakebite Leather, Bubonic Brown, and then Bleached Bone
Step 25: Use slightly watered down Snakebite Leather on top of markings in axe shaft
Step 26: Use Chaos Black with a drop of Codex Grey on boots - continue to add drop of Codex Grey - highlight final with Codex Grey
Step 27: Water down Chaos Black and wash over boots dulling the highlights
Step 28: Blend down to Regal Blue and up to Lightning Blue on cloak
Step 29: Drybrush stone base with Shadow Grey, Space Wolves Grey, and then final highlight of Ghostly Grey

Wednesday, November 21, 2001

Games-Workshop's Lahmian Vampire


This figure represents some new painting and basing techniques for me. Originally purchased for the Chick Challenge II - I didn't have time, but I did challenge myself with a new technique. This was done following the White Dwarf - Painting with the Average Joe article. What's different is that I started from dark to light and overlapped the paint instead of blending. Normally I start in the middle and blend down then up. Completed in November of 2001.

Painting Instructions for Lahmian Vampire:

Step 01: See White Dwarf 257
Step 02: Undercoat model with white primer
Step 03: Use Scorched Brown on the three skulls
Step 04: Use Chaos Black on trim and metal
Step 05: Use Dark Angels Green on dress
Step 06: Use mix of Dark Flesh and Elf Flesh on skin
Step 07: Use Scab Red on shoes and snake
Step 08: Use mix of Dark Angels Green and Snot Green on dress
Step 09: Use a bit more Elf Flesh in the mix of Dark Flesh on skin
Step 10: Use mix of Scab Red and Blood Red on shoes and snake
Step 11: Use Snakebite Leather on the three skulls
Step 12: Use Snot Green on dress
Step 13: Use Blood Red on shoes and snake
Step 14: Use a bit more Elf Flesh in mix of Dark Flesh on skin
Step 15: Use Bubonic Brown on the three skulls
Step 16: Use Burnished Gold on metal bits
Step 17: Use mix of Chaos Black and Fortress Grey for black highlights
Step 18: Use mix of Snot Green and Sunburst Yellow to highlight dress
Step 19: Wash metal bits with watered down brown ink
Step 20: Use Snakebite Leather and Bleached Bone on teeth
Step 21: Eyes - paint black and then dot on either side
Step 22: Use mix of Fiery Orange and Blood Red for final highlights on shoes and snake
Step 23: Use Pallid Flesh into skin mix for final highlights
Step 24: Use Shining Gold as highlight to metal bits
Step 25: Use mix of Shining Gold and Mithril Silver for final metal bits highlight
Step 26: Use thinned down Scab Red on lower lip
Step 27: Use Goblin Green on base

Sunday, September 02, 2001

Games-Workshop's Wizard


The wizard really turned out well for me. It was my first attempt at making a white cloak and using shades of grey to blend. I also used a very light wash of blue over the white. The gems on this model are getting better but there is still lots of room for improvement. Finished in September of 2001.

Painting Instructions for Warhammer Quest Wizard

Step 1: Undercoat model with White Primer
Step 2: Use Bronzed Flesh on skin
Step 3: Use Chaos Black on base, beard, and metal
Step 4: Use Enchanted blue on cape
Step 5: Use Blood Red on shoes, scarf, staff
Step 6: Use Fortress Grey on cloak
Step 7: Use Snakebite leather on belt, pouch, scrolls
Step 8: Use Snot Green on gems and potion bottle
Step 9: Use Sunburst Yellow on bottom of scarf - flames
Step 10: Blend Scab Red thru Golden Yellow on sword
Step 11: Drybrush Tin Bitz, Shining Gold, then Burnished Gold on staff and sword
Step 12: Blend various mix of Fortres Grey to Skull White on robes
Step 13: Wash robes with watered down Ice Blue
Step 14: Blend Cape from Regal Blue to Ice Blue
Step 15: Drybrush Codex Grey to Skull White on beard
Step 16: Blend Blood Red bits from Scab Red to Fiery Orange
Step 17: Finish Blood Red bits with highlight of Golden Yellow
Step 18: Highlight Yellow Flames with Bad Moon Yellow and Skull White
Step 19: Shade and highlight the green bag and gems with Dark Angels Green to Bilious Green
Step 20: Highlight hat with mix of Chaos Black and Codex Grey, then highlight with Codex Grey
Step 21: Shade flesh with Vermin Brown mixing with Bronzed Flesh and highlighting with Elf Flesh
Step 22: Drybrush base with Codex Grey and Fortress Grey

Sunday, July 15, 2001

Games-Workshop's Warrior


The warrior was an interesting project. There's a lot I like about him and there's a bit I'm not satisfied with. The mouth in particular - should have done something to darken the expression but I struggled with it a couple of times and gave up. The body tones, blending the blues and reds, the drybrushing all came out rather well. Finished in July of 2001.

Painting Instructions for Warhammer Quest Warrior

Step 1: Undercoat model with White Primer
Step 2: Use Bronzed Flesh on skin
Step 3: Use Scorched Brown on boot and bear skin
Step 4: Use Blood Red on inside of bear skin
Step 5: Use Snakebite Leather on hair - water down a bit
Step 6: Use Enchanted Blue on loincloth and cuffs
Step 7: Use Chaos Black on all metal bits and bear claws
Step 8: Drybrush Chainmail on all metal bits
Step 9: Highlight drybrush Mithril Silver on sword
Step 10: Wash sword with Enchanted Blue
Step 11: Use Vomit Brown on bear claws
Step 12: Highlight bear claws with Bleached Bone
Step 13: Use Bleached Bone on teeth
Step 14: Drybrush Blood Red on skulls
Step 15: Drybrush bear fur with Bestial Brown, Snakebite Leather, Bubonic Brown, and Bleached Bone
Step 16: Blend inside bear skin from Scab Red to Blood Red
Step 17: Use Bubonic Brown on boot knife
Step 18: Highlight hair with Leprous Brown
Step 19: Use Vermin Brown on fur of boot
Step 20: Drybrush Leprous Brown on fur of boot
Step 21: Drybrush mix of Leprous Brown and Bleached Bone on fur of boot
Step 22: Highlight boot using Bestial Brown to Bubonic Brown
Step 23: Blend blue areas from Enchanted Blue to Lightning Blue with Ice Blue Highlights
Step 24: Blend Vermin Brown, Bronzed Flesh, and Elf Flesh on skin
Step 25: Use Chaos Black on base
Step 26: Drybrush base with Shadow Grey to Ghostly Grey

Saturday, July 07, 2001

Games-Workshop's Elf


After a couple of months off, I was back at it again with a vengeance. The standard Elf was my next victim. I modelled him from the GW folks with a couple of changes. Blended the sword with blue as that seems more elven to me. I was quite impressed with the white triangles on the fringes as that took quite a bit of time and patience. It was one of those do I really want to attempt that type of moments and I'm glad that I did - really brings the character to life. The scans here aren't the greatest as the sword, bow, and cape make the model sit off the scanner at strange angles. Did my best - enjoy. Finished in July of 2001.

Painting Instructions for Warhammer Quest Elf

Step 1: Undercoat model with White Primer
Step 2: Use Elf Flesh on face and hands
Step 3: Use watered down Flesh Wash on face and hands then repeat Step 2
Step 4: Highlight face with Pallid Flesh
Step 5: Use Snot Green on cloak
Step 6: Use Golden Yellow on shirt and cloak tail
Step 7: Use Enchanted Blue on leggings and shirt sleaves
Step 8: Use Blood Red on shirt fringes
Step 9: Use Scorched Brown on boots and sword sheath
Step 10: Use Space Wolves Grey on boot inner lining
Step 11: Use Blazing Orange on bow
Step 12: Undercoat metal with Chaos Black
Step 13: Blend sword from Enchanted Blue to Ice Blue
Step 14: Highlight sword with Skull White
Step 15: Use Snakebite Leather on sword handle and pouch
Step 16: Use Bestial Brown on hair
Step 17: Drybrush Shining Gold on metal
Step 18: Use Blood Red on all gems
Step 19: Blend cloak from Dark Angels Green to Scorpian Green
Step 20: Blend leggings and shirt sleaves from Regal Blue to Ice Blue
Step 21: Blend shirt and cloak tail from Fiery Orange to mix of Bad Moon Yellow and Skull White
Step 22: Drybrush boot, leather bag, and sword handle with Bestial Brown to Bubonic Brown
Step 23: Blend top of boots with Shadow Grey to Ghostly Grey
Step 24: Blend bow and gems with Blood Red to Fiery Orange
Step 25: Use Chaos White for triangle pattern on shirt fringes
Step 26: Highlight metal with Burnished Gold
Step 27: Use Chaos Black on base
Step 28: Drybrush base with Shadow Grey to Ghostly Grey

Tuesday, May 29, 2001

Games-Workshop's Snotling


First set of miniatures I painted for Warhammer Quest were the snotlings. I figured these guys were the easiest to begin with and am happy with the result. There were enough of them that I could try out some ideas. The most difficult was cutting them off their mini base and onto a proper GW base. I utilized drywall paste on the base and carved stones into when dry - which then I drybrushed several shades of grey from dark to light. Finished in April 2001.

Painting Instructions for Warhammer Quest Snotling

Step 1: Undercoat models with white primer
Step 2: Use Bleached Bone on teeth
Step 3: Use Goblin Green on body
Step 4: Wash Snot Green over all of body
Step 5: Use Blood Red on skirt and eyes
Step 6: Use Snakebite Leather on club and rope
Step 7: Use Chaos Black on base and club nail
Step 8: Wash Red Gore on skirt
Step 9: Wash teeth with Flesh Wash
Step 10: Highlight teeth with Bleached Bone
Step 11: Highlight skirt with Blazing Orange going to Fiery Orange
Step 12: Drybrush club with Bubonic Brown and Bleached Bone
Step 13: Wash club with slighty watered down Flesh Wash - get it in the grooves
Step 14: Drybrush Boltgun Metal on club nail
Step 15: Mix one part Goblin Green with one part Bilious Green for highlights - then add another part Bilious Green for fine highlights
Step 16: Skull White dot in middle of eye
Step 17: Drybrush Shadow Grey to Ghostly Grey on base

Thursday, March 01, 2001

Games-Workshop's Blue Skink Standard Bearer


This figure is the standard bearer for my blue skinks. The standard was actually a goof on the part of Games Workshop. I had the wrong topping for my pole. I went with it anyways and like the look. On retrospect, I should have painted the wooden figure the orange and the ribbon the blue so that there is alternating blue-orange-blue contrast. Completed in February of 2001.

Painting Instructions for Blue Skink Standard Bearer:

Step 1: Undercoat models with white primer
Step 2: Use Lightning Blue on the skin - except bottom of head and belly
Step 3: Use Jade Green on the bottom of head and belly
Step 4: Use Snakebite Leather on pouch straps
Step 5: Use Chaos Black on sword sheath, eyeballs
Step 6: Use Sunburst Yellow on upper eye
Step 7: Use Blood Red for loincloth
Step 8: Use Fiery Orange for the fin
Step 9: Use watered down Enchanted Blue on all areas of skin - let seep into creases
Step 10: Wash Snakebite Leather onto pouch
Step 11: Use Blazing Orange in the creases of the fin
Step 12: Use watered down Scaly Green on chest
Step 13: Use watered down Red Gore on loin cloth
Step 14: Use Ice Blue as highlight on skin
Step 15: Drybrush Skull White on highlight creases
Step 16: Use Vomit Brown as highlight on pouch
Step 17: Use Golden Yellow on raised areas of fin
Step 18: Use Vile Green as highlight on chest
Step 19: Use Blazing Orange as highlight on loin cloth - may want to go down to Fiery Orange as well
Step 20: Drybrush Bubonic Brown on pouch straps
Step 21: Use Bleached Bone on claws
Step 22: Use watered down Flesh Wash on claws
Step 23: Use Burnished Gold on rings
Step 24: Very lighty drybrush just a bit of Codex Grey on the sword sheath
Step 25: Use Chaos Black and Bleached Bone on deco teeth
Step 26: Use Fiery Orange and Golden Yellow on deco headpiece
Step 27: Use Scorched Brown on pole
Step 28: Drybrush pole up to Bleached Bone
Step 29: Use Bleached Bone on teeth
Step 30: Wash teeth with watered down Flesh Wash
Step 31: Use Goblin Green on base
Step 32: Use watered down glue on base, then dip into fine ballast
Step 33: Use drybrushed Camo Green onto fine ballast

Wednesday, February 28, 2001

Games-Workshop's Blue Skink Musician


This figure is the musician for my blue skinks. The scan just does not do this one justice as the orange came out too dark. The drum strap was painted using a very fine point. Another note of interest is the shading of the skin on the drum to look like it has been well used. Completed in February of 2001.

Painting Instructions for Lizardmen Skink Musician:

Step 1: Undercoat models with white primer
Step 2: Use Lightning Blue on the skin - except bottom of head and belly
Step 3: Use Jade Green on the bottom of head and belly
Step 4: Use Bubonic Brown on the arrow pouch
Step 5: Use Snakebite Leather on the bag straps
Step 6: Use Chaos Black on eyeballs, and line in crease of the mouth
Step 7: Use Sunburst Yellow on upper eye
Step 8: Use Blood Red for loincloth
Step 9: Use Fiery Orange for the fin
Step 10: Use watered down Enchanted Blue on all areas of skin - let seep into creases
Step 11: Wash Snakebite Leather onto arrow pouch
Step 12: Use Blazing Orange in the creases of the fin
Step 13: Use watered down Scaly Green on chest
Step 14: Use watered down Red Gore on loin cloth and arrows
Step 15: Use Ice Blue as highlight on skin
Step 16: Drybrush Skull White on highlight creases
Step 17: Use Vomit Brown as highlight on arrow pouch
Step 18: Use Golden Yellow on raised areas of fin
Step 19: Use Vile Green as highlight on chest
Step 20: Use Blazing Orange as highlight on loin cloth - may want to go down to Fiery Orange as well
Step 21: Drybrush Bubonic Brown on bag straps
Step 22: Use Bleached Bone on claws
Step 23: Use watered down Flesh Wash on claws
Step 24: Use Burnished Gold on rings
Step 25: Use the Fiery Orange and Lightning Blue pattern on the drum strap
Step 26: Use Bleached Bone on drum up to Snakebite Leather in the middle
Step 27: Use Goblin Green on base
Step 28: Use watered down glue on base, then dip into fine ballast
Step 29: Use drybrushed Camo Green onto fine ballast

Monday, February 26, 2001

Games-Workshop's Blue Skink Champion


This figure is the champion for my blue skinks. I couldn't get the front view to sit on the glass correctly so I had to hold the base with my finger - that's why the black background. I really enjoyed this figure - some great detail - the mouth really sets it off. Completed in February of 2001.


Painting Instructions for Blue Skink Champion:

Step 1: Undercoat models with white primer
Step 2: Use Lightning Blue on the skin - except bottom of head and belly
Step 3: Use Jade Green on the bottom of head and belly
Step 4: Use Bubonic Brown on the arrow pouch
Step 5: Use Snakebite Leather on the arrow pouch straps and bow
Step 6: Use Chaos Black on axe
Step 7: Use Sunburst Yellow on upper eye
Step 8: Use Blood Red for loincloth and arrows
Step 9: Use Fiery Orange for the fin
Step 10: Use watered down Enchanted Blue on all areas of skin - let seep into creases
Step 11: Wash Snakebite Leather onto arrow pouch
Step 12: Use Blazing Orange in the creases of the fin
Step 13: Use watered down Scaly Green on chest
Step 14: Use watered down Red Gore on loin cloth and arrows
Step 15: Use Ice Blue as highlight on skin
Step 16: Drybrush Skull White on highlight creases
Step 17: Use Vomit Brown as highlight on arrow pouch
Step 18: Use Golden Yellow on raised areas of fin
Step 19: Use Vile Green as highlight on chest
Step 20: Use Blazing Orange as highlight on loin cloth and drybrush on arrows - may want to go down to Fiery Orange as well
Step 21: Drybrush Bubonic Brown on arrow pouch straps and bow
Step 22: Use Bleached Bone on claws
Step 23: Use Burnished Gold on rings
Step 24: Use watered down Flesh Wash on claws and rings
Step 25: Very lighty drybrush just a bit of Codex Grey on the sword sheath
Step 26: Mix Blood Red and Tentacle Pink for top of tongue using more of the red further out
Step 27: Drybrush Codex Grey and Fortress Grey on axe
Step 28: Use Goblin Green on base
Step 29: Use watered down glue on base, then dip into fine ballast
Step 30: Use drybrushed Camo Green onto fine ballast

Thursday, February 08, 2001

WOTC's Male Fighter


2015-01-25 - model number update - this was WOC 40004.  I haven't been able to figure out the sculptor of this model.  Lost Minis Wiki has Mize, Wiebe, and Elliot as the sculptors on other models in the same range.

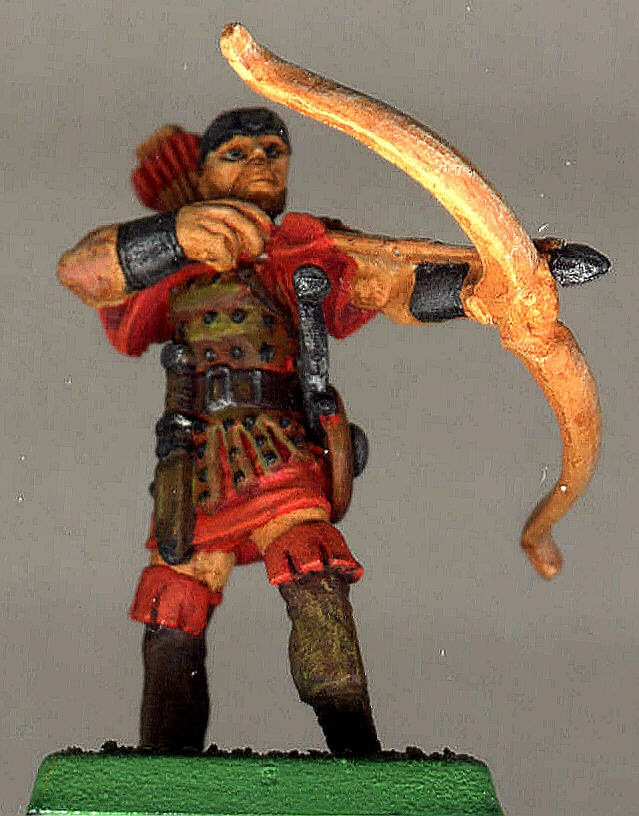
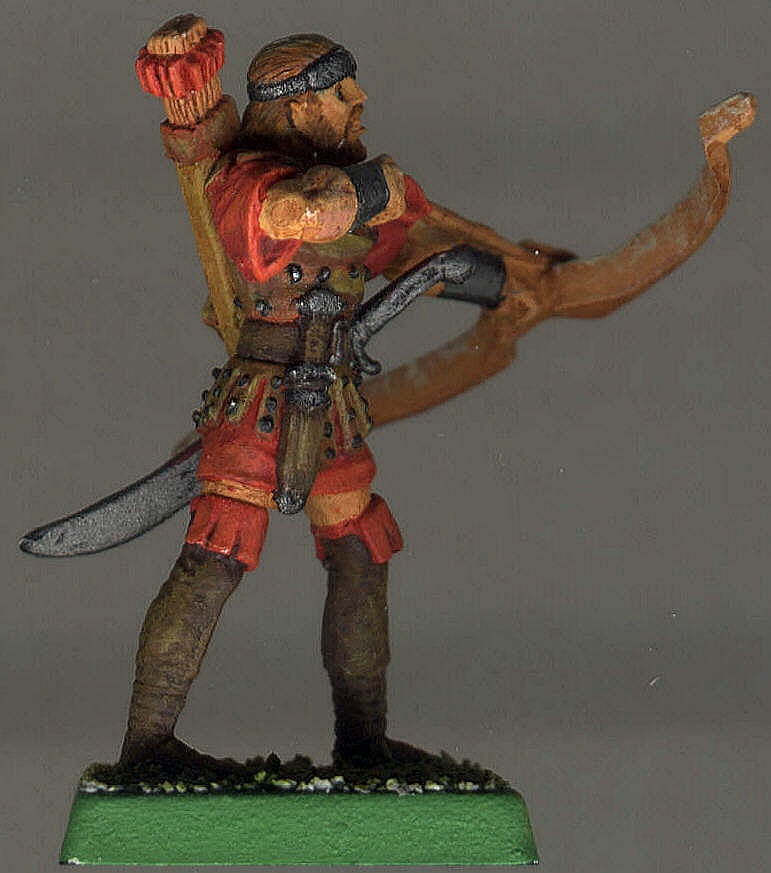
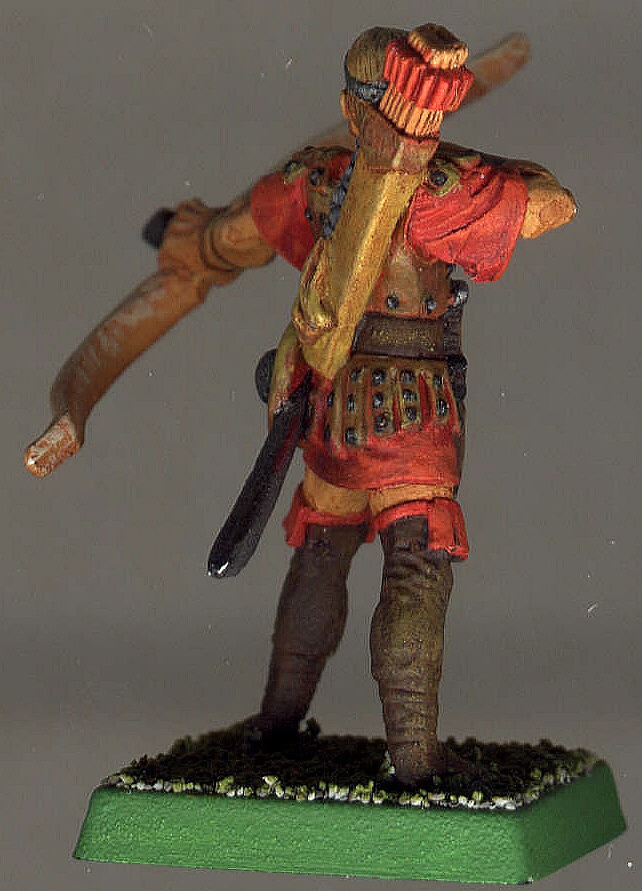
Dungeons and Dragons is the revamped AD&D system. To celebrate the 25th anniversary, WOTC came out with their own miniatures. This one is the male fighter. I painted this fighter in February of 2001.

The sword is bright, but I just had to do something with it in order to represent a magical sword. I also put a shield on this fighter as he just looked naked without one.

My first attempt at modeling! Nothing dramatic, but I put the two straps on between the glove and the shield. Took me an entire hour - I have new respect for all those craftsman that are making these miniatures.

Painting Instructions for Wizard of the Coast Male Fighter

Step 1: Undercoat models with white primer
Step 2: Use Bronzed Flesh on face
Step 3: Use Snakebite Leather on gloves, shoes, belt, and chest
Step 4: Use Snot Green on outside of cloak
Step 5: Undercoat all steel Chaos Black
Step 6: Use Sunburst Yellow on inner coat
Step 7: Use Dark Angels Green on inside of cloak and leggings
Step 8: Drybrush Boltgun Metal on steel
Step 9: Drybrush Chainmail on steel
Step 10: Watered down wash of Regal Blue on steel
Step 11: Use Bestial Brown on hair
Step 12: Shade cloak with Dark Angels Green
Step 13: Highlight cloak with Scorpian Green
Step 14: Shade inner coat Golden Yellow and Fiery Orange
Step 15: Highlight inner coat with Bad Moon Yellow
Step 16: Highlight leather with Bubonic Brown
Step 17: Use watered down Flesh Wash on face
Step 18: Use Bronzed Flesh on main facial features
Step 19: Highlight face with Elf Flesh
Step 20: Blend onto sword starting with Fiery Orange on base going to Bad Moon Yellow on tip
Step 21: Blend onto gem starting with Bilious Green going to Dark Angels Green
Step 22: Use Skull White for dot on gem
Step 23: Use Chaos Black on base
Step 24: Drybrush onto base with Codex Grey, Fortress Grey, then Skull White
Step 25: Use Snot Green on shield
Step 26: Highlight shield with Scorpion Green
Step 27: Use Sunburst Yellow on shield emblem
Step 28: Shade shield emblem with Fiery Orange
Step 29: Wash shield with Sunburst Yellow
Step 30: Highlight shield with Bad Moon Yellow
Step 31: Use Bestial Brown on back of shield
Step 32: Drybrush back of shield with Snakebite Leather, then Bubonic Brown
Step 33: Wash back of shield with Flesh Wash

Saturday, January 27, 2001

Ral Partha's Archers of Lanis


Crucible was the new fantasy tabletop game developed by Ral Partha. At the time of the painting contest conclusion it is unknown as to the status of Ral Partha and the Crucible game - very sad indeed. I finished these two figures at the end of January of 2001.

These scans are a bit different than the others I've done previously. Upon recommendation from others I have placed a box over the figure instead of a cloth. This helps eliminate the shadows. However I used the WarHammer box lid and probably need to find something that isn't so deep as the scans are a bit dark.

I'm very happy with the figures themselves. I probably should have put a darker wash into the arrow shafts. Favorite part is the stud detail - took a long time and a steady hand.

Painting Instructions for Archers of Lanis

Step 1: Use Bronzed Flesh on skin
Step 2: Use Blood Red on all leather and garments
Step 3: Use Snakebite Leather on leather armor, hair, and eye socket
Step 4: Use Scorched Brown on leather boots and belt
Step 4: Use Chaos Black on metal
Step 5: Use Vomit Brown on bow
Step 6: Use Bubonic Brown on quiver
Step 7: Use a watered down Flesh Wash over everything
Step 8: Drybrush Boltgun Metal on metal
Step 9: Shadow Bestial Brown on leather
Step 10: Shadow Red Gore on garments
Step 11: Highlight/drybrush Bleached Bone on bow
Step 12: Use Bleached Bone on eyes
Step 13: Highlight skin with Bronzed Flesh then highlight that with Elf Flesh
Step 14: Highlight leather with Bubonic Brown
Step 15: Highlight garment with Blazing Orange
Step 16: Highlight boots and belt with Bestial Brown
Step 17: Drybrush Snakebite Leather on boots and belt
Step 18: Use Codex Grey on braids
Step 19: Watered down Chaos Black into braid
Step 20: Drybrush Fortress Grey on braids

Thursday, January 18, 2001

Ral Partha's Ogre Ballista


Crucible is the new fantasy tabletop game developed by Ral Partha. In order to get into the spirit, they decided to have an on-line painting contest. I painted this ogre in January of 2001.

You can see mine and many others at the Crucible painting contest web site hosted by the Goblin King.

This miniature was quite large - I did not realize how large it was until I had it in my hands. I thought this figure was rather cool as it had some very nice features.

I did my first bit of terrain - the "rock" is made out of styrofoam which I painted black, two shades of grey and then a final drybrushing of white. Finally, I let some of the grass grow on the rock in the grooves. I like the end result.

Painting Instructions for Ogre Ballista

Step 1: Use Snakebite Leather on all leather armor
Step 2: Use Bronzed Flesh on skin
Step 3: Use Chaos Black as an undercoat on all metal bits
Step 4: Use Regal Blue on all cloth and arrow feathers
Step 5: Use Scorched Brown on ballista
Step 6: Use Bubonic Brown on arrows
Step 7: Drybrush Boltgun Metal on metal bits
Step 8: Drybrush Chainmail on metal bits
Step 9: Drybrush Mithril Silver on metal bits very lightly as a highlight
Step 10: Shade all metal bits with watered down Flesh Wash
Step 11: Wash all cloth with watered down Midnight Blue
Step 12: Highlight all cloth with Ultramarines Blue
Step 13: Drybrush all cloth with Lightning Blue
Step 14: Wash all skin with watered down Flesh Wash
Step 15: Shade skin with Dwarf Flesh - slighty watered down
Step 16: Highlight skin with Elf Flesh
Step 17: Wash all leather with Bestial Brown
Step 18: Highlight Balista with Bestial Brown
Step 19: Drybrush Snakebite Leather on balista
Step 20: Light drybrush Bubonic Brown on balista
Step 21: Highlight all leather with Bubonic Brown
Step 22: Light drybrush Bleached Bone onto leather edges
Step 23: Use Bleached Bone on fingernails and toe claws
Step 24: Use Goblin Green on base
Step 25: Drybrush base with Camo Green