Saturday, November 22, 2003

Reaper's Talisha Highbringer - 2177


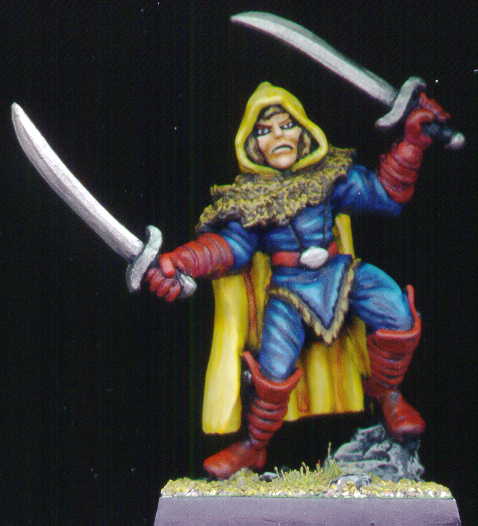
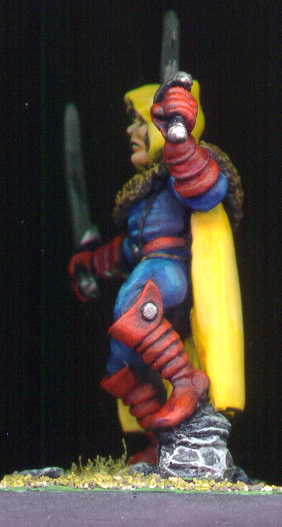
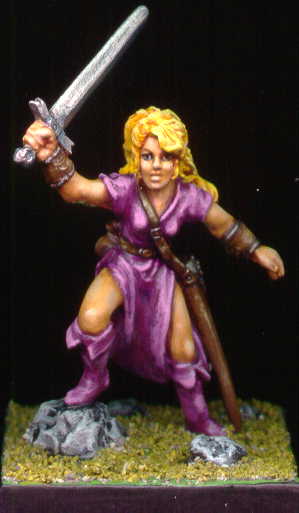
This piece should be renamed to Dolly Parton's revenge.

There is some testing on this model - the skin tones are smooth and contrast with the drybrushing technique used on the dress. From a tabletop distance the high contrast looks good. Close inspection gives a different impression.

Painting Instructions for Reaper Miniature's Talisha Highbringer:
Step 01: Undercoat model with white primer
Step 02: Use Liche Purple on dress
Step 03: Use Warlock Purple on dress
Step 04: Use Tentacle Pink on dress
Step 05: Use mix of Dark Flesh and Bronzed Flesh on skin
Step 06: Use Bronzed Flesh on skin
Step 07: Use Elf Flesh on skin
Step 08: Use Palid Flesh on skin
Step 09: Use Sunburst Yellow on hair
Step 10: Use watered down Flesh Wash on hair
Step 11: Use mix of Bad Moon Yellow and Skull White on hair
Step 12: Add more Skull White to mix and drybrush on hair
Step 13: Use Scorched Brown on leather
Step 14: Use Bestial Brown on leather
Step 15: Use Snakebite Leather on leather
Step 16: Use Bleached Bone and drybrush some highlights on leather
Step 17: Use Boltgun Metal on metal
Step 18: Use watered down Sky Blue Ink on sword
Step 19: Use Chainmail on sword
Step 20: Use Mithril Silver on sword
Step 21: Use Chaos Black on rocks
Step 22: Use Codex Grey on rocks
Step 23: Use Fortress Grey on rocks
Step 24: Use Goblin Green on base
Step 25: Use Camo Green on base

Friday, November 21, 2003

Ral Partha Ranger Greenblade - 03-014


2010-12-15 - thanks to Ernst at DND Lead - he recognized this miniature as being the second stage (Greenblade) of the Ral Partha 3 stage Ranger character.

===================================================

This is another unknown fighter - 25mm in size - so I based it on a Games Workshop round base in order to prop up his size. My goal on this piece was speed - total time from start to finish was just over two hours.

Painting Instructions for Archived Human Fighter:
Step 01: Undercoat model with chaos black primer
Step 02: Use Scaly Green on cloak
Step 03: Use Jade Green on cloak
Step 04: Use Vile Green on cloak
Step 05: Use Bronzed Flesh on face
Step 06: Water down Flesh Wash and use on face
Step 07: Use Elf Flesh for face highlights
Step 08: Use Liche Purple on shirt and pants
Step 09: Use Warlock Purple for shirt and pants highlights
Step 10: Use Vermin Brown on leather
Step 11: Use Leprous Brown on leather
Step 12: Use mix of Bleached Bone and Leprous Brown for leather highlights
Step 13: Use Bestial Brown on wood
Step 14: Use Snakebite Leather on wood
Step 15: Use Bubonic Brown on wood highlights
Step 16: Use watered down Boltgun Metal on steel
Step 17: Use watered down Brazen Brass on helmet
Step 18: Drybrush Codex Grey onto arrow flights
Step 19: Use Goblin Green on base
Step 20: Drybrush Camo Green on grass

Sunday, November 16, 2003

Reaper's Elbreth Eveningstar - 2618


Oh no! Party getting eaten by big purple monster. Don't worry...

It's a bird, it's a plane...

No - it's SuperElf!!

Oh seriously, I was originally thinking of something borish like brown or green and then it hit me - it's an elf - I can paint it any color I want! All I need now is an S on the cape! There are two front scans - the lewd colors cause all sorts of problems with the scanner optimzation coding, so the first scan is with lighten midtones turned on. The second is the standard / normal scan.

Painting Instructions for Reaper Miniature's Elbreth Eveningstar:
Step 01: Undercoat model with chaos black primer
Step 02: Use Golden Yellow on cloak
Step 03: Use Sunburst Yellow on cloak
Step 04: Use Bad Moon Yellow on cloak
Step 05: Use mix of Skull White and Bad Moon Yellow on cloak
Step 06: Use Ged Gore on boots and gloves
Step 07: Use Blood Red on boots and gloves
Step 08: Use mix of Blazing Orange and Blood Red on boots and gloves
Step 09: Use Regal Blue on shirt and pants
Step 10: Use Ultramarines Blue on shirt and pants
Step 11: Use Lighting Blue on shirt and pants
Step 12: Use Ice Blue on shirt and pants
Step 13: Use Scorched Brown on fur
Step 14: Use Bestial Brown on fur
Step 15: Use Snakebite Leather on fur
Step 16: Use Bubonic Brown on fur
Step 17: Use Boltgun Metal on swords
Step 18: Use Chainmail on swords
Step 19: Use Mithril Silver on swords
Step 20: Use Bronzed Flesh on face
Step 21: Use Elf Flesh on face
Step 22: Use Pallid Flesh on face
Step 23: Use Codex Grey on rocks
Step 24: Use Fortress Grey on rocks
Step 25: Use Skull White on rocks
Step 26: Use Goblin Green on base grass
Step 27: Use Camo Green on base grass

Saturday, November 15, 2003

Reaper's Vald the Deceiver - 2569


This character was great fun to paint. I took the techniques from the kneeling assassin for the robe and the evil fighter for the plate mail and put them together for that black and gold evil cleric look.

Painting Instructions for Reaper Miniature's Vald:
Step 01: Undercoat model with black primer
Step 02: Use Chaos Black and mix in some Codex Grey on robe
Step 03: Add more Codex Grey to the mix on robe
Step 04: Add Fortress Grey to the mix on robe
Step 05: Use Codex Grey on robe
Step 06: Use Fortress Grey on robe
Step 07: Drybrush Fortress Grey on hair
Step 08: Use watered down Black Ink on robe and hair
Step 09: Drybrush Scorched Brown on fur
Step 10: Drybrush Bestial Brown on fur
Step 11: Drybrush Vomit Brown on fur
Step 12: Drybrush Bleached Bone on fur
Step 13: Use Bronzed Flesh on face
Step 14: Drybrush Brazen Brass on metal
Step 15: Mix Chainmail to Brazen Brass and highlight metal
Step 16: Use Codex Grey on base
Step 17: Use Fortress Grey on base
Step 18: Use Skull White on base

Friday, November 14, 2003

Reaper's Vasiphur, Evil Fighter - 2606


An evil fighter for the gaming group. The scans on this one are a bit vague as the swords and arms cause the model to sit on the scanner a bit funny. Painting was easy to do as basically all done with a wet drybrush technique.

Painting Instructions for Reaper Miniature's Vasiphur:
Step 01: Undercoat model with black primer
Step 02: Use Boltgun Metal on chain mail and swords
Step 03: Use Red Ink on knee and sword
Step 04: Use Sky Blue Ink on knee and sword
Step 05: Use Brazen Brass on plate mail
Step 06: Use Chainmail to highlight chain mail
Step 07: Use mix of Brazen Brass and Chainmail on plate mail
Step 08: Add more Chainmail to mix of Brazen Brass and Chainmail on plate
Step 09: Use Bronzed Flesh on face
Step 10: Use watered down Flesh Wash on face
Step 11: Use Codex Grey on stones
Step 12: Use Fortress Grey on stones
Step 13: Use Skull White on stones

Wednesday, November 12, 2003

Reaper's Elquin the Daring - 2246


Another gaming model from the gaming group. However, my second conversion ever. I put the mace into the left hand. Originally the figure was without anything in the left hand and it just begged to have something put there.

Painting Instructions for Reaper Miniature's Elquin the Daring:
Step 01: Undercoat model with Chaos Black
Step 02: Use Regal Blue on robe
Step 03: Use Enchanted Blue on robe
Step 04: Use Golden yellow on shirt
Step 05: Use Scab Red on weapon shafts, belts, steel boot plates
Step 06: Use Boltgun Metal on mace
Step 07: Use Chainmail on mace highlights
Step 08: Use Scorched Brown on boots and hair
Step 09: Use Bestial Brown on boots and hair
Step 10: Use Snakebite Leather on boots, hair, and pants
Step 11: Use Bubonic Brown on hair and pants
Step 12: Use Bleached Bone on hair and pants
Step 13: Use a wash of Snakebite Leather on hair and pants
Step 14: Use Lightning Blue on robe
Step 15: Use Blood Red on weapon shafts, belts, steel boot plates
Step 16: Use Blazing Orange on weapon shafts, belts, steel boot plates
Step 17: Use Bad Moon Yellow on shirt
Step 18: Use mix of 6:4 Skull White to Bad Moon Yellow on shirt
Step 19: Use Bronzed Flesh on face and hands
Step 20: Use Elf Flesh on face and hands
Step 21: Use Codex Grey on flooring