Wednesday, December 31, 2014

Heartbreaker Miniatures Identified...


It's the little things that are the most satisfying and today I bumped into a Kickstarter looking to republish the Earthdawn line of miniatures - Kickstarter Earthdawn RPG Fantasy Miniatures.  The company doing the work is Impact! Miniatures and they state that they'll sell the re-published Earthdawn miniatures under the ZN Games branding on their website once the Kickstarter rewards have been shipped.

It looks like Heartbreaker Hobbies & Games originally had the rights to produce Earthdawn miniatures.  The molds for Earthdawn miniatures as well as their general fantasy lines were then purchased by ZN Games.  I've painted a bunch of ZN Games published miniatures.  Those molds have recently been obtained by Impact! Miniatures who kicked off a Kickstarter in October 2014 for the Earthdawn line with FASA's blessing.

Here's why it's satisfying to me... I found the answer to an unknown miniature I've had in the "archived" status.  I was scrolling through the potential stretch goal rewards and there in mold 308 was the orc miniature I've had in my Archived category as a half orc fighter.


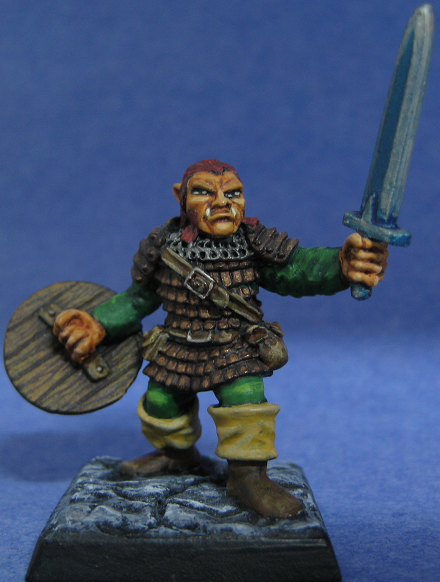
I was able to confirm that by going to Knoble Knight Games and indeed HBH308 was a three pack published in 1993.  Furthermore, going to the Lost Minis Wiki shows that this specific figure was 308B.

The only piece missing is who sculpted figure 308B Orc With Sword for Heartbreaker.

I like to publish the sculptor as part of my blog posting - for the ZN Games figures I was able to pinpoint from within the Lost Minis Wiki the Goblin Scout to Chaz Elliot originally published as 5018 Goblin Hero.  The Goblin Dungeon Boyo to Kev Adams originally published as 2026 Dark Goblin Champion #2 with Axe.  The Wild Satricon to Phil Lewis originally published as 6502 Chaos Knight Musician.

I also found the Human Thug as originally being an Earthdawn miniature 353 Blood Elf Grim Legion Mercenary - but unfortunately no information regarding who sculpted the piece.

The final ZN Games piece the Human Hero I didn't find at all in Lost Minis Wiki - so I'm still looking for the sculptor on that mini as well.

AND... I finally found the answer to the last piece in my unknown bucket - the War Maiden.  It's from the Chronopia line produced by Heartbreaker as well.  According to both the Lost Minis Wiki and The Miniatures Page, this was figure #2 from the warband box 20517 - Sons of Kronos Maidens of the Blade (this is the same box which has the nude figure which is a favorite of mini-painters everywhere).  Unfortunately, I haven't found information on who sculpted the miniature - it might be Kevin (Kev) White - I found an article that he did the aforementioned nude blade maiden leader - it's rumored he did most of the Chronopia line as well as the i-Kore Celtos line (which is why I originally thought it might be a Celtos miniature).


Wednesday, November 05, 2014

Shout Out to The Painting Clinic (aka: Doctor Faust)

When I started this crazy hobby of ours back in 1999, there wasn't much in the way of resources outside of Games Workshop published material, but the internet was starting to take off and a local group formed which we called dcareaminipainters.  While monthly meets were at a local game store we also used an internet group messaging service (bought out by Yahoo) to communicate.  Eventually there became a larger national and then international internet group on Yahoo and that's where I bumped into Dr. Faust and his minipainting website called the PaintingClinic.

The PaintingClinic quickly became a go to resource for me and over the years I've referenced back numerous times.  Eventually he started a YouTube channel and has now abandoned the website altogether which he explains why in this video here (an excellent little history lesson by the way on the beginnings of using the internet for group collaboration as well as a bit of a tirade on internet trolls and life lessons - I found it all interesting).

Every now and then I get an update of the latest videos from channels which I've set as a favorite - I've viewed a few of PaintingClinics videos but those viewings have been few and far between as they've been mostly sci-fi material or armies - neither of which I'm much interested in.  However, within the last month he's been on a Dungeons and Dragons kick and painting singular minis for his gaming sessions - that's awesome!

While I explain my style of painting as a "layering" approach and I write up the steps/paint in each layer within my blog posts; the PaintingClinic videos SHOW you exactly what it means to use the layering method as well as a glaze to blend the layers together.  These are some fantastic videos and I want to give a shout out to some really cool stuff - the benefits of layering is you get 90% of a fully blended look with 20% of the effort - most of his work is within a 2 hour time period.

As of this blog post - here are the videos...

Reaper Ranger Part One
Reaper Ranger Part Two
Reaper Dr. Orontius Part One
Reaper Dr. Orontius Part Two
Reaper Bones Ogre Part One
Reaper Bones Ogre Part Two
Reaper Bones Hell Hound
Ral Partha Copper Dragon Part One
Ral Partha Copper Dragon Part Two

I highly recommend taking the time to watch these videos.  They're all very nicely done (even have a professional feel to them) and last about fifteen minutes each on average.


Saturday, November 01, 2014

Reaper Miniatures' Ghost King - 77161


More Bones Kickstarter... next up was the Ghost King from Reaper Miniatures.  Again, the same sculpt as the metal Dark Heaven Legends line - item 2991 at $7.99 - but, the price of the Bones is $2.79 - about a third of the price - great value!  Unfortunately, this model also displays the issue that's a downside to the Bones line - items like the sword are next to impossible to straighten although I've given it my best effort to heat, straighten, and dip in cold water to set.

I really like the sculpt - sculpted by a name I'm not familiar with - Tim Prow in 2005.  Reminds me directly of the King of the Dead from the Tolkien/Jackson LOTR:ROTK images.  Therefore my naming of Mortuus.

The painting method used was a first for me - started with the darkest base colors - Scab Red on the cloak, Graveyard Earth on the robes.  Boltgun Metal on the armor. Vomit Brown on the bones.  Then, I decided those colors were going to be the highlights - so I opened up the Devlan Mud wash and proceeded to "inverse" layer - using the the wash to paint on layer after layer to darken the model - in the end, all paint on the model was washed with an initial layer driving down to where the darkest recesses have about five or six layers.

Painting Instructions for Ghost King (Mortuus):

Step 1: Undercoat model with black paint (not primer - it will eat into the plastic and cause tackiness)
Step 2: Use Scab Red on cloak
Step 3: Use Graveyard Earth on robes
Step 4: Use Boltgun Metal on armor
Step 5: Use Dwarf Bronze on armor trim
Step 6: Use Vomit Brown on bones
Step 7: Wash model with Devlan Mud - continue process over and over working into the recesses to provide highlight to shadow
Step 8:  Drybrush Codex Grey on base
Step 9: Drybrush Fortress Grey on base
Step 10: Drybrush Skull White on base
Step 11: Use Chaos Black on sides of base

An alternative paint scheme that I thought about would be to have a brighter model by making the robes look like swirling magic air - much like the pizza dijinn or the reaping wraith.  Then the cloak could be brought up to a brighter base and the bones could drive to white highlights.

Kickstarter paint total: 51 + 1 Ghost King = 52

Monday, October 06, 2014

Reaper Miniature's Ragnaros, Evil Warrior - 77150


Back to the Kickstarter pile!  I grabbed the evil warrior by Bobby Jackson Sunday evening and worked up a finished product.  This one is interesting - there's a lot I like about it, but there's some things I'm not a fan of regarding this sculpt.

Two bits I don't care for - the first is the overemphasized sword - I think this is part of the Rakham influence that was happening for a bit and I'm not a fan.  Particularly in bones as it was very difficult to heat up and straighten (I tried numerous times and still didn't get it quite right - advantage metal).  Second, this miniature is over-sized for the footprint - he'd be about 8-9 feet in scale.  Not quite giant size and needing to go on a large versus medium base (thinking D&D terms) but he certainly overwhelms.  That kinda ruins any thought of using as a player character - this is definitely a bad ass boss level character in your dungeon.

With that out of the way, there's a lot to like about this figure - he's cool, he's mean, he's just a wonderful and bad ass sculpt by Bobby Jackson.  The metal plate mail is well done and I was able to cut the left foot off the base and pose it for a more dynamic stepping at you look.  It's a great sculpt that was fun and simple to paint; I'd love to see this exact model shrunk to scale just a bit with a right-sized sword.  He's definitely going to be used as the big baddy in an upcoming game.

The figure is available in both bones for $2.99 as well as figure 3374 in metal for $11.99 (again, bones shows off what a great value it is).

I tried to keep the painting simple so I could get it completed in a single evening.  The model works really well as a drybrush and wash occasion.  I just lightened up on the drybrushing as well as used a more watered down ink wash for each layer.

Painting instructions for Ragnaros, Evil Warrior:

Step 1: Undercoat model with black paint (not primer - it will eat into the plastic and cause tackiness)
Step 2: Drybrush all the armor with Boltgun Metal
Step 3: Wash armor with Sepia ink (watered down just a bit)
Step 4: Drybrush all the armor with Chainmail
Step 5: Wash armor with Sepia ink (watered down just a bit)
Step 6: Wash armor with Red ink (watered down)
Step 7: Drybrush armor with Mithril silver as highlights
Step 8: Wash armor with Sepia ink (watered down)
Step 9: Use Red Gore on shield
Step 10: Wash shield with Sepia ink (watered down just a bit)
Step 11: Drybrush Blood Red highlights onto shield
Step 12: Wash shield with Sepia ink (watered down)
Step 13: Use Bestial Brown on horns and spikes
Step 14: Wash horns and spikes with Sepia ink
Step 14: Use Bubonic Brown on horns and spikes
Step 15: Use Bleached Bone on horns and spikes
Step 16: Use Skull White on horns and spikes
Step 17: Wash horns and spikes with Sepia ink (watered down just a bit)
Step 18: Use Red Gore on sword
Step 19: Use Blood Red on sword
Step 20: Use Blazing Orange on sword
Step 21: Use Sunburst yellow on sword
Step 22: Use Skull White on skull with power line through middle with zig zags to the end
Step 23: Wash sword with Red ink (slightly watered down)
Step 24: Drybrush Codex Grey on base
Step 25: Drybrush Fortress Grey on base
Step 26: Drybrush Skull White on base
Step 27: Use Chaos Black on sides of base

Kickstarter paint total: 50 + 1 Ragnaros = 51


Sunday, October 05, 2014

Reaper Miniature's Townsfolk Beggar - 2584A


Another time lapse - it's been awhile since the eyebeast - that's what kinda happens during the spring and summer.  I actually started painting this figure earlier in the summer when I had a friend over to paint and just recently found time to finish.

This is the beggar from the Reaper Miniatures Townsfolk II pack (2584) which includes the bar girl and the smithy.  This is a great miniature for use in a D&D/Pathfinder game as either the evil/good wizard in disguise that the party encounters early in the campaign and can either help or hinder the party later in the campaign depending upon how they treat the beggar.

Painting instructions for Beggar:

I didn't keep great notes on this one - so it's going to be more of an approximate, but I did a mixed compliments on the color wheel.  The shirt and pants are red and green.  The makeshift cloak is split between blue and orange.  Both of those sets are opposites on the color wheel (complimentary).  Normally you wouldn't mix the two on the same model, but I felt that the two were distinct to the eye and would work.  I like the end result.

I stuck to a neutral color (tans) on the patches - I figured there was already enough various colors and making those anything other than neutral would distract rather than enhance.  The beard was in the ghostly grey colors.

This one is old fashioned metal - so no update to the Kickstarter total.


Thursday, February 13, 2014

Reaper Miniatures' Eye Beast - 77043


I started this miniature on Sunday and it was pretty close to finished - thanks to a snow day in northern Virginia (15" of the white stuff), I was able to finish him up this evening.

I love this miniature - it's a great sculpt by Julie Guthrie this is the Bones version that came with my Kickstarter - I also have the metal version (product no. 2712) which is sitting in my to paint pile.  If you're going to paint and play, then the Bones version is an incredible value - $3.79 versus $14.99 for metal. 

I actually went to the color wheel for this one - the triad is red-violet/blue-green/yellow-orange.  The red-violet is the body; the blue-green is the inside of the mouth and gums; the yellow-orange is the tongue and eyes.

Painting instructions for Eye Beast:

Step 1: Undercoat model with black paint (not primer - it will eat into the plastic and cause tackiness)
Step 2: Use Imperial Purple as basecoat on the body and tentacles
Step 3: Drybrush Liche Purple liberally on the body and tentacles
Step 4: Drybrush Warlock Purple moderately on the body and tentacles
Step 5: Drybrush Tentacle Pink as highlights on the body and tentacles
Step 6: Use Red Gore as the basecoat on all the little eyes and ends of tentacles
Step 7: Use Sunburst Yellow and fill in the main portion of each of the little eyes and ends of tentacles
Step 8: Use Skull White to run a white strip (line) over the middle of the little eyes and ends of tentacles
(the above step gives it a "glow" like laser - kind of like the alien deathrays in HG Wells War of the Worlds)
Step 9: Use Scaly Green inside mouth and on gums as basecoat
Step 10: Use Jade Green as gum highlights
Step 11: Use Blood Red on tongue as basecoat
Step 12: Use Blazing Orange on tongue
Step 13: Use Fiery Orange on tongue as highlights
Step 14: Use Skull White on teeth and center eye
Step 15: Use wash of Snakebite Leather on teeth pushing into the in-betweens and the gums
Step 16: Use really close to a wash of Golden Yellow on the left and right side of the center eye
Step 17: Use Fiery Orange in a three pronged dagger towards middle of center eye
Step 18: Use Blazing Orange to deepen three pronged dagger towards middle of center eye
Step 19: Use Chaos Black to paint in an elongated oval vertically in middle of center eye
Step 20: Drybrush Codex Grey on base
Step 21: Drybrush Fortress Grey on base
Step 22: Drybrush Skull White on base as highlights
Step 23: Use Gunmetal on sword
Step 24: Use Bright Bronze on handle of sword

Kickstarter paint total: 49 + 1 Eye Beast = 50

Saturday, February 08, 2014

Reaper Miniature's Zombies - 77014


I painted these two zombies from the Kickstarter while watching the second Resident Evil movie (Apocalypse) on Netflix - again, Resident Evil provides the perfect movie for this painting session!

Again, the value of the Bones figures is pretty awesome - $4.49 for a pack of three bones (the Kickstarter only came with two).  The metal figure is in their Warlord line as 14410 and will set you back $4.99 a piece.

I painted these two a bit different than the other set of zombies from the Kickstarter - I started these with a base of Bestial Brown.  I wasn't really happy with the result as it was too brown and I ended up giving the models a wash of Desert Yellow to add some color and that worked out rather well.

Painting instructions for Zombies:

Step 01: Undercoat model with black paint (not primer - it will eat into the plastic and cause tackiness)
Step 02: Paint all flesh with Bestial Brown
Step 03: Drybrush all flesh with Rotting Flesh
Step 04: Drybrush highlights on flesh with Pallid Flesh
Step 05: Wash all flesh with Desert Yellow
Step 06: Use Scorched Brown as basecoat on tattered pants
Step 07: Use Snakebite Leather on tattered pants
Step 08: Use Bubonic Brown as highlights on tattered pants
Step 09: Use Scorched Brown as basecoat on hair
Step 10: Drybrush highlights on hair with Bestial Brown
Step 11: Drybrush Codex Grey on base
Step 12: Drybrush Fortress Grey on base
Step 13: Drybrush Skull White on base

Kickstarter paint total: 47 + 2 Zombies = 49

Wednesday, January 08, 2014

Reaper Miniature's Zombies - 77053


I painted these three zombies from the Kickstarter on Sunday while watching the original Resident Evil movie on Netflix - it was the perfect movie for this painting session!  Call me a fanboy - I'm big on Milla Jovovich going back to her role in The Fifth Element (which ranks near the top on my list of favorite sci-fi movies).

I was able to crank out everything except the base which I completed tonight.

Again, the value of the Bones figures is pretty awesome - $5.49 for a pack of three bones.  The metal figure is in their Legends line as 3598B and will set you back $3.99 a piece.

Painting instructions for Zombies:

Step 01: Undercoat model with black paint (not primer - it will eat into the plastic and cause tackiness)
Step 02: Paint all flesh with Camo Green
Step 03: Drybrush all flesh with Rotting Flesh
Step 04: Drybrush highlights on flesh with Pallid Flesh
Step 05: Paint tattered pants with Regal Blue
Step 06: Drybrush tattered pants with Enchanted Blue
Step 07: Drybrush highlights of tattered pants with Lightning Blue
Step 08: Drybrush highlights on hair with Shadow Grey
Step 09: Drybrush Codex Grey on base
Step 10: Drybrush Fortress Grey on base
Step 11: Drybrush Skull White on base

Kickstarter paint total: 44 + 3 Zombies = 47

Saturday, January 04, 2014

Reaper Miniature's Mummy - 77144


Another Kickstarter model 77144 - purchasing this model from a retailer will have 3 in the pack for $5.49 or the original metal model can be purchased (2156) for $4.99.  The Kickstarter came with only one of these in the Vampire package.  I didn't overthink painting the model - again, the best purpose for the Bones line of miniatures from Reaper is to get them painted up for the gaming table - so this was a quick drybrush and a bit of fine detail on the face.

Painting instructions for Mummy:

Step 01: Undercoat model with black paint (not primer - it will eat into the plastic and cause tackiness)
Step 02: Drybrush Desert Yellow
Step 03: Drybrush Bleached Bone
Step 04: Drybrush Skull White
Step 05: Use Rotting Flesh on face
Step 06: Use watered down Sepia ink on face
Step 07: Highlight face features with Rotting Flesh
Step 08: Use Skull White on lower teeth
Step 09: Drybrush Codex Grey on base
Step 10: Drybrush Fortress Grey on base
Step 11: Drybrush Skull White on base

Kickstarter paint total: 43 + 1 Mummy = 44