Tuesday, July 29, 2003

Reaper's Mellonir Windrunner - 2120


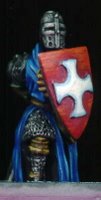
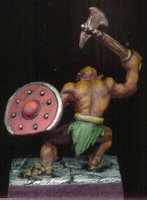
Mellonir Windrunner takes the concepts from the Templar Knight and applies them with just a bit more care - time on this was about 8 hours in total. Again the highlights are to white on the cloak. Not so on the other colors as I think it would take away from the overall appearance. However, they are do span a complete range from dark to light. The wooden shield was a new first - after viewing several other painted shields by well known painters, I approached this one differently. Instead of dark base with different colored lines as in the above Templar - I went with a dark brown base, then a thick light brown, then a medium brown within the light brown (see my painting instructions below). For comparisons - see the 2nd Templar pic or the 3rd Orc picture from below to get a view of the backside of shield and compare to the 2nd and 4th pic of Mellonir Windrunner.

Painting Instructions for Reaper Miniature's Windrunner:
Step 01: Undercoat model with Black primer
Step 02: Use Boltgun Metal on chainmail and sword
Step 03: Use Dark Flesh on face
Step 04: Use mix of Dark Flesh and Bronzed Flesh on face
Step 05: Add more Bronzed Flesh to mix on face
Step 06: Use Bronzed Flesh on face
Step 07: Use a more watered down Elf Flesh on face final highlights
Step 08: Use Scaly Green on cloak
Step 09: Use mix of Scaly Green and Jade Green on cloak
Step 10: Use Jade Green on cloak
Step 11: Use mix of Jade Green and Vile Green on cloak
Step 12: Use Vile Green on cloak
Step 13: Use mix of Vile Green and Skull White on cloak
Step 14: Add more Skull White to mix
Step 15: Use Skull White on cloak as final highlights
Step 16: Use Nauseating Blue on clothing and shield
Step 17: Use Liche Purple on clothing and shield
Step 18: Use Warlock Purple on clothing and shield
Step 19: Use mix of Warlock Purple and Tentacle Pink on clothing and shield
Step 20: Use more Tentacle Pink into mix
Step 21: Use Tentacle Pink on clothing and shield as final highlights
Step 22: Use Leprous Brown on gloves and boots
Step 23: Use wash of Chestnut Ink on gloves and boots
Step 24: Use mix of Leprous Brown and Golden Yellow on gloves and boots
Step 25: Add Skull White to mix for gloves and boots
Step 26: Add more Skull White to mix for gloves and boots final highlights
Step 27: Use Scorched Brown on leather
Step 28: Use Bestial Brown on leather
Step 29: Use mix of Snakebite Leather and Bubonic Brown on leather
Step 30: Use Bubonic Brown on leather as final highlights
Step 31: Use Scorched Brown on back of shield
Step 32: Use Vomit Brown for wide stripes on back of shield
Step 33: Use Bestial Brown to fill in wide stripes on back of shield
Step 34: Use Dwarf Bronze on metal clips
Step 35: Use Shining Gold to highlight metal clips
Step 36: Use Chainmail to highlight chainmail
Step 37: Use Mithril Silver to highlight chainmail and sword
Step 38: Wash sword with watered down Sky Blue Ink
Step 39: Drybrush Shadow Grey on hair
Step 40: Drybrush Space Wolves Grey on hair
Step 41: Drybrush Codex Grey on stone
Step 42: Drybrush Fortress Grey on stone
Step 43: Drybrush Skull White on stone

Thursday, July 10, 2003

Ral Partha's Hamatula - 11-645


This figure is an AD&D 2nd Edition miniature from Ral Partha. This figure was painted as a study in red. To see what would happen and the characteristics of going from a deep red to a whitish yellow.

Painting Instructions for Ral Partha's Hamatula:
Step 01: Undercoat model with black primer
Step 02: Use Scab Red on skin
Step 03: Use Red Gore on skin
Step 04: Use Blood Red on skin
Step 05: Use Blazing Orange on skin
Step 06: Use Fiery Orange on skin
Step 07: Use Golden Yellow on skin
Step 08: Use Bad Moon Yellow on skin
Step 09: Use Skull White with a dab of Bad Moon Yellow on skin
Step 10: Use Vomit Brown on nails and teeth
Step 11: Use Flesh Wash between grooves of nails and teeth
Step 12: Use Bleached Bone on nails and teeth
Step 13: Use Skull White on nails and teeth
Step 14: Use Bad Moon Yellow on base
Step 15: Wash Fiery Orange on base
Step 16: Wash Blood Red on base
Step 17: Wash Scab Red on base

Wednesday, July 02, 2003

Reaper's Templar Knight - 2513


The Templar Knight I picked up after participating in a Living Greyhawk RPGA event. He's my Paladin. The painting of this figure has a couple of interesting notes. First, I completed this figure in a six hour span one evening - which by my standards is fast. My goal was to be quick (relatively speaking), like the below orcs, but at the same time to create a high quality paintjob that gets attention. Additionally, this was the first time I went to a white highlight on my primary color (the blue robes). I've always hesitated before and this was a tough barrier for me to get through. I really like the results, but I can see needs for further improvement.

Painting Instructions for Templar Knight:
Step 01: Undercoat model with Black primer
Step 02: Drybrush Boltgun Metal on all chainmail and metal bits
Step 03: Use Regal Blue on robes
Step 04: Use mix of Regal Blus and Ultramarines Blue on robes
Step 05: Use Ultramarines Blue on robes
Step 06: Use mix of Ultramarines Blue and Lightning Blue on robes
Step 07: Use Lightning Blue on robes
Step 08: Use Ice Blue on robes
Step 09: Use Skull White on robes
Step 10: Use Scab Red on shield
Step 11: Use Red Gore on shield
Step 12: Use Blood Red on shield
Step 13: Use Blazing Orange on shield
Step 14: Use Ice Blue on cross on shield
Step 15: Use mix of Ice Blue and Skull White on cross on shield
Step 16: Use Skull White on cross on shield
Step 17: Use Scorched Brown on leather bits
Step 18: Use Bestial Brown on leather bits
Step 19: Use Snakebite Leather on leather bits
Step 20: Use Buboninc Brown on leather bits
Step 21: Use mix of Bubonic Brown and Bleached Bone on leather bits
Step 22: Use Scorched Brown on back of shield
Step 23: Use Bestial Brown to make vertical lines on back of shield
Step 24: Use Vomit Brown to make vertical lines on back of shield
Step 25: Use Bleached Bone to make vertical line on back of shield
Step 26: Use Boltgun Metal around outside of and small line around back of shield
Step 27: Use Tin Bitz on sword pommel
Step 28: Mix Tin Bitx and Boltgun Metal for highlights on sword pommel
Step 29: Use Chainmail on metal highlights
Step 30: Use Mithril Silver as final metal highlights
Step 31: Drybrush Codex Grey on stone
Step 32: Drybrush Fortress Grey on stone
Step 33: Drybrush Skull White on stone

Tuesday, July 01, 2003

Reaper's Various Orcs


This group of orcs have been painted very quickly for a tabletop look. There are less transitional layers - more contrast. However, I didn't want to paint, wash, drybrush. I still wanted the figs to have a good looking paintjob. So the technique is layered, but without the normal blended look. I also skipped out on some detail work such as the eyes, belt buckles, and the like. The idea in the end is to go with a unified look that works on the tabletop.

Painting Instructions for Reaper Miniature's Orcs:
Step 01: Undercoat models with black primer
Step 02: Use Boltgun Metal on all metal bits
Step 03: Mix some Flesh Wash (2x), a bit of Red Ink a bit of Yellow Ink onto metal bits as a rust affect
Step 04: Lightly drybrush Boltgun Metal on all metal bits
Step 05: Use Dark Flesh on skin
Step 06: Use Vermin Brown to highlight skin
Step 07: Use Leprous Brown as final highlight on skin
Step 08: Use Scorched Brown on wood (including back of shields)
Step 09: Use Bestial Brown as drybrush on wood (line back of shields)
Step 10: Use Vomit Brown as drybrush on wood (highlight line back of shields)
Step 11: Use very light drybrush of Bleached Bone on wood
Step 12: Wash drybrush with Bestial Brown
Step 13: Use Snakebite Leather on leather (leave black lines)
Step 14: Use Bubonic Brown as heavy highlight on leather
Step 15: Use Scab Red on shield
Step 16: Highlight shield with Blood Red
Step 17: Use Boltgun Metal on metal bits of shield
Step 18: Use Chaos Black on sides of base and rocks
Step 19: Drybrush Codex Grey on rocks
Step 20: Drybrush Fortress Grey on rocks
Step 21: Drybrush Skull White on rocks