Thursday, September 23, 2021

Reaper Miniatures Wererats - 77293, 77294, 77295


Although they each have separate SKU numbers - these minis came in a set as part of one of the Bones Kickstarters - so I worked on them together and differed them by the color of the cloak.
  • 77293 - the middle pics with the pickaxe is the Wererat Berserker
  • 77294 - the top pics with the two blades is the Wererat Stalker
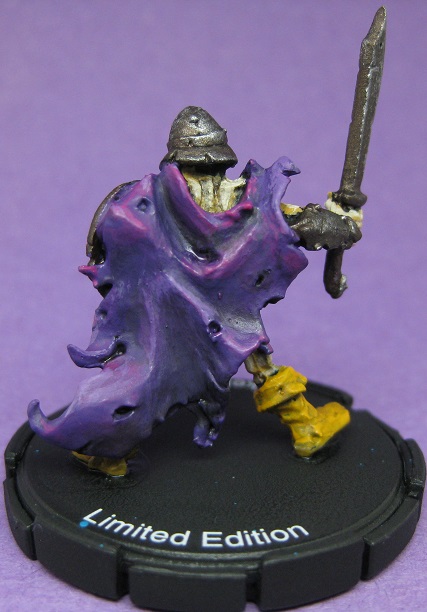
  • 77295 - the bottom pics with the single blade is the Wererat Assassin
For the next couple of weeks you can see the painting of these minis on twitch: https://www.twitch.tv/videos/1155675662

Painting instructions for Peryton (used my Vallejo Game Color)...

Step 1: I'm using Stynylrez primer on the bones models - just slop it on and cover everything - it works great!
Step 2: Use Terracotta on fur
Step 3: Drybrush Parasite Brown on fur
Step 4: Drybrush Scrofulous Brown on fur
Step 5: Use Hexed Lichen or Dark Green or Night Blue on cloak
Step 6: Highlight with Warlord Purple, Sick Green, or Magic Blue on cloak
Step 7: Make wash of base color and wash cloak
Step 8: Use Sombre Grey on pants
Step 9: Use Black on teeth and eye sockets
Step 10: Use Bloody Red on eyeball
Step 11: Use Bonewhite on teeth and rolled up map
Step 12: Use Gunmetal on blades
Step 13: Use Chainmail Silver as highlight on blades
Step 14: Use Bright Bronze on rings/bracelets
Step 15: Use Leather Brown on backpack, pouch, bag
Step 16: Highlight with Plague Brown on backpack, pouch, bag
Step 17: Final Highlight with Filthy Brown on backpack, pouch, bag
Step 18: Use Black on base
Step 19: Drybrush Cold Grey on base
Step 20: Drybrush Stonewall Grey on base

Kickstarter paint total: 158 + 3 Wererats = 161

Sunday, September 19, 2021

Reaper Miniatures Peryton - 77392


These are three copies of the same Peryton figure from the Reaper Bones line.  I modeled the paint scheme after the 5e Monster Manual artwork.

I completed these three earlier this week - the paint night is on twitch for another week or so - https://www.twitch.tv/videos/1149181904

Painting instructions for Peryton (used my Vallejo Game Color)...

Step 1: I'm using Stynylrez primer on the bones models - just slop it on and cover everything - it works great!
Step 2: Drybrush Cold Grey on base
Step 3: Drybrush Stonewall Grey on base
Step 4: Use Gory Red over the entire model as a basecoat
Step 5: Use Royal Purple on wings, body, and tail
Step 6: Use Warlord Purple on wings and as highlights on body and tail
Step 7: Use Tentacle Pink as highlights on wings
Step 8: Use Bloody Red on wings and drybrush on chest fur
Step 9: Drybrush Hot Orange on wings and chest fur
Step 10: Use a wash of Royal Purple on wings
Step 10: Drybrush Orange Fire on chest fur and use on feet
Step 11: Drybrush Gold Yellow on chest and highlight feet
Step 12: Use Sombre Grey on head
Step 13: Use Wolf Grey as highlights on head
Step 14: Use Ghost Grey as final highlights on head
Step 15: Use a wash of Sombre Grey on head
Step 16: Use Charred Brown on antlers
Step 17: Us Beasty Brown as highlight on antlers
Step 18: Use Vermin Brown as final highlights on antlers
Step 19: Use a wash of Charred Brown on antlers
Step 20: Use Black on the wing's talons
Step 21: Use Night Blue as highlight on wing's talons

Kickstarter paint total: 155 + 3 Pertyon = 158

Sunday, September 12, 2021

WizKids Skeleton - WZK541


This was a fun Friday night project 19 years in the making, lol.  I purchased back in 2002 a handful of Mage Knight limited edition metal models off of ebay.  These were recasts of the plastic models done in metal and packaged with a Limited Edition base.

The first painted complete was the Noble Archer which I completed in July 2002.

The second painted complete was the Wraith which I completed in September 2010.

I've placed them into one of those display cubes you pick up from the craft stores:


I have one more to complete the cube - the Amazon Warrior Queen - hopefully it won't be another decade before I get that model completed.

The actual painting of this model was done using the paint schema of the Golgath, Eradicator.


Friday, September 10, 2021

WizKids Wraith & Specter - WZK72570


Another set of fantastic miniatures produced by Wizkids based upon the images pulled directly from the D&D monster manual.  The blue is the Wraith and of course the Wraith can have up to seven Specters in its control at any given time.  This product ships as a packaged set with the two pieces and both pieces are translucent plastic.

One could base them and use the models as is in their translucent state, but what fun would that be!  Plus, I had some new paint products I wanted to try.  I had a blue wash produced by Vallejo and from Games Workshop / Citadel, I have their Technical Tesseract Glow (which I used for the first time on the giant sword of the Genie Efreeti model painted just a few days ago).

I painted both of these models in a two hour session you can watch on twitch for the next two weeks: https://www.twitch.tv/videos/1143345620

Both of these models were simplistic in the actual "painting" of the model - the Wraith I used Vallejo's Blue Wash - I watered that down just a bit as I wanted to maintain a translucency through the model and I figured that more thin layers for additional color could be added as needed.  That one turned out great and the wash acted almost like a stain on the clear plastic - it pretty much turned out exactly as I was hoping it would and very much like the result.

The Specter was a different story and I really struggled with the GW/Citadel Tesseract Glow paint.  It's potentially possible I don't know how to use it properly.  It appeared to work very well on the Genie Effeeti sword painted just a few days ago - that was a nice big flat surface which also was initially a clear plastic piece.  When placing the paint on the Specter it just wanted to fill the cavities of the robe, hair, chest and came out all blotchy.  It was a bit of frustration - so I ended up using three different layers letting the first layer almost act as a primer - I let each layer dry before adding the next.  The end result is a very cool neon glow piece but there's no translucency through the model - it's very opaque.  Maybe that's what I'm missing, I don't think this paint is intended to be translucent?  Maybe I should have set a layer of white or grey primer down first and then used the technical paint and I would have had a better go at it.  While it wasn't the initial look I was going for, the end result looks great and I'm looking forward to using on the game table!

If you have more experience with the Tesseract Glow technical paint from GW, then please comment below.


Thursday, September 02, 2021

WizKids Genie Efreeti - WZK73723


Oh my goodness, this miniature by Wizkids is from their Pathfinder Deep Cuts line and was a blast to paint as well as a fantastic representation of the Pathfinder source drawing.  The difference between the drawing and the miniature is the right hand in the drawing is in a fist and starting to gather in the power of a fireball while the miniature added a shield.  Now let's talk about that shield - first, why would a Genie Efreeti need a shield and second (more importantly) look at the hand positioning - once you see it, it can't be unseen - the shield is useless with vertical hand positioning.  I think Wizkids should have given us a clear plastic fireball in that hand instead.  However, that's nitpicking and this is an amazing mini!

Painting of this miniature was streamed on Twitch and these videos will be available for about a week or so from this posting per Twitch policies:
https://www.twitch.tv/videos/1129760691 - session 1
https://www.twitch.tv/videos/1135686605 - session 2

Painting instructions for Geenie Efreeti (used Vallejo)...

Step 1: No need to primer - already done
Step 2: Use Hexed Lichen on the robes
Step 3: Use mix of Hexed Lichen and Warlord Purple on the robes
Step 4: Add Tentacle Pink to the mix for highlights on the robes
Step 5: Use watered down Hexed Lichen as a wash on the robes
Step 5: Use Gory Red on the armor
Step 6: Use Scarlett Red on skin
Step 7: Use Bloody Red on skin 
Step 8: Use Hot Orange for highlights on skin
Step 9: Use wash of Bloody Red on skin
Step 10: Use Vermin Brown on shield
Step 11: Use Sepia Ink on shield as a wash
Step 12: Use Glorious Gold on armor and top of sword
Step 13: Use watered down Flesh Wash with a tiny drop of Scarlet Red and wash all gold
Step 14: Use Black on base
Step 15: Drybrush Cold Grey on rock
Step 16: Drybrush Stonewall Grey on rock
Step 17: Use GW's Technical Tesseract Glow on the sword