Sunday, August 31, 2003

Reaper's Faramere of Vestonia - 2086


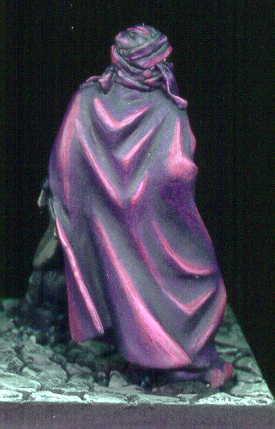
Faramere of Vestonia is another gaming figure for my local rpg group. I envision an old fighter, battling off a group of orcs which attacked him and his maiden daughter while on the road - just waiting to be rescued.

Painting Instructions for Reaper Miniature's Faramere:
Step 01: Undercoat model with black primer
Step 02: Use Dark Angels Green on cloak
Step 03: Use mix of Dark Angels Green and Snot Green on cloak
Step 04: Use Snot Green on cloak
Step 05: Use 3:1 mix of Snot Green and Rotting Flesh on cloak
Step 06: Use 2:1 mix of Snot Green and Rotting Flesh on cloak
Step 07: Use Bronzed Flesh on skin
Step 08: Use watered down Flesh Wash on skin
Step 09: Use Bronzed Flesh again on skin
Step 10: Use mix of Bronzed Flesh and Elf Flesh on skin
Step 11: Use Scorched Brown on hair
Step 12: Use Storm Blue on tunic and pants
Step 13: Use Regal Blue on tunic and pants
Step 14: Use mix of Regal Blue and Ultramarines Blue on tunic and pants
Step 15: Add Lightning Blue to mix on tunic and pants
Step 16: Use Lightning Blue for final highlights on tunic and pants
Step 17: Use Dark Flesh on leather
Step 18: Use Vermin Brown on leather
Step 19: Use Leprous Brown as final highlights on leather
Step 20: Drybrush Bestial Brown on hair
Step 21: Drybrush Snakebite Leather on hair
Step 22: Drybrush Bubonic Brown on hair
Step 23: Drybrush metal with Chainmail
Step 24: Highlight metal with Mithril Silver
Step 25: Drybrush base with Codex Grey
Step 26: Drybrush base with Fortress Grey
Step 27: Drybrush base with Skull White

Wednesday, August 27, 2003

Reaper's Assassin, Blue Orchid - 2588


Assassin, Blue Orchid should be renamed Purple People Eater! I wanted something dark and the deep purple with black leather armor fit the picture in my mind. This figure was done to gaming standards for my local rpg group.

Painting Instructions for Reaper Miniature's Purple People Eater:
Step 01: Undercoat model with black primer
Step 02: Use Chaos Black and Liche Purple mix as basecoat on cloak
Step 03: Add more Liche Purple to mix on cloak
Step 04: Use Imperial Purple on cloak
Step 05: Use Warlock Purple for highlights on cloak
Step 06: Use Tentacle Pink as final highlights on cloak
Step 07: Use mix of Chaos Black and Codex Grey to highlight leather
Step 08: Use Codex Grey as final highlight on leather
Step 09: Use Boltgun metal on metal studs, bits, and swords
Step 10: Use Mithril Silver for highlights on swords
Step 11: Use Ice Blue on bottle
Step 12: Use Chaos Black on sides of base and rocks
Step 13: Drybrush Codex Grey on rocks
Step 14: Drybrush Fortress Grey on rocks
Step 15: Drybrush Skull White on rocks

Tuesday, August 19, 2003

Reaper's Sparrowhawk, Paladin - 2600


Sparrowhawk the Paladin was a fig I picked after we kept bumping into a mighty Paladin in our local rpg. This was a quick paint for the game table. Time on this was about 6 hours during a night between travel for work and vacation. The metals were watered down and painted in layered highlights, just like any other paint. The back of the shield used the same technique as Windrunner the elf - above. The sword was an interesting experiment of mixing a color with a metallic. I wanted the sword to be brighter to give it a mystical appearance - the inner part was skull white with mithril silver and the outer parts was lightning blue with mithril silver. Then I did a wash of mithril silver to give it a shine. I'm somewhere between hating it and liking it and can't make up my mind if it works or not. The attempt was to give the idea it was a magic sword with it's own properties (a glow of white to blue to match the Paladin's colors) without going overboard.

Painting Instructions for Reaper Miniature's Sparrowhawk:
Step 01: Undercoat model with black primer
Step 02: Use Boltgun Metal - watered down then brush wiped
Step 03: Use Shadow Grey on shield
Step 04: Use Space Wolved Grey on shield
Step 05: Use Ghostly Grey on shield
Step 06: Use Skull White on shield as final highlight
Step 07: Use Midnight Blue on clothes and shield design
Step 08: Use Regal Blue on clothes and shield design
Step 09: Use Enhanted Blue on clothes and shield design
Step 10: Use Lightning Blue on clothes and shield design
Step 11: Use Ice Blue on clothes and shield design
Step 12: Use Scorched Brown on leather
Step 13: Use Bestial Brown on leather
Step 14: Use Snakebite Leather on leather
Step 15: Use Bubonic Brown on leather as final highlight
Step 16: Try something new - mix Skull White with Mithril Silver - inner sword
Step 17: Try something new - mix Lightning Blue with Mithril Silver - outer sword
Step 18: Use Mithril Silver - as a wash on sword
Step 19: Use Mithril Silver watered down as highlight on plate armor
Step 20: Use Dark Flesh on hair
Step 21: Drybrush Leprous Brown on hair
Step 22: Add Pallid Flesh to mix and drybrush on hair
Step 23: Add more Pallid Flesh on hair and drybrush - keep doing
Step 24: Use Bronzed Flesh on face
Step 25: Use watered down Flesh Wash on face
Step 26: Use Elf Flesh on face as highlights
Step 27: Use thick line of Vomit Brown on back of shield
Step 28: Use thin line of Bestial Brown on back of shield
Step 29: Use Chaos Black on base
Step 30: Drybrush Codex Grey on base
Step 31: Drybrush Fortress Grey on base
Step 32: Drybrush Skull White on base