Saturday, August 05, 2023

Lost Mine of Phandelver - Freebie & Contrast Paints


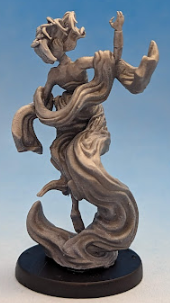
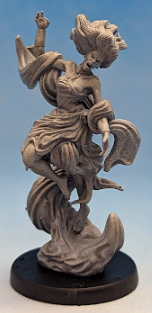
I ordered some additional miniatures from 3D Dungeon Labs and besides the two extra giant spiders they also sent me a freebie miniature of this wood fey/sprite or pan creature.  It was the perfect opportunity to utilize some new contrast paints which I'd picked up from the local hobby store. I previously had picked up four of Vallejo's "contrast" paints they call Xpress Color.  I believe Games Workshop was the originator of the contrast paint type a few years back.  I had some friends tinker with the stuff creating a WH40k army or parts of one but none of them stayed with the paint line.

There were only 4 colors of the Vallejo Xpress Color in stock and the local hobby store said they had a difficult time keeping stock because they'd sell out almost immediately. I was able to pick up a brown, grey, green, and blue.  That's enough basic colors to do something with.  Well that something came about with this model.

I remember reading that these types of paints work best on a white or grey primer.  I still had an old can of white primer and therefore shot this model up with it.  Then I went to town on the model with the Vallejo Xpress Color.

First up was the green and using this paint I did what I'd normally do - load up the brush and start inside out - meaning I'd start on the face first and work my way out.  Normally this is good because you can be a bit "messy" and then "clean" by painting over any messes as you work towards the outer part of the model.

I made two mistakes immediately.  I put too much paint on the brush and hence the face and the upper body received too much green paint and I slobbered on other areas of the model which become issues later on.  The Xpress Color is a bit if an ink and paint had a baby but it really acts more like an ink.  The paint works with very little on the brush on top of a white foundation.  It's very transparent and pools into the recesses like an ink.  This thick and thin of the paint give it its contrast - where it pools has a darker color than the flat of a model.  I noticed also that as it dries, it stretches the paint pulling the paint towards the ends and thinning out the middle.

Mistake 1 - you'll notice that the face is too dark compared to the body - I slobbered too much on the face and so the paint didn't have the ability to pull into recess and pull towards the end.  The solution is to use very little of the paint over a solid white primer.  

Mistake 2 - I'm used to slobbering paint initially and then cleaning up that slobber with another color.  This is displayed in the hair of the model and the sash across the back.  I initially did some brush strokes slobbering on the green and quickly realized how fluid this paint actually was and how little I needed to use and that because of the translucent effect the paint needed over white primer that this was going to cause a problem.  The solution and understanding is that this is a very technical paint and black lines generate where paint overlaps - which is a very cool effect because essentially it does the black lining for you!  This effect is noticeable on the front of the model where the brown meets the green or the blue of the sash has a black line between it and the green of the body or the brown of the pan flute.  You can also see on the back of the model where the green was slobbered all over the sash and the blue on top just turns into big splotches of black.  Therefore the trick is to stay "within the lines" and have a slight overlap between two colors to generate a thin black line for higher contrast.

Once the green was done and I started to learn some lessons, I then pulled out the brown and did up all the wood on the creature - the legs, hands, shoulder pads, and antlers.  I made sure to use only a little bit of the paint at a time and being very careful technically to only put paint on the right parts.  I found myself dabbing and spreading more than actually painting.

Next came the blue which I used on the sash and the shoulder pad decorations.  And finally I used the grey on the hooves, 

Some thoughts...

* the paint over a solid and smooth white primer is going to generate a very dynamic model

* very little paint goes a long way

* keep washing the brush, dry it into a point with a twirl, then dab into the paint - do this often but do not leave water on the brush as normal

* the contrast is between crevice and flat - not as the sun shines which we've been taught as mini-painters to do for the past two decades

* the brightness and shading of the sun can be accomplished by moving the paint around or placing a second layer - so for example, I placed more brown at the bottom side of the antlers once I figured out how the paint worked

* the grey was too translucent - it needed two coats

* it's a fast way of painting - this entire model took an hour and I probably could have done it in less time as I was learning the paint

* it's a very technical paint - you can't be sloppy and you can't change your mind unless you repaint a section white

* there's no blending or layering - it's a very different thought process 

* I would not teach a beginner using this paint - however an intermediate painter can use this paint to quickly paint highly dynamic models

Overall it's an interesting paint line - I'm going to keep dabbling with it and probably pick up some more colors within the paint line.

Friday, August 04, 2023

Lost Mine of Phandelver - Giant Spider 2


More spider love!  I painted these the opposite of the first group of giant spiders for the Lost Mine.  I ordered some additional miniatures from 3D Dungeon Labs and mentioned that when you play the end sequence of Lost Mines you really need four of these giant spiders - so Jonathan sent me another two spiders with my new miniatures.  These look fantastic as a set - 2 blues and 2 reds.


Wednesday, June 28, 2023

Polygons & Peril Borderlands Inspired Lilith Dice Set


Something new and different for the blog - miniature painting of a different sort - I received today a "deluxe" set of dice from Polygons & Peril Etsy shop - the Borderland Inspired Lilith dice set is hand cast and hand painted making every die unique in the set.  

I opted for the "deluxe" version instead of the "standard" 7 dice set - this one has 12 dice - it adds a total of 4d6's for spell damage - 2d20's for 5e's advantage/disadvantage roles - and even a d2 for odds/evens - it's brilliant, that's the die I've always been missing and didn't know it!


Saturday, June 24, 2023

WizKids Eidolon Possessed Sacred Statue - WZK90167


"Really, take my eyeball and I will CRUSH you!!" What a great sculpt of the classic first edition AD&D Player's Handbook cover drawing come to life.  So let's go down that path for a second as WOTC has crossed the streams a bit... it appears from Mordenkainen's Tome of Foes (page 177) that the classic drawing is a statue of the archdevil Moloch.  The entry for an Eidolon (page 193) states that it is a sacred undead guardian for the gods to protect the sites they deem holy - the Eidolon jumps into one of the sacred statues at the site and animates the statue with its actions.  Okay, so Moloch has a powerful statline, but the monster isn't a god.  Therefore, while I love the figure, it's not the figure for an Eidolon and its sacred statues - I believe the statues should have more of a Tomb Raider feel (perhaps one of my favorite movie scenes was there in the temple with the statues becoming animated).  Also, I agree with many of the comments on the stat page, I wouldn't wait until a 5/6 to animate a statue, I'd just allow it to jump from one statue to the next.

I also would have preferred this statblock to be huge or gargantuan.  Then I can use my dice tower purchased from Gamespot and animate it, brahahaha.  A recent game with the statue dice tower as a set prop for a temple encounter - also check out the cool t-shirt, lol...


Alright, back to this figure from Wizkids -- again, this was a simple airbrush solution of a dark red to a fiery orange and then given a black wash to tone it all down and pop out the stone cracks.  Give it a proper base and drybrush the greys and it's done.  I did give an attempt at an emerald eye - I still have a long way to go to make realistic gems - I did the inverse dark to light and then a spot of white - it looks okay but not great.  Overall though, I really like the way this one turned out and look forward to unleashing it on my players.


Saturday, June 17, 2023

WizKids Bodaks - WZK90155


I love these monsters - just suck the life out of the characters with their aura and gaze of undead along with the ability to pass a message direct from Orcus - so many role playing opportunities there!  The sculpts on these represent the drawing in the monster manual (Volo's Guide specifically) pretty well and while I'm liking the sculpt and the overall figure, I don't care for the color rendering in the pages of the book.  Therefore I decided to go with something darker and more alien - I sprayed these with Imperial Purple and then the Vallejo Game Air line has a color called Alien Purple or something like that which is a nice highlight.  Airbrush is so freaking awesome!  Then did my standard drybrushing of Cold Grey and Stonewall Grey on the base.  Done!


Saturday, June 10, 2023

Lost Mine of Phandelver - Cultists


Oh these were great fun to paint with the airbrush and simple as well.  I did these two different ways - one group of three was Black to Sombre Grey while the other was a Black to a Stormy Blue.  Each model was sprayed a base coat, then from about a 2:00 position a lighter color and then from the 12:00 position the lightest.  The interesting bit about the airbrush is that the spray has a dithering effect - essentially it's spraying fine dots of paint.  When I look at the model in my hand I can't see the dithering, but when I take a picture of it in high res at 2x or 3x the size the dithering is obvious.  I used a wash to blend in the three layers of sprayed paint.

The washes were a Black Wash and a Blue Wash respectively.  Following that I put together about a 60/40 mix of Sombre Grey with Dead Flesh to paint the face - the idea is I wanted to keep a very subdued/shadowy look to this group.  Finally, I wanted one item of important to each model highlighted - the book with some writing, the dagger, or the flaming skull - which was painted with Goblin Green, Escorpena Green, and Livery Green.  On that model I tried my first attempt at object source lighting (OSL) - whereby the green flames on the skull reflected back on the model as a light source.

This is part of the 3D Dungeon Labs Etsy shop purchase.

Sculpt: Excellent - these were fun sculpts to airbrush with lots of dynamic flowing robes/cloaks and as a group will look great on the tabletop

3D Print: Excellent - well done - clean - no issues anywhere - very solid

Fitness: Good - has the proper base and scale, and while these models make good generic cultists, they're not really dragon cultists - dragon cultists are famous for their dragon masks.


Saturday, June 03, 2023

Lost Mine of Phandelver - Stirge


These were fun - more 3d prints from 3D Dungeon Labs.  I first hit these with the airbrush using a dark red first and then hitting them with a highlight from on top with a pure red.  I followed the airbrush up by bringing them to the desk and hitting the nose, belly, and claws using the schemes that I did with these hand painted Reaper Stirges.

This is part of the 3D Dungeon Labs Etsy shop purchase.

Sculpt: Excellent - these were fun sculpts and as a group will look great on the tabletop

3D Print: Excellent - well done - clean - no issues anywhere

Fitness: Excellent - has the proper base and scale, model matches expectations - very well done.


Friday, June 02, 2023

Lost Mine of Phandelver - Ghoul


Oh I just loved these models - I think they're more ghast looking than ghoul if you look at the 5e Monster Manual - but either way I love the look.  The book has them more grey to white - I went just a slightly different direction with these going from Rotting Flesh to Bone White to Dead White.

The rotting flesh was airbrushed over the entire model.  I then hit them with Bone White at about the 3 o'clock level and then did a final highlight of Dead white at the 12 o'clock position.  The close ups is kinda washed up and hard to see the graduations, but I think the group picture show this better - there's quite a bit a contrast from dark to light.

I thought about taking these to the desk to detail them out and actually did bring them over, but then decided against it as it would have been too time consuming without benefit on these models as I'd have to paint the clothes, the tongues, eyes, intestines, etc. and they have different features as some have clothes and some don't - it just would have broken the art direction I was going for here.

This is part of the 3D Dungeon Labs Etsy shop purchase.

Sculpt: Excellent - more ghast than ghoul but the sculpt itself is really well done.

3D Print: Excellent - well done - clean - no issues anywhere

Fitness: Excellent - has the proper base and scale, model matches expectations with the exception that I would say these are more ghastly than ghoulish, but you can really use either way - and I love that some appear more hobgoblin/monstrous and some human - makes for a nice mix that any creature can become a ghoul/ghast.


Thursday, June 01, 2023

EnderToys - Bone Bridge


This is one of the coolest terrain pieces I've purchased - $15 on Amazon.  I have the perfect adventure for this from Kobold Press within the Underworld Lairs book.  My players are going to lose their minds when I put this on the table.

I started this one off with the airbrush - first hitting it with a black primer.  Then I airbrushed all the bone pieces with Bone White.  Then airbrushed the bridge with Beasty Brown.

Once complete with airbrushing, I brought it onto the desk to clean up overspray - mostly on the black.  I did not drybrush the black with my grey stone treatment that I do to most bases because the model's 3d print is a little bit rough - if there's a negative on this one is that the 3d is a bit coarse - would like to have seen this print with a bit finer settings.


Monday, May 29, 2023

Lost Mine of Phandelver - Wraith


Another great looking model from 3D Dungeon Labs- this one is for the wraith representing the deceased wizard controlling the undead in the mine.  I airbrushed this at the same time as the Banshee but instead of giving it a grey wash I used a watered down black wash instead to more closely resemble the picture in the 5e monster manual.  This model also had a scythe which I cut off to look more like a staff as I think an NPC wizard would be carrying a representation of his staff and not a scythe.

This is part of the 3D Dungeon Labs Etsy shop purchase.

Sculpt: Excellent - another awesome and dynamic sculpt

3D Print: Excellent - well done - clean - no issues anywhere

Fitness: Excellent - has the proper base and scale, model matches expectations with the exception that I cut off the scythe - but I didn't downgrade my score because of it - I think the resulting "staff" looks good.


Sunday, May 28, 2023

Lost Mine of Phandelver - Nothic


Sooo.... this one was a bit of a disappointment - when I was tinkering with the purple Banshee, I also sprayed this one and the reality is that it's just too small of a model to work out with trying to layer on airbrushed highlights.  Maybe when I swap out that finer needle.

Which gets to my next point - this is the Nothic from 3D Dungeon Labs which came in my Lost Mine of Phandelver kit.  Almost all the models get high marks, this one - meh.  It's just too small and doesn't have a lot of great features - it's a baby Nothic.  So here's my analysis...

This is part of the 3D Dungeon Labs Etsy shop purchase.

Sculpt: Good - it's a good sculpt as a baby Nothic - it doesn't knock your socks off as it's just standing there hunched over

3D Print: Excellent - well done - clean - no issues anywhere

Fitness: Average- has the proper base but the scale is off as it should be at least twice the size in width and height - maybe more - a Nothic should fill that medium base.  Also, not a fan of the porcupine look - it's okay, but a bit overdone.


Saturday, May 27, 2023

Lost Mine of Phandelver - Banshee


This model was another printed up by 3D Dungeon Labs and is a really strong looking model for the Banshee encounter - just overall a great looking model - very impressive. I decided to use this model as a fun learning experiment with the airbrush as I was provided a "bonus" model in my received kit.
(there were actually quite a few "bonus" models which is a super nice touch and a major recommendation for using this Etsy shop for 3d prints)

Both of these models I started the same of spraying the entire model first with a dark color.  Then I went to the 3 o'clock position and twirled it around while spraying the model with a lighter color.  Next I loaded the airbrush with the next highlight color and hit it from the 1 o'clock position.  Finally with the brightest highlight from the 12 o'clock position.

The white banshee I then washed with vallejo's Pale Grey wash which blends in the dithering from the airbrush.  The purple banshee I didn't wash as I think it's still plenty dark (and actually photos a bit darker than it actually is in my hand).

Using an airbrush and a wash is a super quick way to get a model like this on the tabletop.  There's some dithering and I'm not sure how to get away from that.  I did purchase Badger's finest needle but I haven't gotten that out yet - in theory the "dots" it sprays should be smaller and then a tighter spray pattern.  I also need to see if spraying at a higher psi will make a difference.  Something I need to experiment with and figure out.

This is part of the 3D Dungeon Labs Etsy shop purchase.

Sculpt: Excellent - another awesome and dynamic sculpt

3D Print: Excellent - well done - clean - no issues anywhere

Fitness: Excellent - has the proper base and scale, model matches expectations - very well done.


Friday, May 26, 2023

Reaper Miniatures Candleabra (Candelabra) - 77138


Yes, it's spelled incorrectly - I wonder if someone should tell Reaper that their website (and I assume packaging) has a spelling error or if they'll just say that's intentional, lmao.  Their website search tags has it spelled correctly.

I needed these for an encounter a while back (yes, used them unpainted, lol) and they've been sitting on my desk since then causing clutter; but I also needed to practice airbrushing metal for a much larger project so I grabbed these as the test subjects.

I sprayed these two candelabras gold with the airbrush and then used a watered down black wash to give it definition.  Then painted the candles white and the flame yellow with red highlights.  Black base and done.

Test complete and I used the same technique for a much larger project I'm looking forward to showing soon.

Kickstarter paint total 177 + 2 Candleabra (Candelabra) = 179


Wednesday, May 24, 2023

Reaper Miniatures Thain Grimthorn, Dwarf Cleric - 77213


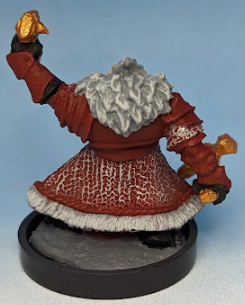
okay, so this has a bit of a funny as to how I came about painting this miniature on a Wednesday night before our Thursday night D&D game.  We're just about done with the Lost Mine of Phandelver campaign that came in the Starter Set and the group voted to keep the current characters and roll into another WOTC campaign.  Originally we just used Discord to keep some notes and we didn't really have character backgrounds.  As we were moving forward into a bigger campaign I generated a private website and asked each player to send me a character portrait and a bit of a background that I could publish.  The dwarven cleric, who originally had this super long name that we all chuckled around the table and simultaneously said doc, sent me a picture of Doc from the Disney cartoon and he was in a red suite.  I'm pretty sure he sent it to me as a joke, but I went with it.  Not only did I put it on the website, but I immediately grabbed this dwarven cleric from my Bones pile and set about painting Doc with red coat and armor.

Painting instructions for Dwarf Cleric (used Reaper paints)...

Step 1: I'm using Stynylrez primer on the bones models - just slop it on and cover everything - it works great!
Step 2: Use Dwarven Flesh on face
Step 3: Use Concrete Grey on beard, fringe, and base
Step 4: Use Arctic Grey on beard and fringe as highlights
Step 5: Use Garnet Red on everything else
Step 6: Drybrush Filigree Silver on chainmail
Step 7: Use Pure Black for gloves and boots
Step 8: Use Dwarven Gold for weapons and tablet

Kickstarter paint total 176 + 1 Dwarf Cleric = 177


Sunday, May 21, 2023

Reaper Miniatures Female Centaur - 77264


One of my current players has another D&D session were he's playing this centaur creature - he asked if I'd paint it and I figured why not.  Completed this on Friday night from start to finish - my goal was to get the best looking mini I could paint within a few hours.

Painting instructions for Female Centaur (used Reaper paints)...

Step 1: I'm using Stynylrez primer on the bones models - just slop it on and cover everything - it works great!
Step 2: Use Charred Brown on the entire model
Step 3: Use Uniform Brown on the horse skin
Step 4: Use Green Ochre as highlights on horse skin
Step 5: Use Faded Khaki as final highlights on horse skin
(those three colors make up the Reaper triad 9127, 28, 29)
Step 6: Drybrush Stained Ivory on the fur
Step 7: Use Desert Tan on the human skin
Step 8: Use Golden Yellow on hair
Step 9: Use Pale Saffron as highlights on hair
Step 10: Use Garnet Red on spear shaft
Step 11: Use Dwarven Gold on spear point and armor plating
Step 12: Use Pure Black on base
Step 13: Drybrush Concrete Grey on base
Step 14: Drybrush Arctic Grey as highlights on base


Saturday, May 20, 2023

D'Artisan Shoppe - WetnDri

I can't recall ever doing a product review but I'm quite pleased with a recent purchase of a wet palette but this also includes a dry (dri) palette.  I came across D'Artisan Shoppe once before on Amazon for some brushes and they were okay but not really my style.  From that initial purchase I occasionally receive product info they send out and I received an advert for their WetnDri palette - I normally just use a paper plate, a folded paper towel, and my own cut out parchment paper that I steal from the kitchen.  It works - but palette was reasonably priced on Amazon so I thought it worth the try - works pretty well!

First - whoever is doing the packaging at the D'Artisan Shoppe is a genius.  The packaging is as good as any coming from Apple, Samsung or Google for a high end electronic product.


The palette comes in this lovely box that when you open, it has this nice Thank You message with a QR code to their website to sign up for more information or to send a message about your product.  Fully opening the package gets you to the palette which has a great strap with their logo holding the three sections together with another note explaining the various features of the palette.  Even the sponge pad has their logo stamped into it...

So how did it work...
Well as you would expect - it's science - the moisture from the pad seeps through the parchment paper  into the paint at about the same rate that evaporation occurs which keeps the paint at a pretty constant  to work with while painting your model.  The parchment paper is included and cut to the dimensions of the pad - I think there's 50 pieces which should last me a long time and I could use my own but quite honestly their prices for the pre-cut on Amazon were reasonable and saves me the labor and effort to do it myself.

Some of the other niceties are the various pieces - there's a bottom piece which holds the water, pad, and parchment paper.  Then there's the middle section which has a dozen or so wells for inks or paint you want to mix - I used one of the wells to setup my drybrush with just the right amount of paint.  Finally there's a top piece which works with a paintbrush holder to keep your brushes organized while you paint.  The entire setup is rather nifty.

Here's a picture of the next day after an evening of painting (you can see the primered model in the earlier pictures and the finished model below) - the paint remains decently usable even though I left it all open overnight (probably would be perfect if I put the middle section on the bottom to keep it sealed) because I was done with the model and didn't actually need the paint anymore.


This ends up being the product I didn't know I actually needed - two thumbs way up!

Monday, May 15, 2023

WizKids Spectator and Gazers - WZK73717


Looks like it has been awhile since I broke open a WizKids model - I have so many great models but they've taken a backseat to the specific ones I needed for the campaigns I'm running.  Actually, I grabbed this one because the model that came in the Lost Mines set that I purchased off Etsy is a Beholder and not a Spectator (the Beholder is a wicked cool print and I'll work on it another time) and I happened to have this model sitting in a bag of monsters to paint.

This set also comes with a couple of Gazers - I slapped some paint on them as well.

Painting instructions for Spectator (used my Vallejo Game Color)...

Step 1: No need to primer - already done
Step 2: Use Sick Green on body and stalks
Step 3: Use Vallejo Game Wash watered down on body and stalks
Step 4: Use Goblin Green to highlight body and stalks
Step 5: Use Royal Purple on main eye and gums
Step 6: Use Hexed Lichen on mouth and tongue
Step 7: Use Warlord Purple on tongue and as highlights on gums
Step 8: Use Squid Pink on tongue
Step 9: Use Scorpion Green on stalk eyeballs
Step 10: Use Black to carve out the eyeball and base
Step 11: Use Bonewhite to carve out the eyeball and teeth
Step 12: Use Dead White on eyeball and teeth
Step 13: Use Black to place slit in eyeball and stalk eyeballs
Step 14: Drybrush Cold Grey on base
Step 15: Drybrush Stonewall Grey on base