Wednesday, May 24, 2023

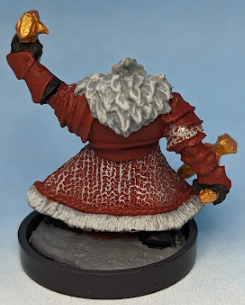
Reaper Miniatures Thain Grimthorn, Dwarf Cleric - 77213


okay, so this has a bit of a funny as to how I came about painting this miniature on a Wednesday night before our Thursday night D&D game.  We're just about done with the Lost Mine of Phandelver campaign that came in the Starter Set and the group voted to keep the current characters and roll into another WOTC campaign.  Originally we just used Discord to keep some notes and we didn't really have character backgrounds.  As we were moving forward into a bigger campaign I generated a private website and asked each player to send me a character portrait and a bit of a background that I could publish.  The dwarven cleric, who originally had this super long name that we all chuckled around the table and simultaneously said doc, sent me a picture of Doc from the Disney cartoon and he was in a red suite.  I'm pretty sure he sent it to me as a joke, but I went with it.  Not only did I put it on the website, but I immediately grabbed this dwarven cleric from my Bones pile and set about painting Doc with red coat and armor.

Painting instructions for Dwarf Cleric (used Reaper paints)...

Step 1: I'm using Stynylrez primer on the bones models - just slop it on and cover everything - it works great!
Step 2: Use Dwarven Flesh on face
Step 3: Use Concrete Grey on beard, fringe, and base
Step 4: Use Arctic Grey on beard and fringe as highlights
Step 5: Use Garnet Red on everything else
Step 6: Drybrush Filigree Silver on chainmail
Step 7: Use Pure Black for gloves and boots
Step 8: Use Dwarven Gold for weapons and tablet

Kickstarter paint total 176 + 1 Dwarf Cleric = 177


Sunday, May 21, 2023

Reaper Miniatures Female Centaur - 77264


One of my current players has another D&D session were he's playing this centaur creature - he asked if I'd paint it and I figured why not.  Completed this on Friday night from start to finish - my goal was to get the best looking mini I could paint within a few hours.

Painting instructions for Female Centaur (used Reaper paints)...

Step 1: I'm using Stynylrez primer on the bones models - just slop it on and cover everything - it works great!
Step 2: Use Charred Brown on the entire model
Step 3: Use Uniform Brown on the horse skin
Step 4: Use Green Ochre as highlights on horse skin
Step 5: Use Faded Khaki as final highlights on horse skin
(those three colors make up the Reaper triad 9127, 28, 29)
Step 6: Drybrush Stained Ivory on the fur
Step 7: Use Desert Tan on the human skin
Step 8: Use Golden Yellow on hair
Step 9: Use Pale Saffron as highlights on hair
Step 10: Use Garnet Red on spear shaft
Step 11: Use Dwarven Gold on spear point and armor plating
Step 12: Use Pure Black on base
Step 13: Drybrush Concrete Grey on base
Step 14: Drybrush Arctic Grey as highlights on base


Saturday, May 20, 2023

D'Artisan Shoppe - WetnDri

I can't recall ever doing a product review but I'm quite pleased with a recent purchase of a wet palette but this also includes a dry (dri) palette.  I came across D'Artisan Shoppe once before on Amazon for some brushes and they were okay but not really my style.  From that initial purchase I occasionally receive product info they send out and I received an advert for their WetnDri palette - I normally just use a paper plate, a folded paper towel, and my own cut out parchment paper that I steal from the kitchen.  It works - but palette was reasonably priced on Amazon so I thought it worth the try - works pretty well!

First - whoever is doing the packaging at the D'Artisan Shoppe is a genius.  The packaging is as good as any coming from Apple, Samsung or Google for a high end electronic product.


The palette comes in this lovely box that when you open, it has this nice Thank You message with a QR code to their website to sign up for more information or to send a message about your product.  Fully opening the package gets you to the palette which has a great strap with their logo holding the three sections together with another note explaining the various features of the palette.  Even the sponge pad has their logo stamped into it...

So how did it work...
Well as you would expect - it's science - the moisture from the pad seeps through the parchment paper  into the paint at about the same rate that evaporation occurs which keeps the paint at a pretty constant  to work with while painting your model.  The parchment paper is included and cut to the dimensions of the pad - I think there's 50 pieces which should last me a long time and I could use my own but quite honestly their prices for the pre-cut on Amazon were reasonable and saves me the labor and effort to do it myself.

Some of the other niceties are the various pieces - there's a bottom piece which holds the water, pad, and parchment paper.  Then there's the middle section which has a dozen or so wells for inks or paint you want to mix - I used one of the wells to setup my drybrush with just the right amount of paint.  Finally there's a top piece which works with a paintbrush holder to keep your brushes organized while you paint.  The entire setup is rather nifty.

Here's a picture of the next day after an evening of painting (you can see the primered model in the earlier pictures and the finished model below) - the paint remains decently usable even though I left it all open overnight (probably would be perfect if I put the middle section on the bottom to keep it sealed) because I was done with the model and didn't actually need the paint anymore.


This ends up being the product I didn't know I actually needed - two thumbs way up!

Monday, May 15, 2023

WizKids Spectator and Gazers - WZK73717


Looks like it has been awhile since I broke open a WizKids model - I have so many great models but they've taken a backseat to the specific ones I needed for the campaigns I'm running.  Actually, I grabbed this one because the model that came in the Lost Mines set that I purchased off Etsy is a Beholder and not a Spectator (the Beholder is a wicked cool print and I'll work on it another time) and I happened to have this model sitting in a bag of monsters to paint.

This set also comes with a couple of Gazers - I slapped some paint on them as well.

Painting instructions for Spectator (used my Vallejo Game Color)...

Step 1: No need to primer - already done
Step 2: Use Sick Green on body and stalks
Step 3: Use Vallejo Game Wash watered down on body and stalks
Step 4: Use Goblin Green to highlight body and stalks
Step 5: Use Royal Purple on main eye and gums
Step 6: Use Hexed Lichen on mouth and tongue
Step 7: Use Warlord Purple on tongue and as highlights on gums
Step 8: Use Squid Pink on tongue
Step 9: Use Scorpion Green on stalk eyeballs
Step 10: Use Black to carve out the eyeball and base
Step 11: Use Bonewhite to carve out the eyeball and teeth
Step 12: Use Dead White on eyeball and teeth
Step 13: Use Black to place slit in eyeball and stalk eyeballs
Step 14: Drybrush Cold Grey on base
Step 15: Drybrush Stonewall Grey on base


Sunday, May 14, 2023

Lost Mine of Phandelver - Bugbear


I've really enjoyed painting these monsters printed up by 3D Dungeon Labs, but I think these bugbears are my favorite so far.

It was back to the spray booth with these.  I hit these first with the airbrush of an orange - I did it without a primer and I probably should have used a white primer first.  The sprayed orange was a bit translucent to the gray material underneath and ended up looking like a dingy orange/brown.  I think I ended up spraying two more coats of orange before I was happy.  I then brought them onto desk for a drybrush of Orange Fire.  I then did the leather armor black as a strong contrast against the orange and then Gunmetal Metal on all the spikey bits and the weapons.  I love that a few of these guys have potion bottles on them and I used Livery Green to give it a bit of a pop.  Again, the basing of these is black as I'm going with the design language of the D&D pre-painted figures.

This is part of the 3D Dungeon Labs Etsy shop purchase.

Sculpt: Excellent - this is an awesome sculpt - outstanding - I loved how oversized they are on the base - I believe these guys are one of the biggest critters to still be considered medium - oh, and a couple of them carrying doors for shields - frickin' awesome!

3D Print: Excellent - well done - clean - no issues anywhere

Fitness: Excellent - has the proper base and scale, model matches expectations - very well done.


Thursday, April 13, 2023

I've Been Painting and Playing D&D (and Collecting T-Shirts)

Okay, okay - it's gone on long enough - I'm surprised myself that I haven't posted in over a year - but I've been painting miniatures, playing d&d, collecting t-shirts like these below, and I received a brand new toy for Christmas in an airbrush - very exciting.


I started with the basic box way back in 1979 (I received the box with chits instead of dice because there was a dice shortage as the game started to grow in popularity).  The rules book had a blue cover with the blue and white drawing of adventurers attacking a dragon sitting on his hoard of treasure - when I saw that t-shirt it was an instant purchase.  If you want to play more D&D, then you need an I Love My Wife t-shirt - she can't say no when you're wearing that t-shirt, lol!

Oh, the airbrush - yes!  I've been thinking about an airbrush for years but was always hesitant - well that changed when one was gifted under the tree this past holiday - so I had a new light installed in the garage where I setup a card table and do my thing.  I have everything in two bins and can be airbrushing within five minutes...


Expect to see more posts as I've started to get the camera out - I'm going to backdate several posts both in 2022 and at the beginning of 2023.  I'll do my best to slot them in order of being painted and as I do so I'll link them and edit this post with links to all the backposts.  I'll also do a posting of airbrushing thoughts as I watched a lot of videos and did quite a bit of accessory purchasing in January prior to actually starting to airbrush in February.

Backdated Posts:
=================

Feb. 11, 2022 - Reaper Miniatures Orc Warrior
Feb. 12, 2022 - Reaper Miniatures Orc Warrior of Kargir
Feb. 13, 2022 - Reaper Miniatures Orc Warrior of Kargir
Feb. 14, 2022 - Reaper Miniatures Orc With Axe
Apr. 16, 2022 - Reaper Miniatures Dragonman Warrior
Jun. 10, 2022 - Reaper Miniatures Galadanoth, Elf Sniper
Jun. 11, 2022 - Reaper Miniatures Vernone, Ivy Crown Knight
Jun. 12, 2022 - Reaper Miniatures Juliette, Female Sorceress
Jun. 13, 2022 - Reaper Miniatures Cuth Wolfson, Barbarian
Jun. 14, 2022 - Reaper Miniatures Hobgoblin Warriors
Jun. 15, 2022 - Reaper Miniatures Eando Kline
Nov. 05, 2022 - Reaper Miniatures Basilisk
Nov. 06, 2022 - Reaper Miniatures Razormouth
Dec. 17, 2022 - Reaper Miniatures Giant Cobra
Feb. 04, 2023 - Lost Mine of Phandelver - Green Dragon 
Feb. 11, 2023 - Mantic Games Abyssal Gargoyles 
Feb. 13, 2023 - Lost Mine of Phandelver - Flameskull
Feb. 18, 2023 - Reaper Miniatures Maggotcrown Ogre Juggernaut
Feb. 19, 2023 - Lost Mine of Phandelver - Ochre Jelly
Feb. 25, 2023 - Lost Mine of Phandelver - Ash Zombies
Feb. 26, 2023 - Lost Mine of Phandelver - Twig Blight
Mar. 04, 2023 - Lost Mine of Phandelver - Giant Spider
Mar. 12, 2023 - Lost Mine of Phandelver - Wolf
Mar. 19, 2023 - Lost Mine of Phandelver - Skeleton
Mar. 25, 2023 - Lost Mine of Phandelver - Grick
Apr. 02, 2023 - Lost Mine of Phandelver - Dwarf


Sunday, April 02, 2023

Lost Mine of Phandelver - Dwarf


This is one of two dwarfs that I received in the kit - which is a bit strange as there are three dwarves that are specific to the plot - although the potential is only for any 2 to be on the table at any given time and most likely you'll only have 1.  However, each has a pivotal plot point and it would be nice to have different models for each.  With that said, I got a kick out of the two models included - and this one is the first painted.

This is part of the 3D Dungeon Labs Etsy shop purchase.

Sculpt: Excellent - this is an awesome sculpts and the I love all the gadgets and the lantern

3D Print: Excellent - well done - clean

Fitness: Excellent - has the proper base and scale, model matches expectations


Back to painting at the desk - no airbrush involved on this one!

Painting instructions for Dwarf (used my Vallejo Game Color)...

Step 1: I'm using Stynylrez primer on the bones models - just slop it on and cover everything - it works great!
Step 2: Use Dwarf Skin on flesh
Step 3: Use Ghost Grey on beard and eyebrows
Step 4: Use Beasty Brown on pipe and steins
Step 5: Use Magic Blue on clothes
Step 6: Use Gory Red on axe handle
Step 7: Use Bloody Red on potion bottles
Step 8: Use Leather Brown on leather
Step 9: Use Camo Green on canteen and bedroll
Step 10: Use Bonewhite on horn
Step 11: Use Moon Yellow on lantern
Step 12: Use Gunmetal on all metal
Step 13: Use Bright Bronze on the top of axe
Step 14: Use Black on base
Step 15: Use Flesh Wash on face
Step 16: Use Pale Grey Wash on beard
Step 17: Use Blue Wash on clothes
Step 18: Use Game Wash on all metallic
Step 19: Use watered down Game Wash on all leather and other bits

Saturday, March 25, 2023

Lost Mine of Phandelver - Grick


Gricks are one of my favorite low level monsters in the game - they receive damage resistance versus non-magical weapon attacks and if their tentacles hit they get an extra beak attack - just love 'em!   They also remind me of something out of Aliens or from Resident Evil.  These models look great - particularly like the ones climbing up the column - and I received 8 of these buggers.

I sprayed these green with the airbrush to start.  Then came in with Camo Green on the underbelly, Orange Fire on the beak, Tentacle Pink on the tentacles, Stonewall Grey on the column.  I made a Dark Green wash for the critter and used the Pale Grey wash on the column.  Then painted the base Black.

This is part of the 3D Dungeon Labs Etsy shop purchase.

Sculpt: Excellent - this is an awesome sculpt and really brings the depiction in the monster manual alive

3D Print: Good- well done - for the most part it's clean, but I don't know a lot about the latest 3d printing but if I was to guess I'd say these printed sideways and had support posts as there's a bunch of micro bumps on the back that popped out when I did the dark green and pale grey washes

Fitness: Excellent - has the proper base and scale, model matches expectations


Saturday, March 18, 2023

Lost Mine of Phandelver - Skeleton


I absolutely love these skeletons - I received a dozen - a number of them marked as bonus.  They're fantastic looking and as I've already noted in previous posts I'm really impressed with the durability of the 3d print - no issues with the weapons nor the skelly arms.

Well this was an interesting paint that I think at the end turned out pretty well but had some issues along the way - mainly in using the Vallejo Game Wash - it's just too dark.  So I pulled out the airbrush on these dozen models and hit them up with Bonewhite.  Then I hit them with the Game Wash and it went so dark - the leather bits is the end result.  So I repainted by hand the skull and bones.  Then I figured it needed some color - so I used Regal Blue on all remnants of pants and Gory Red on weapon shafts or shields.  Then I used Gunmetal on weapon blades and a Black base.

This is part of the 3D Dungeon Labs Etsy shop purchase.

Sculpt: Excellent - this is an awesome set of sculpts and the group together looks awesome

3D Print: Excellent - well done - clean

Fitness: Good - has the proper base and scale, but... while I absolutely love all the sculpts, it technically doesn't match the module - early on in the crypts there's a few human skeletons - but when going through the mine, there are dwarf and orc skeletons everywhere from the great war that occurred there centuries ago and a number of them animate because of the corrupted wild magic - if the kit contained 4 human, 4 dwarf, and 4 orc then I would rate this excellent - but as is, it's good but doesn't provide the look and feel that fits the history of the mine


Saturday, March 11, 2023

Lost Mine of Phandelver - Wolf


So these were a bit of an experiment with the airbrush as I'm starting to get the hang of using and wanted to see what I could do with another group of models - this time I received 9 wolves which is more than enough for any of the planned encounters in the module.

The first pass on the models was with Beasty Brown.  Then I hit the tops of the model with Scarlet Red to give it some color on top.  Finally I hit the legs and the underbelly with Bonewhite.  A Black base and the pack is complete!

This is part of the 3D Dungeon Labs Etsy shop purchase.

Sculpt: Excellent - this is an awesome set of sculpts and the pack look is awesome

3D Print: Excellent - well done - clean

Fitness: Excellent - has the proper base and scale, model matches expectations


Saturday, March 04, 2023

Lost Mine of Phandelver - Giant Spider


I love these giant spiders as they were spectacular to paint up and they look wicked awesome.

I hit these first with the airbrush of a blue.  Then brought them onto desk for a drybrush of Lightning Blue and then I hit the legs first with Scarlet Red and then I used Bloody Red on top.  Paint the eyes, pincers, and base Black.

This is part of the 3D Dungeon Labs Etsy shop purchase.

Sculpt: Excellent - this is an awesome sculpt - outstanding - the connection points to the base are a bit touchy and I had to use some extra glue there which I hid by painting black to conceal it into the base

3D Print: Excellent - well done - clean - I noted with the Twig Blights that I'm impressed with the strength of the printed material - have had no issues with legs as the material has taken travel and game play abuse

Fitness: Excellent - has the proper base and scale, model matches expectations - however, and I almost downgraded this to Good, the module needs 4 and the kit only comes with 2 - there are 2 needed during an encounter in Thundertree, however the end game encounter at the temple needs 4 - therefore I technically can't complete the final game encounter without bringing in other models


Sunday, February 26, 2023

Lost Mine of Phandelver - Twig Blight


This was my second hoard of minis - although 8 is a far cry from 23 ash zombies, the airbrush was again a welcome method of getting the job done.  I hit the entire model with brown - I probably could have done a top coat of a highlight brown much like with the zombies, but I knew that I was going to spend some time picking out some of the growth items like leaves, fungus, and mushrooms.  Again, like the ash zombies I decided not to black out the base as I wanted to add some color to the objects on the base.

This is part of the 3D Dungeon Labs Etsy shop purchase.

Sculpt: Excellent - this is an awesome sculpt and does a better job than the monster manual in my opinion

3D Print: Excellent - well done - clean - and I'm impressed with the strength of the printed material - these prints have lots of tiny bits sticking out and they've lasted without breaking through case travel and gameplay

Fitness: Excellent - has the proper base and scale, model matches expectations -  although I'm sure the model count in the set matched the module, I probably could have used a few more bonus twig blights as my players split up the party at times and I had twig blights popping out of every bush and tree

Saturday, February 25, 2023

Lost Mine of Phandelver - Ash Zombie


This was my first hoard of minis which I sprayed with the airbrush and is really where using the airbrush gets its time in the spotlight.  I had 23 of these minis which, if you think about doing that by hand, it would be so laborious.  Instead, I shot these first from all angles with Plague Brown and then only from the top with Dead Flesh.  I followed that up with painting the outside edge of the base with Black.

I love these minis - the idea of these ash zombies popping up and forming from the volcanic ash of Mount Hotenow is awesome.  What's makes it great is multiple figures on a base and all the little detail like one zombie's hand on the head of another to lift himself up, lol - that awesome!  

This is part of the 3D Dungeon Labs Etsy shop purchase. So let's give it some ratings...

Sculpt: Excellent - this is an awesome sculpt and really brings the idea forward of a hoard of zombies popping up out of the ash

3D Print: Excellent - well done - clean

Fitness: Excellent - has the proper base and scale, model goes beyond my expectation with the multitude of figures - normally you just get a single zombie - my players did ask if each figure on the base had its own stats - lol - no, I just used one stat block per figure

I did get away from my art "design/language" on this one with the base.  What I've been going for with these models is to be similar to the Wizkids pre-painted models which is a primary model color, a couple of splashes of additional color to highlight model features, and then a black base.  Trying to paint the base black here would lose the efficiencies gained by using the airbrush and I feel that the base ash is actually part of the model design where these zombies form from the ash itself - therefore I simply painted the edge of the base black.


Sunday, February 19, 2023

Lost Mine of Phandelver - Ochre Jelly


Back to solid colors from the metallic and more learning with the airbrush.  This time starting with a yellow-green working to a yellow.  I think finished this one up on the paint bench and hand brushing brighter yellow highlights.

This is part of the 3D Dungeon Labs Etsy shop purchase.

Sculpt: Good- there might not be a lot you can do with a blob of oozing jelly, and this does get its inspiration from the monster manual, but it just doesn't meet that same wow factor that the other miniatures of the set achieve nor does it have a base (I added my own)

3D Print: Good - it's a clean print, but it does suffer from its sides curling up so the bottom is not flat - I really wanted to put this on the top side of the base but it wouldn't look good as there's quite a bit of curl and it wouldn't sit flat.  So instead I flipped the base and super glued it inside.

Fitness: Good - has the proper scale, model matches expectations - could have used this model scaled down on the 3d printer into some medium sized models because when an Ochre Jelly is attacked with lightning or slashing damage (most likely low level characters are going to swing a sword at it), the jelly splits from one large creature into two medium creatures.

My takeaway is that yellow allows colors underneath to bleed through - the yellow looked bright when first sprayed on the model, but then became more transparent to the colors underneath when it dried - probably should have added some white to the yellow while airbrushing as I've found that yellow is more opaque and covers quite well - adding white to a color gives it better coverage.

Saturday, February 18, 2023

Reaper Miniatures Maggotcrown Ogre Juggernaut - 44011


This miniature is sitting on a 2" base and is pretty good size - basically it's an undead ogre - full title is Bones Black: Maggotcrown Ogre Juggernaut - it is part of the Bones Black line but I'm not sure why it uses the Bones Black in the title as there isn't a metal nor an original Bones version of this model (looking at Reaper's website there's only a handful which use the Bones Black in the naming of the figure).  

This is the first Bones Black miniature that I've painted and in my opinion much better than the original Bones material.  It's a bit harder, more rigid (but still has some flex which is good to keep paint from chipping on a drop), and holds detail much better.  Pricing appears to be about the same as the original Bones material.

After airbrushing the core colors in the previous three models, I wanted to test what it's like spraying metallic paint through an airbrush.  I used the base metal color in the Vallejo Air kit that was actually considered a primer.  It laid down beautifully - far better than I expected.  Normally I'd do a model like this with a black undercoat and then a lot of drybrushing.  Spraying down metal give the model an awesome look - very smooth and the metal dries in perfect flat without sheen.  I then used Vallejo Game Wash and a size 8 brush to carefully apply lots of wash to give the metallic paint depth and shadow.  I layered up the skull from a Filthy Brown, Bonewhite, Dead White and then a light Flesh Wash to tone it down.  Drybrushing of Cold Grey, Stonewall Grey, and DeadWhite on the base and that's it!

Rarely is there a model that I say oh that was easy and it looks great - usually it's a scale of effort to results - more effort = better results but less miniatures to the table and less effort = okay results but more miniatures to the table (the story of 2022).  I'm really liking what the airbrush can do to provide less effort and better results which equals more miniatures that look great!