Friday, July 30, 2021

Bolt Action German


This was figure #1 for a Bolt Action German army which was a test bed for the color selections and some more experimentation on dipping (I'm still trying, lol).

Normally I paint fantasy miniatures which are either unique or maybe a small handful of monsters which create an encounter.  My son has a German army for the tabletop war game Bolt Action.  As we have some fifty guys to paint I decided to do one first as a test for a simple color scheme as well as the dip can for shading.

I used Reaper's paints as they had the best colors for the job - a medium grey for the helmet, field grey (which is more green than grey which is historically accurate), military grey for the pants, and black for boots and bits.  Bolt Action is a beer and pretzels game and not a historically accurate game - so my goal was something closely representing in the "it's good enough" category.  After blocking in the colors I then dipped it straight into Vallejo's Game Wash.

It's just too dark.  I've come to the conclusion that you can't really dip it.  

So I did a group of six models and used a mix that was about 1/3 wash and 2/3 water.  Instead of dipping I used a fat 8pt brush to spread the wash onto the model.  That's better.


Since then, we've some more units and we increased the wash a bit somewhere between 40/60 and 50/50.  That appears to be the right amount for this Vallejo Game Wash and not obliterating the model.


Thursday, July 15, 2021

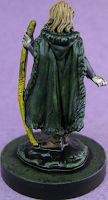
Reaper Miniatures Aeris, Female Elf Ranger - 77405


This was an interesting experiment or I should say continued experiment with Vallejo's Game Wash Dipping Formula.  My first go with the product was the Wizkids Bone Naga and then the second go was the Reaper Giant Wererat whereby I tweaked the application with the idea of watering it down, using a brush, being more specific and controlled in the wash.  I wanted to go back to the idea of dipping a model into the product as the product has "Dipping" in the name and I had a thought that this might work better with a "normal" sized miniature which has been block painted.  

By block painting I mean no highlights nor shadows - just painting sections or blocks of the miniature with a single color - face is pale, hair is yellow, cloak is green, leather is brown, pants are purple, and bow is yellow/brown.  This miniature was one painted by my wife at the beginning of a Dungeons and Dragons campaign and therefore was the perfect test bed.  No fancy highlights, shadows, blending, glazing, drybrushing or anything else - this is a simple as it gets - open a pot of paint and use that to color block each feature of the mini (almost like a coloring book and a box of crayons).  

Done with care, it can look quite good on the tabletop and it's easy for beginners.  I love teaching the art of miniature painting and my players love painting their character at the start of a campaign.  And that works on the tabletop.  So here's the test - can it look better with almost no effort other than dip in a can of wash?  So that's what I did - I dipped the model upside down in the wash - shook/tapped off as much of the wash as possible over the pot - then stood the model upright and let dry with no additional touches by me.  

The result - not bad!  The dip provided the concept of blacklining by residing in the areas between blocks of features (example the face from the hair and the face from the cloak).  It provided depth and dimension in the hair, fur on the cloak, and the leather armor and boots as well as facial features such as eyes, nose and mouth.  By standing the model upright to dry the remaining wash naturally went to the downwards side of the model and thereby produced the shadows one would expect.  The bad... it's a bit sloppy and the maybe I could have used a paintbrush with some water to take away the wash off the bow for better results.  Additionally it dries with a super high sheen which can be overcome with a can of matte finish and that will protect the model through all the game day abuse.  

Overall, it's a great way to provide quick depth to a model for the game table with practically no effort.  I have to paint about a 50 unit army of Germans for the beer and pretzel tabletop game Bolt Action - a very simple WWII game that's lots of fun to play with friends, a few beers and snacks.  I think a simple paint job on each model and a dip in the game wash pond is going to be the ticket for success - look forward to future blog posts on that!

This came out of the pile of bones Kickstarter minis...

Kickstarter paint total: 152 + 1 Elf Ranger = 153


Sunday, July 11, 2021

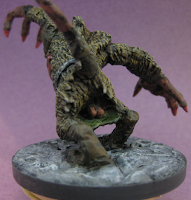
Reaper Miniatures Giant Wererat - 77292


Quickly following up on the Bone Naga; I finished this up mid-week and did a stream on twitch which, for the next couple of weeks, you can catch the 2 hour session - https://www.twitch.tv/videos/1080162462

This model was ideal for trying out the Vallejo Game Wash Dipping Formula but with the adjustments of stirring the pot, watering down the mix, and using a brush versus dipping the entire model.

Painting instructions for Giant Wererat (used my Vallejo Game Color)...

Step 1:  I'm using Stynylrez primer on the bones models - just slop it on and cover everything - it works great!
Step 2: Use Charred Brown over the entire fur (almost the entire model)
Step 3: Drybrush Beasty Brown over the entire fur
Step 4: Drybrush Scrofulous Brown over the entire fur
Step 5: Wash with Game Wash Dipping Formula (66/33 mix with brush - don't dip) over entire fur
Step 6: Use Tan on the flesh bits - hands, tail, mouth, nose
Step 7: Wash with Game Wash Dipping Formula (66/33 mix with brush - don't dip) over all flesh
Step 8: Use Leather Brown on the teeth and as highlights on the face fur
Step 9: Use Bonewhite on the teeth leaving the Leather Brown as the root
Step 10: Use Dead White on the teeth as final highlight
Step 11: Use Black on eyes and in the recesses of the exposed muscles/guts
Step 12: Use Scarlett Red on tongue, claws/nails, and exposed muscles/guts
Step 13: Use mix of Scarlett Red and Tan and highlight tongue and on the exposed muscles/guts
Step 14: Use tan as final highlight on exposed muscles/guts
Step 15: Use Bloody Red on eyes and highlights on claws/nails
Step 16: Use Hot Orange as final highlights on claws/nails
Step 17: Use Black on the belt chain
Step 18: Use Gunmetal Metal on belt chain
Step 19: Wash with Game Wash Dipping Formula (66/33 mix with brush - don't dip) over belt chain
Step 20: Use Camouflage Green on loin cloth
Step 21: Use mix of Camouflage Green and Bone White on loin cloth as highlights

Kickstarter paint total: 151 + 1 Giant Wererat = 152


Monday, July 05, 2021

WizKids Bone Naga - WZK90086


This was an "interesting" experience/experiment.  I'm always on the quest for well painted miniatures for tabletop gameplay that can be painted quickly.  To that end, one of the techniques I've heard quite a bit about is "dipping" whereby you dip the painted miniature in a wash that then gives it depth.  Vallejo had recently come out with a very large pot they call "Vallejo Game Wash Dipping Formula".  The instructions say it's the perfect finish for miniatures... quickly creates shadows and instantly brings volume and depth.  Furthermore it says to shake well before using.

I figured the perfect miniature to test this on was a skeletal model - right - how easy - throw some layers of bone on, dip, and done!  Well, my experience wasn't great - maybe I'm just too picky but the end result was a mottled mess.

For the next few weeks you can catch it all on twitch - https://www.twitch.tv/videos/1077080014

I used my traditional layering technique going from a desert yellow to bone to white.  I was super happy with the look I was getting - if anything, maybe it just needed a wash of the base color desert yellow just to smooth out the layers.  However I went with giving it the dip - here are my thoughts...

  • Instructions were to shake - bad idea James Bond - the wash becomes an air bubble mess - I think it would have been better off stirred.  Will stir as needed next time.
  • Instructions say to dip the model into the pot - it came out a big bubbly mess with a thick wash that sticks on everything including hands (and I've washed five times and it's still on the hands).  It dries rather quickly and is a bit sticky until it does so.  The directions also say to remove the excess quickly - which I did using a number 8 brush and I did a combination of pulling the wash off as well as watering it down.  Next time, no dipping... I'll try using a brush along with thinning it down with a bit of water so it's more like a true wash.
  • The wash mottled the model - because of the centipede feet, the wash just clung to each bony protrusion and darkened/blacked-out the model's highlights with a wash that was bubbly (because of the shaking we did initially to the pot) and hard to control because it was drying faster than I could get the excess pulled off or watered down.  Additionally the pooling of the wash doesn't necessarily go where you want it.
  • The bottle says quick and easy way to achieve realistic shading effects - I think it just made the model very monochromatic in the black and white scale.

I know people have written blogs and rant and rave over YouTube on how awesome dipping is to quickly bring shadows and a finished look to miniatures. Maybe bone/skeletal critters aren't the answer for this wash technique and color?  Also, the model itself might not be conducive to dipping whereas a more solid piece without fifty protrusions is a better choice?  Also, I think the idea is to paint at the highlight layer, dip, and go.  I'll keep testing - but please put any thoughts in the comments below.

Painting instructions for Bone Naga (used Vallejo)...

Step 1: No need to primer - already done.
Step 2: Use Desert Brown to base model
Step 3: Use mix of Desert Brown and Bonewhite for a layer of highlights
Step 4: Use Bonewhite for the main highlights
Step 5: Use mix of Bonewhite and Dead White for final highlights
Step 6: Stop here or us a wash of Desert Brown to tone down the contrast if needed - Game Wash dipping formula not recommended

I hit my model up with a protective coating of matte clear and it will look great on the game table and I'm sure I'll still get lots of oohs and aahhs.