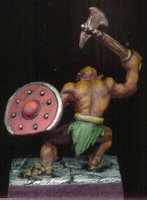


This group of orcs have been painted very quickly for a tabletop look. There are less transitional layers - more contrast. However, I didn't want to paint, wash, drybrush. I still wanted the figs to have a good looking paintjob. So the technique is layered, but without the normal blended look. I also skipped out on some detail work such as the eyes, belt buckles, and the like. The idea in the end is to go with a unified look that works on the tabletop.
Painting Instructions for Reaper Miniature's Orcs:
Step 01: Undercoat models with black primer
Step 02: Use Boltgun Metal on all metal bits
Step 03: Mix some Flesh Wash (2x), a bit of Red Ink a bit of Yellow Ink onto metal bits as a rust affect
Step 04: Lightly drybrush Boltgun Metal on all metal bits
Step 05: Use Dark Flesh on skin
Step 06: Use Vermin Brown to highlight skin
Step 07: Use Leprous Brown as final highlight on skin
Step 08: Use Scorched Brown on wood (including back of shields)
Step 09: Use Bestial Brown as drybrush on wood (line back of shields)
Step 10: Use Vomit Brown as drybrush on wood (highlight line back of shields)
Step 11: Use very light drybrush of Bleached Bone on wood
Step 12: Wash drybrush with Bestial Brown
Step 13: Use Snakebite Leather on leather (leave black lines)
Step 14: Use Bubonic Brown as heavy highlight on leather
Step 15: Use Scab Red on shield
Step 16: Highlight shield with Blood Red
Step 17: Use Boltgun Metal on metal bits of shield
Step 18: Use Chaos Black on sides of base and rocks
Step 19: Drybrush Codex Grey on rocks
Step 20: Drybrush Fortress Grey on rocks
Step 21: Drybrush Skull White on rocks
1 comment:
Reaper models 2124, 2262, 2272, 6017
Post a Comment