Tuesday, September 05, 2023

Reaper Miniatures Death Shroud - 3723 and Another Even More Contrast Paint


Like the ghost, I found another model that I could use a single Vallejo Xpress Color to use on the model - and like the ghost, the Death Shroud is a wonderful metal model - I just love metal models and this model has an awesome stance and flow.

I took what I learned from the ghost in regards to applying the paint and this time tried pulling the paint down so that it would pool more at the bottom and in the underneaths of the model. As I was being more deliberate with the technique of the brushstroke, I was more successful - not perfect, but definitely a better job of using the brush to guide the settling of paint.


Monday, September 04, 2023

Reaper Miniatures Lurien, Ghost - 3170 and Even More Contrast Paints


Back to the metal - I love metal - don't ever take my metal away! Just something nice about the feel and weight of a metal model that is lovely.

And back to the contrast paints - or as Vallejo call them Xpress Color. This time I wanted to try a metal model undercoated with white and I figured this ghost was perfect. No need to overthink this - just apply a single color.

This is another interesting experiment because the paint wants to dive into the depths of the model - which is fine but doesn't necessary mean that it's going to leave the highlights and shadows that you'd normally give a model thinking about the light source. On the other hand it does give the model character and depth with little to no effort. I was also able to manipulate the paint a little bit before it starts to set and dry. You can kind of pull it to thin it down in areas to give a lighter effect - but it's a bit tricky. Some areas I was successful on and others not so much.


Sunday, September 03, 2023

Reaper Miniatures Owlbear - 77156 and More with Contrast Paints


This owlbear has been sitting on my desk based for quite awhile and I had the perfect experiment for it - some more playing around with Contrast Paints - I'm using Vallejo's version called Xpress Color. They're hard to find in stock and therefore I have a limited pallet of Brown, Blue, Green, and Grey. Which is fine as I don't want to go crazy in investing in a new paint line without doing some more testing. The first was the freebie woodland fey creature which was a 3d printed model.

This is my first attempt at trying it on a Bones model - this is the original white bones which came from one of the early kickstarters. I didn't do anything special to it - no primer, nothing - I just wanted to see what would happen if I started slathering this new paint directly over a bones model.

The end result is okay. The paint pools into the depths leaving it light on top and dark in the recesses. The painting was quick and what I learned from the first model is I had to be careful painting within the lines. So with that level of care I literally slapped paint on as quickly as possible to see what I could get - sort of the situation every DM gets into - the game's tonight and you just thought of this great idea and you need to grab that non-painted mini off the shelf and get it ready for tonight's game. Certainly within 30 minutes you can have a respectable mini to game with.

Kickstarter paint total 180 + 1 Owlbear = 181


Saturday, September 02, 2023

Fat Dragon Games DRAGONLOCK: Stoneskull Tower Final

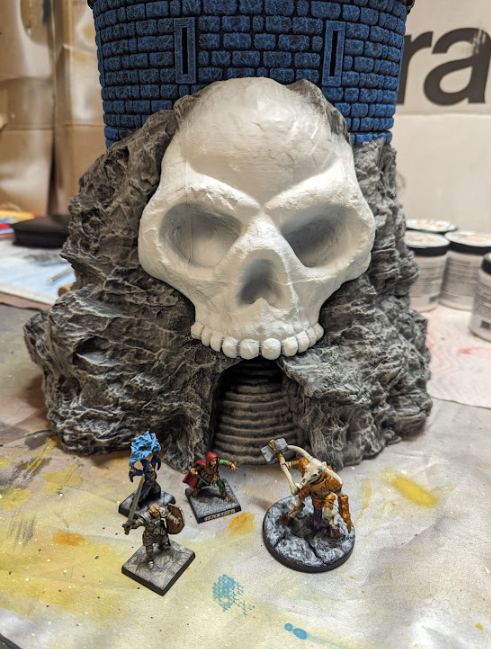
Finally finished! Painted up a couple of layers as were needed by the game module. The roof I drybrushed it with Scorpion Green and the gargoyles grey, and the dome gold.


Tuesday, August 29, 2023

Fat Dragon Games DRAGONLOCK: Stoneskull Tower Part 4

Same drybrushing technique was used on the skull mountain base. Once finished, I gave it it's first go at fit and finish for the first ring and to see how everything lines up including some test models. Confirming everything was good, I then sprayed all the remaining levels with a black undercoat.


Sunday, August 27, 2023

Fat Dragon Games DRAGONLOCK: Stoneskull Tower Part 3

I mentioned in an earlier post I made a trip to Humpty Dumpty to pickup paint and my local hobby store to pickup a large Citadel drybrush - I made use of both on the first ring of the tower. After spraying the ring with a black undercoat, I then drybrushed Magic Blue and then Electric Blue. The floor was done using Cold Grey and Stonewall Grey.


Friday, August 25, 2023

Fat Dragon Games DRAGONLOCK: Stoneskull Tower Part 2

Today was determining fit and finish and stackability. The 3d print comes with a quarter wall - print four quarter walls and you have a complete ring. Each quarter sits on a pyramidal peg which actually sets very well. However, I figured that you needed to use the dragon locks at the bottom (there's 3 slots) which cinches in the sides together tightly - else it it'll have a gap. While the tower was designed with only a couple of levels if you use the included stair - I needed more levels for the module I was going to run and the party was going to be magically teleported, so I asked my buddy to actually fill in the center hole.


Tuesday, August 22, 2023

Fat Dragon Games DRAGONLOCK: Stoneskull Tower

 So we did a thing, a really big gigantic thing, lol...

We purchased the Stoneskull Tower from Fat Dragon Games. One of my Dungeons and Dragons players has a very large 3d printer but this tower was even larger than his print table - however, he's a pretty talented guy and he figured out how to slice the base into a pie and delivered the skull mountain base to me in pieces.


They were supposed to be printed in quarters - and he essentially printed them in eighths - so a little bit off glue and then some compound to hide the gap and all was good!  These four pieces then created the skull mountain base for the tower.


Once all the glue was dried and the gaps filled and the fit confirmed as being good I then took the pieces out on the workbench and used the airbrush to spray a black basecoat on the entire skull mountain base.


Wednesday, August 16, 2023

Reaper Miniatures Cadirith, Demonic Colossal Spider - 77395


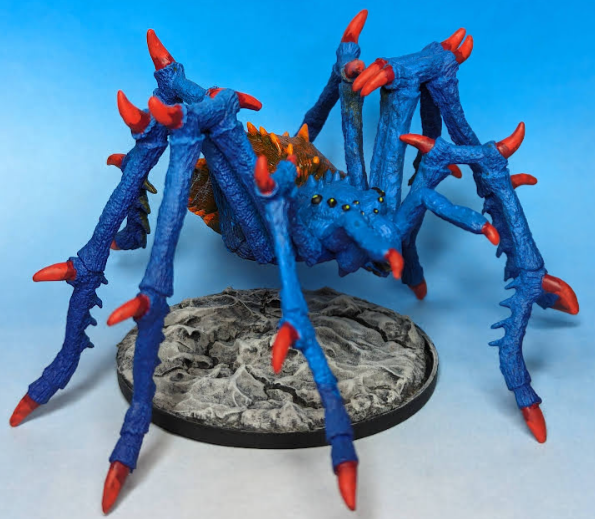
This colossal was the big bad at the bottom of the chasm. I was running a module by Kobold Press that has the adventures going down into a muti-level chasm and at the bottom is this huge demonic bone spider. I didn't have a huge demonic bone spider, but I did have a huge demonic "Bones" spider sitting on the shelf in a pile of "Bones" from an early kickstarter for the "Bones" product line from Reaper. So I had this bad boy emerge from a pile of bones at the bottom of the chasm and everything worked perfectly.

One of the difficulties of this colossal monstrosity is that the original white Bones mixture has a tendency to bend/warp over time for something this big and heavy. Another problem, in the tactical combat of a Dungeons and Dragons game everyone playing needs to know which squares the monster is in order to determine both player and monster attacks. 

I solved both problems with a base and a paperclip. The bottom of the spider has a hollow and I bent one side of the paperclip into the hollow and superglued it into place. I then determined that the monster without the legs is basically "huge" in game terms which is a 3" diameter base. The paperclip was then superglued to the base and the base covered with compound. Problem solved - the spider has proper game dimensions and the weight of the miniature is on the metal post of the paperclip.

Painting instructions for Demonic Colossal Spider (used Vallejo paints)...

Step 1: Airbrushed the entire model with a dark blue
Step 2: Airbrushed the entire topside of the model with Magic Blue
Step 3: Airbrushed the very top (from the 12-o'clock position) with Electric Blue
Step 4: Airbrushed the bulb part of the spider with an Orange
Step 5: Brought the model into the hobby room and brush painted the remainder
Step 6: Use Scarlet Red on the talons
Step 7: Use Bloody Red on the tips of talons
Step 8: Use Black on the pincers and eyes
Step 9: Use Livery Green on the eyes
Step 10: Use Hot Orange on spikes
Step 11: Use Orange Fire on tips of spikes
Step 12: Use Black on base
Step 13: Drybrush Cold Grey on base
Step 14: Drybrush Stonewall Grey on base

Kickstarter paint total 179 + 1 Demonic Colossal Spider = 180


Saturday, August 12, 2023

Game Day With the Dragon Bone Bridge

The pillars were completed as well as the demon spider that was going to be the big bad at the bottom of the bottom of the chasm. I set everything up on the dining room table.


Giving the miniatures a test go on the platform to make sure everything was stable. It was exceptionally so! There are pegs that link into the bottom of the dungeon tiles and the bottoms of the pillars are dragon locked into the other pieces - the board was solid and would take any abuse from the players.


The results were awesome! Both groups had a great time and the board held up as expected. Highly recommend the dungeon tiles by Fat Dragon Games and the pillars module which provides the ability to create multi-level dungeon terrain.


Thursday, August 10, 2023

Making the Bridge Work With Fat Dragon Games Dungeon Terrain

It was time to put that really cool dragon bone bridge to good use by building it into a terrain gaming piece for a module I was going to run from Kobold Press for two different groups. I had a friend print off a bunch of dungeon tiles from Fat Dragon Games which I sprayed black and then layed out into what was going to be the top layer within a dungeon chasm with the bone bridge going across.


I then went to Home Depot and picked up some sample pots in color matched grey. Then a trip to the local hobby store and I picked up this giant scenery brush by Games Workshop. Then I went drybrush crazy.


The pillars weren't quite ready so I used some paint bottles to elevate the top layer from the bottom and gave it a test with the miniatures that were going to be used for the dungeon adventure.


And there you have it - more or less ready to go! I have two groups that are both in need to run through the same module so I get to use this scenario twice!