Showing posts with label Warhammer Quest. Show all posts

Sunday, December 09, 2001

Games-Workshop's Dwarf


The dwarf was an interesting experiment in drybrushing as he's mostly hair, feathers, chain armor, and metal. When I drybrushed, the paint was a bit watered down to be more precise. The cloak on the back was blended starting with the medium blue and working down and then up the color scale. The axe handle shows that I need to learn how to make a wood texture when there is none in the mini. Finished in December of 2001.

Painting Instructions for Warhammer Quest Dwarf

Step 1: Undercoat model with White Primer
Step 2: Use Dwarf flesh on face
Step 3: Use Chaos Black on base, steel, beard, and helm feathers
Step 4: Use Scorched Brown on axe handlesword handle, sheeth, and pouch
Step 5: Use Enchanted Blue on cloack
Step 6: Use Golden Yellow on gloves
Step 7: Use mix of Dwarf Flesh and Elf Flesh on cheeks and nose
Step 8: Drybrush Codex Grey on beard and wings
Step 9: Drybrush Fortress Grey on beard and very lightly on wings
Step 10: Drybrush Skull White on beard and extremely lightly on top part of wings
Step 11: Wash beard with Chaos Black
Step 12: Re-drybrush beard lightly with Skull White
Step 13: Use Chainmail on all metal bits
Step 14: Use Mithril Silver on highlights of axe
Step 15: Use Shining Gold on all edges of metal highlights
Step 16: Use watered down Flesh Wash on all metal
Step 17: Use Dark Angels Green on cloth between hands and armor
Step 18: Use a Flesh Wash on the gloves - getting into grooves between fingers
Step 19: Use Golden Yellow on gloves
Step 20: Use Sunburst Yellow on gloves - sides and top
Step 21: Use Bad Moon Yellow on gloves - top
Step 22: Mix Bad Moon Yellow and Skull White - use to highlight gloves
Step 23: Add more Skull White to mix and finish highlights on gloves
Step 24: Add continued highlights on all Scorched Brown of Bestial Brown, Snakebite Leather, Bubonic Brown, and then Bleached Bone
Step 25: Use slightly watered down Snakebite Leather on top of markings in axe shaft
Step 26: Use Chaos Black with a drop of Codex Grey on boots - continue to add drop of Codex Grey - highlight final with Codex Grey
Step 27: Water down Chaos Black and wash over boots dulling the highlights
Step 28: Blend down to Regal Blue and up to Lightning Blue on cloak
Step 29: Drybrush stone base with Shadow Grey, Space Wolves Grey, and then final highlight of Ghostly Grey

Sunday, September 02, 2001

Games-Workshop's Wizard


The wizard really turned out well for me. It was my first attempt at making a white cloak and using shades of grey to blend. I also used a very light wash of blue over the white. The gems on this model are getting better but there is still lots of room for improvement. Finished in September of 2001.

Painting Instructions for Warhammer Quest Wizard

Step 1: Undercoat model with White Primer
Step 2: Use Bronzed Flesh on skin
Step 3: Use Chaos Black on base, beard, and metal
Step 4: Use Enchanted blue on cape
Step 5: Use Blood Red on shoes, scarf, staff
Step 6: Use Fortress Grey on cloak
Step 7: Use Snakebite leather on belt, pouch, scrolls
Step 8: Use Snot Green on gems and potion bottle
Step 9: Use Sunburst Yellow on bottom of scarf - flames
Step 10: Blend Scab Red thru Golden Yellow on sword
Step 11: Drybrush Tin Bitz, Shining Gold, then Burnished Gold on staff and sword
Step 12: Blend various mix of Fortres Grey to Skull White on robes
Step 13: Wash robes with watered down Ice Blue
Step 14: Blend Cape from Regal Blue to Ice Blue
Step 15: Drybrush Codex Grey to Skull White on beard
Step 16: Blend Blood Red bits from Scab Red to Fiery Orange
Step 17: Finish Blood Red bits with highlight of Golden Yellow
Step 18: Highlight Yellow Flames with Bad Moon Yellow and Skull White
Step 19: Shade and highlight the green bag and gems with Dark Angels Green to Bilious Green
Step 20: Highlight hat with mix of Chaos Black and Codex Grey, then highlight with Codex Grey
Step 21: Shade flesh with Vermin Brown mixing with Bronzed Flesh and highlighting with Elf Flesh
Step 22: Drybrush base with Codex Grey and Fortress Grey

Sunday, July 15, 2001

Games-Workshop's Warrior


The warrior was an interesting project. There's a lot I like about him and there's a bit I'm not satisfied with. The mouth in particular - should have done something to darken the expression but I struggled with it a couple of times and gave up. The body tones, blending the blues and reds, the drybrushing all came out rather well. Finished in July of 2001.

Painting Instructions for Warhammer Quest Warrior

Step 1: Undercoat model with White Primer
Step 2: Use Bronzed Flesh on skin
Step 3: Use Scorched Brown on boot and bear skin
Step 4: Use Blood Red on inside of bear skin
Step 5: Use Snakebite Leather on hair - water down a bit
Step 6: Use Enchanted Blue on loincloth and cuffs
Step 7: Use Chaos Black on all metal bits and bear claws
Step 8: Drybrush Chainmail on all metal bits
Step 9: Highlight drybrush Mithril Silver on sword
Step 10: Wash sword with Enchanted Blue
Step 11: Use Vomit Brown on bear claws
Step 12: Highlight bear claws with Bleached Bone
Step 13: Use Bleached Bone on teeth
Step 14: Drybrush Blood Red on skulls
Step 15: Drybrush bear fur with Bestial Brown, Snakebite Leather, Bubonic Brown, and Bleached Bone
Step 16: Blend inside bear skin from Scab Red to Blood Red
Step 17: Use Bubonic Brown on boot knife
Step 18: Highlight hair with Leprous Brown
Step 19: Use Vermin Brown on fur of boot
Step 20: Drybrush Leprous Brown on fur of boot
Step 21: Drybrush mix of Leprous Brown and Bleached Bone on fur of boot
Step 22: Highlight boot using Bestial Brown to Bubonic Brown
Step 23: Blend blue areas from Enchanted Blue to Lightning Blue with Ice Blue Highlights
Step 24: Blend Vermin Brown, Bronzed Flesh, and Elf Flesh on skin
Step 25: Use Chaos Black on base
Step 26: Drybrush base with Shadow Grey to Ghostly Grey

Saturday, July 07, 2001

Games-Workshop's Elf


After a couple of months off, I was back at it again with a vengeance. The standard Elf was my next victim. I modelled him from the GW folks with a couple of changes. Blended the sword with blue as that seems more elven to me. I was quite impressed with the white triangles on the fringes as that took quite a bit of time and patience. It was one of those do I really want to attempt that type of moments and I'm glad that I did - really brings the character to life. The scans here aren't the greatest as the sword, bow, and cape make the model sit off the scanner at strange angles. Did my best - enjoy. Finished in July of 2001.

Painting Instructions for Warhammer Quest Elf

Step 1: Undercoat model with White Primer
Step 2: Use Elf Flesh on face and hands
Step 3: Use watered down Flesh Wash on face and hands then repeat Step 2
Step 4: Highlight face with Pallid Flesh
Step 5: Use Snot Green on cloak
Step 6: Use Golden Yellow on shirt and cloak tail
Step 7: Use Enchanted Blue on leggings and shirt sleaves
Step 8: Use Blood Red on shirt fringes
Step 9: Use Scorched Brown on boots and sword sheath
Step 10: Use Space Wolves Grey on boot inner lining
Step 11: Use Blazing Orange on bow
Step 12: Undercoat metal with Chaos Black
Step 13: Blend sword from Enchanted Blue to Ice Blue
Step 14: Highlight sword with Skull White
Step 15: Use Snakebite Leather on sword handle and pouch
Step 16: Use Bestial Brown on hair
Step 17: Drybrush Shining Gold on metal
Step 18: Use Blood Red on all gems
Step 19: Blend cloak from Dark Angels Green to Scorpian Green
Step 20: Blend leggings and shirt sleaves from Regal Blue to Ice Blue
Step 21: Blend shirt and cloak tail from Fiery Orange to mix of Bad Moon Yellow and Skull White
Step 22: Drybrush boot, leather bag, and sword handle with Bestial Brown to Bubonic Brown
Step 23: Blend top of boots with Shadow Grey to Ghostly Grey
Step 24: Blend bow and gems with Blood Red to Fiery Orange
Step 25: Use Chaos White for triangle pattern on shirt fringes
Step 26: Highlight metal with Burnished Gold
Step 27: Use Chaos Black on base
Step 28: Drybrush base with Shadow Grey to Ghostly Grey

Tuesday, May 29, 2001

Games-Workshop's Snotling


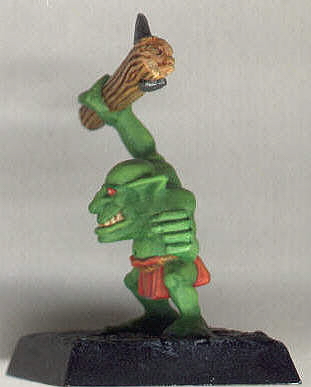
First set of miniatures I painted for Warhammer Quest were the snotlings. I figured these guys were the easiest to begin with and am happy with the result. There were enough of them that I could try out some ideas. The most difficult was cutting them off their mini base and onto a proper GW base. I utilized drywall paste on the base and carved stones into when dry - which then I drybrushed several shades of grey from dark to light. Finished in April 2001.

Painting Instructions for Warhammer Quest Snotling

Step 1: Undercoat models with white primer
Step 2: Use Bleached Bone on teeth
Step 3: Use Goblin Green on body
Step 4: Wash Snot Green over all of body
Step 5: Use Blood Red on skirt and eyes
Step 6: Use Snakebite Leather on club and rope
Step 7: Use Chaos Black on base and club nail
Step 8: Wash Red Gore on skirt
Step 9: Wash teeth with Flesh Wash
Step 10: Highlight teeth with Bleached Bone
Step 11: Highlight skirt with Blazing Orange going to Fiery Orange
Step 12: Drybrush club with Bubonic Brown and Bleached Bone
Step 13: Wash club with slighty watered down Flesh Wash - get it in the grooves
Step 14: Drybrush Boltgun Metal on club nail
Step 15: Mix one part Goblin Green with one part Bilious Green for highlights - then add another part Bilious Green for fine highlights
Step 16: Skull White dot in middle of eye
Step 17: Drybrush Shadow Grey to Ghostly Grey on base