Showing posts with label Brettonian. Show all posts

Saturday, January 10, 2004

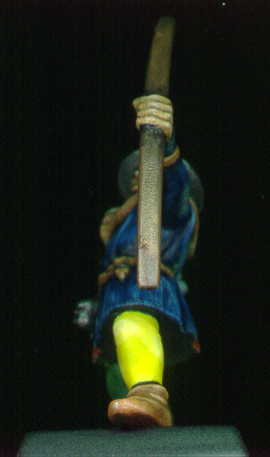
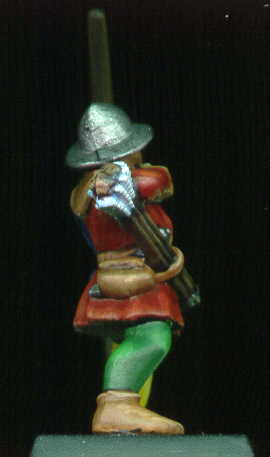
Games Workshop's Archer


The archer is a test using Reaper Pro-Paints for a class I'm teaching to elementary school age children. In the classroom we are using the paint-kits #1 & #2 by Reaper Miniatures.

I happened to have a bunch of Games Workshop Brettonian archers on the shelf which I picked up from e-bay cheap. So one of them became my study. I used 16 out of the 17 pots of Reaper paint in my possession.

Painting Instructions for Archer:
Step 01: Undercoat model with grey
Step 02: Use Dragon Black to outline all boundaries and metal
Step 03: Use Ruddy Flesh on face and hands
Step 04: Use watered down Flesh Wash on face and hands
Step 05: Use Caucasion as highlights on face and hands
Step 06: Used Oil Leather on all leather
Step 07: Use a wash of Walnut on all leather
Step 08: Used Oil Leather mixed with Caucasion on all leather
Step 09: Used more Caucasion into mix as highlights on all leather
Step 10: Use Breonne Navy on half of jacket
Step 11: Use mix of Breonne Navy and Dragon Blue on half of jacket
Step 12: Use Dragon Blue on jacket
Step 13: Use mix of Linen White and Dragon Blue as highlights on jacket
Step 14: Use Blood Red on half of jacket
Step 15: Use Firehawk on half of jacket
Step 16: Use mix of Sunlight and Firehawk on half of jacket
Step 17: Use Kilt Green on half of pants
Step 18: Use mix of Emerald and Kilt Green on half of pants
Step 19: Use more Emerald into mix as highlights on half of pants
Step 20: Use Sunlight on half of pants
Step 21: Use mix of Dragon White and Sunlight on half of pants
Step 22: Use more Dragon White into mix as highlights on half of pants
Step 23: Use Walnut on bow and arrow shafts
Step 24: Use mix of Woodland Brown and Walnut on bow and arrow shafts
Step 25: Use more Woodland Brown to mix on bow and arrow shafts
Step 26: Use Woodland Brown on bow and arrow shafts
Step 27: Use Linen White on arrow flights
Step 28: Use much watered down Dragon Blue on arrow flights
Step 29: Use Dragon White on arrow flights
Step 30: Use Truesilver on metal bits
Step 31: Use Dragon Black on base

Sunday, November 17, 2002

Games-Workshop's Bretonnian Henchman


These four figures were painted in a single night for my warhammer skirmish battle board scenario - troll under the bridge. Not bad - mostly washes and dryrbrushing with a few highlight layers. Completed in November 2002.

Thursday, July 27, 2000

Games-Workshop's Gui Le Gros


This figure is the equivalent of the musician of my Bretonnian Archers. Who are we really kidding - it's Friar Tuck from Robin Hood! The scan really doesn't show well due to the huge difference in contrasts between dark and light. This one always gets rave reviews from others when they visit. The pinstriping was the biggest challenge. Completed in July of 2000.

Painting Instructions for Gui Le Gros:

Step 1: Undercoat models with white primer
Step 2: Use Bronzed Flesh on face and hands
Step 3: Use Chaos Black on helmet, beer mugs and do eyes (along with Skull White)
Step 4: Use Bleached Bone on the leather hood
Step 5: Use Bestial Brown on cloak and pants and ropes - also on barrel
Step 6: Use Scorched Brown on shoes and arrow gaurd on arm
Step 7: Use Bubonic Brown on bow, arrows, and money pouch
Step 8: Drybrush Bubonic Brown on ropes
Step 9: Use watered down Scorched Brown to shade the robe
Step 10: Highlight Snakebite Leather on robe with just a bit of Bubonic Brown
Step 11: Highlight Bestial Brown on arrow bag with a bit of Snakebite Leather followed by Bubonic Brown
Step 12: Drybrush Flesh Wash on face, hands, barrel, and bow
Step 13: Shade hood with Vomit Brown
Step 14: Highlight hood with Skull White
Step 15: Use Bleached Bone to create trim around robe
Step 16: Use Bestial Brown to create trim around hood
Step 17: Use Bestial Brown to highlight shoes
Step 18: Use Snakebite Leather to highlight pants
Step 19: Use Burnished Gold on tips of bow - then go over with Flesh Wash
Step 20: Drybrush Chainmail on mugs, helmet, arrows, and barrel
Step 21: Use Goblin Green on base
Step 22: Use watered down glue on base, then dip into fine ballast
Step 23: Use drybrushed Camo Green onto fine ballast

Sunday, July 23, 2000

Games-Workshop's Hugo Le Petit


This figure is the standard bearer of my Bretonnian Archers. Who are we really kidding - it's lil' John! This was my first mini where I worked out how to shade and highlight skin and the wooden staff. Favorite part is the rabbit off the back - the detail is a little washed out in the scan but it looks great up close. Completed in July of 2000.

Painting Instructions for Hugo Le Petit:

Step 1: Undercoat models with white primer
Step 2: Use Bronzed Flesh on face and hands
Step 3: Use Snakebite Leather on staff and shoes
Step 4: Use Dark Angels Green on collar/hood and leggings
Step 5: Use Snot Green on coat
Step 6: Use Scorched Brown on belt and bag
Step 8: Use watered down Scorched Brown on shoes
Step 9: Use Bubonic Brown on bow & arrows
Step 10: Use drybrushed Bubonic Brown on shoes and staff
Step 11: Use watered down Snakebite Leather on the bow
Step 12: Use Bestial Brown on the bow straps and handle - highlight Scorched brown areas
Step 13: Use Bestial Brown on hair
Step 14: Use drybrushed Bubonic Brown on hair
Step 15: Use Snot Green to highlight collar/hood and leggings
Step 16: Use drybrushed Scorpion Green to highlight coat
Step 17: Use Burnished Gold on belt clip and tips of bow
Step 18: Use just a bit of Flesh Wash on the Burnished Gold
Step 19: Use Fortress Grey on the bunny - highlight with Skull White
Step 20: Use watered down Flesh Wash on hands and face (including eyes and mouth)
Step 21: Use Goblin Green on base
Step 22: Use watered down glue on base, then dip into fine ballast
Step 23: Use drybrushed Camo Green onto fine ballast

Thursday, July 13, 2000

Games-Workshop's Bertrand The Brigand


This figure is the leader of my Bretonnian Archers. Who are we really kidding - it's Robin Hood and his gang! This was my first metal mini where highlighting and shading techniques started to actually work. Unfortunately, the scan makes it difficult to see the white or the green/brown shades. Therefore tried to select a happy medium. Completed in July of 2000.

Painting Instructions for Bertrand The Brigand:

Step 1: Undercoat models with white primer
Step 2: Use Bronzed Flesh on face and hands
Step 3: Use Snot Green on collar/hood
Step 4: Use Snot Green on arrow fletching
Step 5: Use Dark Angels Green on coat and hat
Step 6: Use Bestial Brown on leggings and inner coat, belt, and bag
Step 7: Use Snakebite Leather on arrow box
Step 8: Use Bubonic Brown on bow & arrows
Step 9: Use Scorched Brown on shoes and arrow gaurd
Step 10: Use Skull White on sleaves
Step 11: Use drybrushed Chainmail on sword
Step 12: Use Snakebite Leather to highlight leggings
Step 13: Use Snot Green to highlight coat and hat
Step 14: Use drybrushed Scorpion Green to highlight arrow fletching
Step 15: Use Fortress Grey to shadow white sleaves
Step 16: Use watered down Flesh Wash on hands and face (including eyes and mouth)
Step 17: Use Enchanted Blue on the feather
Step 18: Highlight feather with Ice Blue
Step 19: Use Goblin Green on base
Step 20: Use watered down glue on base, then dip into fine ballast
Step 21: Use drybrushed Camo Green onto fine ballast

Tuesday, February 15, 2000

Games-Workshop's Bretonnian Archer Command Group


The Bretonnian Archer Command Group was my first exposure to drybrushing, using flesh wash on the skin for face shading, creation of the standard, and an attempt at eyeballs. Completed in February of 2000.

Painting Instructions for Command Group:

Step 1: Undercoat model with white primer
Step 2: Use Elf Flesh on face and hands
Step 3: Use Blood Red on leather armor
Step 4: Use Enchanted Blue on under-garments
Step 5: Use Bestial Brown on knife handle
Step 6: Use heavily watered down Bestial Brown on hands and face
Step 7: Use Chaos Black on shoes, belt, bindings, sword, and helmet
Step 8: Use Chainmail on sword, helmet, and bits like end of belt, etc.
Step 9: Use Flesh Wash on banner pole
Step 10: Use Goblin Green on base
Step 11: Use watered down glue on base, then dip into fine ballast
Step 12: Use drybrushed Camo Green onto fine ballast
Step 13: Create banner using heavy white construction paper and paint prior to cutout using Enchanted Blue, Skull White, and Blood Red
Step 14: Glue banner around pole to create battle standard

Saturday, January 15, 2000

Games-Workshop's Bretonnian Sorceress on Foot


This figure is the first metal figure that I have painted. At this point, I did not know anything about highlighting, shading, drybrushing, etc. It was enough of a challenge just to get the right color of paint onto the correct spot. I was really excited about the belt detail. Completed in January of 2000.

Painting Instructions for Bretonnian Sorceress on Foot:

Step 1: Undercoat model with white primer
Step 2: Use Elf Flesh on face and hands
Step 3: Use Skull White on eyes and teeth
Step 4: Use Blood Red on dangly sleaves
Step 5: Use Enchanted Blue on robe
Step 6: Use Bestial Brown on hair and wand shaft
Step 7: Use heavily watered down Bestial Brown on hands and face (including eyes and mouth)
Step 8: Use Chainmail on sword
Step 9: Use Sunburst Yellow mixed with a bit of Bestial Brown on wand head, sword handle, belt, and tassles
Step 10: Use Blood Red on cloth part of belt and headband
Step 11: Use Goblin Green on base
Step 12: Use watered down glue on base, then dip into fine ballast
Step 13: Use drybrushed Camo Green onto fine ballast

Friday, December 31, 1999

Games-Workshop's Brettonian Archers


These figures are the very first miniatures that I painted. I purchased the starter kit which came with several of the plastic Bretonnian archers. This is the "paint by numbers" approach. Completed in November of 1999.

Painting Instructions for Archers:

Step 1: Undercoat models with white primer
Step 2: Use Elf Flesh on face and hands
Step 3: Use Blood Red on coats
Step 4: Use Enchanted Blue on under-garments and arrow fletchings
Step 5: Use Bestial Brown on bow & arrows
Step 6: Use heavily watered down Bestial Brown on hands and face (including eyes and mouth)
Step 7: Use Chaos Black on shoes, belt, bag, buttons, and helmet
Step 8: Use Chainmail on helmet, and bits like arrows, end of belt, etc.
Step 9: Use drybrushed Chainmail on arrow fletchings
Step 10: Use Goblin Green on base
Step 11: Use watered down glue on base, then dip into fine ballast
Step 12: Use drybrushed Camo Green onto fine ballast