Welcome to a display of painted miniatures by Rick. Each entry has an explanation to the figure and the "step by step" instructions. Enjoy!
Showing posts with label Michael Perry. Show all posts
Sunday, September 01, 2013
Game's Workshop's Wraith 3
I absolutely love some of Game Workshop's older skeletons and wraiths that were sculpted pre-2000. The old Vampire Counts models were a mixed bag in my opinion. There were some models like the wights, necromancers, and banshees that just looked ridiculous - kinda like skeletons going to a Mardi-Gras. There were other sculpts during the same time period that were just fantastic and I've wanted to pull into a Dungeons & Dragons game.
I have the Citadel Miniatures 2000 Annual that had all the GW miniatures in production at the time. The Armoured Skeletons on the bottom of pages 336 are awesome and I've painted up skeleton 3 and skeleton 5. Would love to get my hands on a few more such as sculpts 1, 2, and 4 and make a proper five piece unit out of them that I can drop on adventurers - they all have a bit of heavy armour (british spelling) and a bad-ass halberd to give out some damage.
In that same book a few pages later - page 343 to be exact - is a set of wraiths with a killer scythe. My favorite of these has been wraith 3 and I picked him up as GW blister pack 8572G for $5.49 over a decade ago and he's been sitting on my shelf (last time I saw this figure at the GW store it was in the high teens - crazy prices for a single figure). I love the flowing robes and the way the sculpt floats above the base - I've kinda had this Scooby-Doo vision in my mind of a ghostly wraith floating down the castle halls chasing intrepid adventurers to their doom.
Therefore, unlike similar Reaper models (skeleton/ghost with sword, skeleton ghost) I painted this up as vision of a blue ghost including the robes, head, and weapon. I started with enchanted blue as the base color and kept adding skull white with each layer until I was satisfied that I had captured the right look. I also tossed out the tiny base and put him on a GW one inch base with my standard dungeon look and the name "Harvester".
The Citadel book says the miniatures on page 343 were designed by Michael Perry and Trish Morrison - doesn't specify who did wraith 3.
Labels:
Games-Workshop,
Michael Perry,
Trish Morrison
Saturday, January 10, 2004
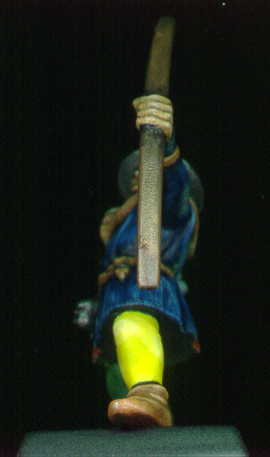
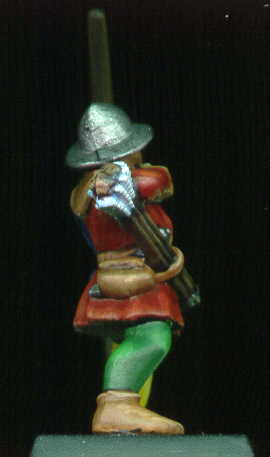
Games Workshop's Archer


The archer is a test using Reaper Pro-Paints for a class I'm teaching to elementary school age children. In the classroom we are using the paint-kits #1 & #2 by Reaper Miniatures.
I happened to have a bunch of Games Workshop Brettonian archers on the shelf which I picked up from e-bay cheap. So one of them became my study. I used 16 out of the 17 pots of Reaper paint in my possession.
Painting Instructions for Archer:
Step 01: Undercoat model with grey
Step 02: Use Dragon Black to outline all boundaries and metal
Step 03: Use Ruddy Flesh on face and hands
Step 04: Use watered down Flesh Wash on face and hands
Step 05: Use Caucasion as highlights on face and hands
Step 06: Used Oil Leather on all leather
Step 07: Use a wash of Walnut on all leather
Step 08: Used Oil Leather mixed with Caucasion on all leather
Step 09: Used more Caucasion into mix as highlights on all leather
Step 10: Use Breonne Navy on half of jacket
Step 11: Use mix of Breonne Navy and Dragon Blue on half of jacket
Step 12: Use Dragon Blue on jacket
Step 13: Use mix of Linen White and Dragon Blue as highlights on jacket
Step 14: Use Blood Red on half of jacket
Step 15: Use Firehawk on half of jacket
Step 16: Use mix of Sunlight and Firehawk on half of jacket
Step 17: Use Kilt Green on half of pants
Step 18: Use mix of Emerald and Kilt Green on half of pants
Step 19: Use more Emerald into mix as highlights on half of pants
Step 20: Use Sunlight on half of pants
Step 21: Use mix of Dragon White and Sunlight on half of pants
Step 22: Use more Dragon White into mix as highlights on half of pants
Step 23: Use Walnut on bow and arrow shafts
Step 24: Use mix of Woodland Brown and Walnut on bow and arrow shafts
Step 25: Use more Woodland Brown to mix on bow and arrow shafts
Step 26: Use Woodland Brown on bow and arrow shafts
Step 27: Use Linen White on arrow flights
Step 28: Use much watered down Dragon Blue on arrow flights
Step 29: Use Dragon White on arrow flights
Step 30: Use Truesilver on metal bits
Step 31: Use Dragon Black on base
Sunday, November 17, 2002
Games-Workshop's Bretonnian Henchman
Monday, September 16, 2002
Games-Workshop's River Troll #1


This is the first river troll painted for the skirmish scenario - under the bridge. This model was actually a blast to paint - a big ol' nasty troll!
The painting technique used was layering up from dark angels green to bilious green mixed with white. Quite a dramatic change.
The first four views show the traditional front, side, rear views. The two below are a first layer wash base which I posted to the DC area mini-painting group as a bit of discussion regarding good enough to game with versus the pure artistic painting. Essentially this was the foundation and the discussion surrounds is the foundation good enough for the gaming board - if the foundation takes 20 percent of the effort do players really need another 80 percent to fill in all the details when your looking at a game from 3 to 10 feet away?


Finished in September 2002.
Painting Instructions for River Troll 1
Step 1: Undercoat model with White Primer
Step 2: Use Chaos Black on hairy bits and scale
Step 3: Use slight watered down Dark Angels Green on all skin and scale
Step 4: Use Hawk Turquoise on hairy bits
Step 5: Use watered down Chaos Black over hairy bits - repeat Step 4 where needed
Step 6: Use Scab Red on all bony protusions, nails, tongue, and eyes
Step 7: Use Scorched Brown on log club
Step 8: Use watered down Flesh Wash on teeth
Step 9: Drybrush Snot Green on scale
Step 10: Use Snot Green on all skin
Step 11: Use Red Gore on all bony protusions, nails, and eyes
Step 12: Use Warlock Purple on tongue
Step 13: Use Tentacle Pink and blend into Warlock Purple to highlight tongue
Step 14: Use slightly watered down Scorpion Green on all skin - start to highlight
Step 15: Repeat 14 for bolder highlighting areas
Step 16: Use Blood Red on all bony protusions, nails, and eyes
Step 17: Drybrush Bestial Brown on log club
Step 18: Drybrush Snakebite Leather on log club
Step 19: Drybrush Vomit Brown on log club
Step 20: Very light drybrush of Bleached Bone on highlight of log club
Step 21: Use half 60/40 mix of Bilious Green and Scorpion Green on all skin - continue to highlight
Step 22: Use Bilious Green on all skin for highlight
Step 23: Use Bilios Green and Skull White for final skin highlight
Step 24: Use mix of Hawk Turquoise and Skull White for drybrush on hairy bits
Step 25: Use Bleached Bone on teeth
Step 26: Use mix of Bleached Bone and Skull White to highlight teeth
Step 27: Use Skull White as final highlight on teeth
Step 28: Use Skull White, Fortress Grey, and Chaos Black on toothy spikes on club
Thursday, July 27, 2000
Games-Workshop's Gui Le Gros


This figure is the equivalent of the musician of my Bretonnian Archers. Who are we really kidding - it's Friar Tuck from Robin Hood! The scan really doesn't show well due to the huge difference in contrasts between dark and light. This one always gets rave reviews from others when they visit. The pinstriping was the biggest challenge. Completed in July of 2000.
Painting Instructions for Gui Le Gros:
Step 1: Undercoat models with white primer
Step 2: Use Bronzed Flesh on face and hands
Step 3: Use Chaos Black on helmet, beer mugs and do eyes (along with Skull White)
Step 4: Use Bleached Bone on the leather hood
Step 5: Use Bestial Brown on cloak and pants and ropes - also on barrel
Step 6: Use Scorched Brown on shoes and arrow gaurd on arm
Step 7: Use Bubonic Brown on bow, arrows, and money pouch
Step 8: Drybrush Bubonic Brown on ropes
Step 9: Use watered down Scorched Brown to shade the robe
Step 10: Highlight Snakebite Leather on robe with just a bit of Bubonic Brown
Step 11: Highlight Bestial Brown on arrow bag with a bit of Snakebite Leather followed by Bubonic Brown
Step 12: Drybrush Flesh Wash on face, hands, barrel, and bow
Step 13: Shade hood with Vomit Brown
Step 14: Highlight hood with Skull White
Step 15: Use Bleached Bone to create trim around robe
Step 16: Use Bestial Brown to create trim around hood
Step 17: Use Bestial Brown to highlight shoes
Step 18: Use Snakebite Leather to highlight pants
Step 19: Use Burnished Gold on tips of bow - then go over with Flesh Wash
Step 20: Drybrush Chainmail on mugs, helmet, arrows, and barrel
Step 21: Use Goblin Green on base
Step 22: Use watered down glue on base, then dip into fine ballast
Step 23: Use drybrushed Camo Green onto fine ballast
Sunday, July 23, 2000
Games-Workshop's Hugo Le Petit


This figure is the standard bearer of my Bretonnian Archers. Who are we really kidding - it's lil' John! This was my first mini where I worked out how to shade and highlight skin and the wooden staff. Favorite part is the rabbit off the back - the detail is a little washed out in the scan but it looks great up close. Completed in July of 2000.
Painting Instructions for Hugo Le Petit:
Step 1: Undercoat models with white primer
Step 2: Use Bronzed Flesh on face and hands
Step 3: Use Snakebite Leather on staff and shoes
Step 4: Use Dark Angels Green on collar/hood and leggings
Step 5: Use Snot Green on coat
Step 6: Use Scorched Brown on belt and bag
Step 8: Use watered down Scorched Brown on shoes
Step 9: Use Bubonic Brown on bow & arrows
Step 10: Use drybrushed Bubonic Brown on shoes and staff
Step 11: Use watered down Snakebite Leather on the bow
Step 12: Use Bestial Brown on the bow straps and handle - highlight Scorched brown areas
Step 13: Use Bestial Brown on hair
Step 14: Use drybrushed Bubonic Brown on hair
Step 15: Use Snot Green to highlight collar/hood and leggings
Step 16: Use drybrushed Scorpion Green to highlight coat
Step 17: Use Burnished Gold on belt clip and tips of bow
Step 18: Use just a bit of Flesh Wash on the Burnished Gold
Step 19: Use Fortress Grey on the bunny - highlight with Skull White
Step 20: Use watered down Flesh Wash on hands and face (including eyes and mouth)
Step 21: Use Goblin Green on base
Step 22: Use watered down glue on base, then dip into fine ballast
Step 23: Use drybrushed Camo Green onto fine ballast
Thursday, July 13, 2000
Games-Workshop's Bertrand The Brigand


This figure is the leader of my Bretonnian Archers. Who are we really kidding - it's Robin Hood and his gang! This was my first metal mini where highlighting and shading techniques started to actually work. Unfortunately, the scan makes it difficult to see the white or the green/brown shades. Therefore tried to select a happy medium. Completed in July of 2000.
Painting Instructions for Bertrand The Brigand:
Step 1: Undercoat models with white primer
Step 2: Use Bronzed Flesh on face and hands
Step 3: Use Snot Green on collar/hood
Step 4: Use Snot Green on arrow fletching
Step 5: Use Dark Angels Green on coat and hat
Step 6: Use Bestial Brown on leggings and inner coat, belt, and bag
Step 7: Use Snakebite Leather on arrow box
Step 8: Use Bubonic Brown on bow & arrows
Step 9: Use Scorched Brown on shoes and arrow gaurd
Step 10: Use Skull White on sleaves
Step 11: Use drybrushed Chainmail on sword
Step 12: Use Snakebite Leather to highlight leggings
Step 13: Use Snot Green to highlight coat and hat
Step 14: Use drybrushed Scorpion Green to highlight arrow fletching
Step 15: Use Fortress Grey to shadow white sleaves
Step 16: Use watered down Flesh Wash on hands and face (including eyes and mouth)
Step 17: Use Enchanted Blue on the feather
Step 18: Highlight feather with Ice Blue
Step 19: Use Goblin Green on base
Step 20: Use watered down glue on base, then dip into fine ballast
Step 21: Use drybrushed Camo Green onto fine ballast
Friday, December 31, 1999
Games-Workshop's Brettonian Archers


These figures are the very first miniatures that I painted. I purchased the starter kit which came with several of the plastic Bretonnian archers. This is the "paint by numbers" approach. Completed in November of 1999.
Painting Instructions for Archers:
Step 1: Undercoat models with white primer
Step 2: Use Elf Flesh on face and hands
Step 3: Use Blood Red on coats
Step 4: Use Enchanted Blue on under-garments and arrow fletchings
Step 5: Use Bestial Brown on bow & arrows
Step 6: Use heavily watered down Bestial Brown on hands and face (including eyes and mouth)
Step 7: Use Chaos Black on shoes, belt, bag, buttons, and helmet
Step 8: Use Chainmail on helmet, and bits like arrows, end of belt, etc.
Step 9: Use drybrushed Chainmail on arrow fletchings
Step 10: Use Goblin Green on base
Step 11: Use watered down glue on base, then dip into fine ballast
Step 12: Use drybrushed Camo Green onto fine ballast
Subscribe to:
Posts (Atom)