Showing posts with label Alan Perry. Show all posts

Saturday, January 17, 2004

Games Workshop's Skink


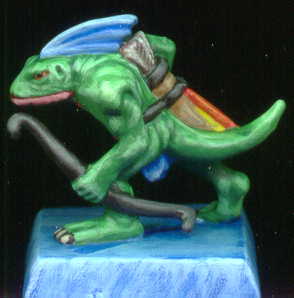
This Games Workshop Skink was painted with Reaper pro-paints as test.

I worked up a practice skink for teaching a paint class to kids using Reaper Pro-Paints. The base was a bit of fun copied from the house painter at Dream Wizards.

Painting Instructions for Skink (using Reaper Pro-Paints):
Step 01: Undercoat model with white primer
Step 02: Use Dragon Blue on fin and loincloth
Step 03: Use mix of Dragon White and Dragon Blue on fin and loincloth
Step 04: Use mix 2/3 Dragon White and 1/3 Dragon Blue on fin and loincloth
Step 05: Use mix 3/4 Dragon White and 1/4 Dragon Blue on fin and loincloth
Step 06: Use Kilt Green on body
Step 07: Use Emerald on body
Step 08: Use mix of 2/3 Emerald and 1/3 Dragon White
Step 09: Use mix of 1/2 Emerald and 1/2 Dragon White
Step 10: Use Blood Red on underbelly
Step 11: Use 1/2 Dragon White and 1/2 Blood Red on underbelly
Step 12: Use 2/3 Dragon White and 1/3 Blood Red on underbelly
Step 13: Use Woodland Brown on quiver
Step 14: Use mix of Dragon White and Woodland Brown on quiver
Step 15: Use Walnut on straps, bow, and toenails
Step 16: Use mix of Dragon White and Walnut on straps and bow
Step 17: Use Caucasion on toes

Saturday, January 10, 2004

Games Workshop's Archer


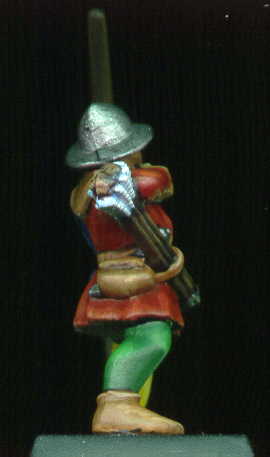
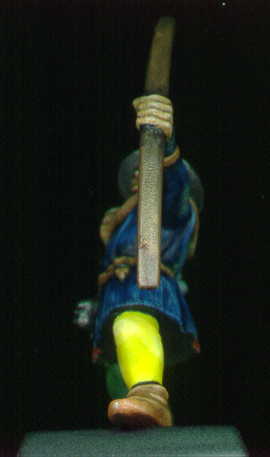
The archer is a test using Reaper Pro-Paints for a class I'm teaching to elementary school age children. In the classroom we are using the paint-kits #1 & #2 by Reaper Miniatures.

I happened to have a bunch of Games Workshop Brettonian archers on the shelf which I picked up from e-bay cheap. So one of them became my study. I used 16 out of the 17 pots of Reaper paint in my possession.

Painting Instructions for Archer:
Step 01: Undercoat model with grey
Step 02: Use Dragon Black to outline all boundaries and metal
Step 03: Use Ruddy Flesh on face and hands
Step 04: Use watered down Flesh Wash on face and hands
Step 05: Use Caucasion as highlights on face and hands
Step 06: Used Oil Leather on all leather
Step 07: Use a wash of Walnut on all leather
Step 08: Used Oil Leather mixed with Caucasion on all leather
Step 09: Used more Caucasion into mix as highlights on all leather
Step 10: Use Breonne Navy on half of jacket
Step 11: Use mix of Breonne Navy and Dragon Blue on half of jacket
Step 12: Use Dragon Blue on jacket
Step 13: Use mix of Linen White and Dragon Blue as highlights on jacket
Step 14: Use Blood Red on half of jacket
Step 15: Use Firehawk on half of jacket
Step 16: Use mix of Sunlight and Firehawk on half of jacket
Step 17: Use Kilt Green on half of pants
Step 18: Use mix of Emerald and Kilt Green on half of pants
Step 19: Use more Emerald into mix as highlights on half of pants
Step 20: Use Sunlight on half of pants
Step 21: Use mix of Dragon White and Sunlight on half of pants
Step 22: Use more Dragon White into mix as highlights on half of pants
Step 23: Use Walnut on bow and arrow shafts
Step 24: Use mix of Woodland Brown and Walnut on bow and arrow shafts
Step 25: Use more Woodland Brown to mix on bow and arrow shafts
Step 26: Use Woodland Brown on bow and arrow shafts
Step 27: Use Linen White on arrow flights
Step 28: Use much watered down Dragon Blue on arrow flights
Step 29: Use Dragon White on arrow flights
Step 30: Use Truesilver on metal bits
Step 31: Use Dragon Black on base

Thursday, March 01, 2001

Games-Workshop's Blue Skink Standard Bearer


This figure is the standard bearer for my blue skinks. The standard was actually a goof on the part of Games Workshop. I had the wrong topping for my pole. I went with it anyways and like the look. On retrospect, I should have painted the wooden figure the orange and the ribbon the blue so that there is alternating blue-orange-blue contrast. Completed in February of 2001.

Painting Instructions for Blue Skink Standard Bearer:

Step 1: Undercoat models with white primer
Step 2: Use Lightning Blue on the skin - except bottom of head and belly
Step 3: Use Jade Green on the bottom of head and belly
Step 4: Use Snakebite Leather on pouch straps
Step 5: Use Chaos Black on sword sheath, eyeballs
Step 6: Use Sunburst Yellow on upper eye
Step 7: Use Blood Red for loincloth
Step 8: Use Fiery Orange for the fin
Step 9: Use watered down Enchanted Blue on all areas of skin - let seep into creases
Step 10: Wash Snakebite Leather onto pouch
Step 11: Use Blazing Orange in the creases of the fin
Step 12: Use watered down Scaly Green on chest
Step 13: Use watered down Red Gore on loin cloth
Step 14: Use Ice Blue as highlight on skin
Step 15: Drybrush Skull White on highlight creases
Step 16: Use Vomit Brown as highlight on pouch
Step 17: Use Golden Yellow on raised areas of fin
Step 18: Use Vile Green as highlight on chest
Step 19: Use Blazing Orange as highlight on loin cloth - may want to go down to Fiery Orange as well
Step 20: Drybrush Bubonic Brown on pouch straps
Step 21: Use Bleached Bone on claws
Step 22: Use watered down Flesh Wash on claws
Step 23: Use Burnished Gold on rings
Step 24: Very lighty drybrush just a bit of Codex Grey on the sword sheath
Step 25: Use Chaos Black and Bleached Bone on deco teeth
Step 26: Use Fiery Orange and Golden Yellow on deco headpiece
Step 27: Use Scorched Brown on pole
Step 28: Drybrush pole up to Bleached Bone
Step 29: Use Bleached Bone on teeth
Step 30: Wash teeth with watered down Flesh Wash
Step 31: Use Goblin Green on base
Step 32: Use watered down glue on base, then dip into fine ballast
Step 33: Use drybrushed Camo Green onto fine ballast

Wednesday, February 28, 2001

Games-Workshop's Blue Skink Musician


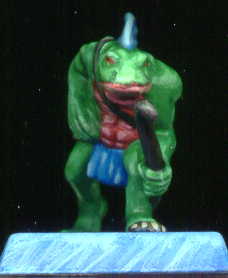
This figure is the musician for my blue skinks. The scan just does not do this one justice as the orange came out too dark. The drum strap was painted using a very fine point. Another note of interest is the shading of the skin on the drum to look like it has been well used. Completed in February of 2001.

Painting Instructions for Lizardmen Skink Musician:

Step 1: Undercoat models with white primer
Step 2: Use Lightning Blue on the skin - except bottom of head and belly
Step 3: Use Jade Green on the bottom of head and belly
Step 4: Use Bubonic Brown on the arrow pouch
Step 5: Use Snakebite Leather on the bag straps
Step 6: Use Chaos Black on eyeballs, and line in crease of the mouth
Step 7: Use Sunburst Yellow on upper eye
Step 8: Use Blood Red for loincloth
Step 9: Use Fiery Orange for the fin
Step 10: Use watered down Enchanted Blue on all areas of skin - let seep into creases
Step 11: Wash Snakebite Leather onto arrow pouch
Step 12: Use Blazing Orange in the creases of the fin
Step 13: Use watered down Scaly Green on chest
Step 14: Use watered down Red Gore on loin cloth and arrows
Step 15: Use Ice Blue as highlight on skin
Step 16: Drybrush Skull White on highlight creases
Step 17: Use Vomit Brown as highlight on arrow pouch
Step 18: Use Golden Yellow on raised areas of fin
Step 19: Use Vile Green as highlight on chest
Step 20: Use Blazing Orange as highlight on loin cloth - may want to go down to Fiery Orange as well
Step 21: Drybrush Bubonic Brown on bag straps
Step 22: Use Bleached Bone on claws
Step 23: Use watered down Flesh Wash on claws
Step 24: Use Burnished Gold on rings
Step 25: Use the Fiery Orange and Lightning Blue pattern on the drum strap
Step 26: Use Bleached Bone on drum up to Snakebite Leather in the middle
Step 27: Use Goblin Green on base
Step 28: Use watered down glue on base, then dip into fine ballast
Step 29: Use drybrushed Camo Green onto fine ballast

Monday, February 26, 2001

Games-Workshop's Blue Skink Champion


This figure is the champion for my blue skinks. I couldn't get the front view to sit on the glass correctly so I had to hold the base with my finger - that's why the black background. I really enjoyed this figure - some great detail - the mouth really sets it off. Completed in February of 2001.


Painting Instructions for Blue Skink Champion:

Step 1: Undercoat models with white primer
Step 2: Use Lightning Blue on the skin - except bottom of head and belly
Step 3: Use Jade Green on the bottom of head and belly
Step 4: Use Bubonic Brown on the arrow pouch
Step 5: Use Snakebite Leather on the arrow pouch straps and bow
Step 6: Use Chaos Black on axe
Step 7: Use Sunburst Yellow on upper eye
Step 8: Use Blood Red for loincloth and arrows
Step 9: Use Fiery Orange for the fin
Step 10: Use watered down Enchanted Blue on all areas of skin - let seep into creases
Step 11: Wash Snakebite Leather onto arrow pouch
Step 12: Use Blazing Orange in the creases of the fin
Step 13: Use watered down Scaly Green on chest
Step 14: Use watered down Red Gore on loin cloth and arrows
Step 15: Use Ice Blue as highlight on skin
Step 16: Drybrush Skull White on highlight creases
Step 17: Use Vomit Brown as highlight on arrow pouch
Step 18: Use Golden Yellow on raised areas of fin
Step 19: Use Vile Green as highlight on chest
Step 20: Use Blazing Orange as highlight on loin cloth and drybrush on arrows - may want to go down to Fiery Orange as well
Step 21: Drybrush Bubonic Brown on arrow pouch straps and bow
Step 22: Use Bleached Bone on claws
Step 23: Use Burnished Gold on rings
Step 24: Use watered down Flesh Wash on claws and rings
Step 25: Very lighty drybrush just a bit of Codex Grey on the sword sheath
Step 26: Mix Blood Red and Tentacle Pink for top of tongue using more of the red further out
Step 27: Drybrush Codex Grey and Fortress Grey on axe
Step 28: Use Goblin Green on base
Step 29: Use watered down glue on base, then dip into fine ballast
Step 30: Use drybrushed Camo Green onto fine ballast

Tuesday, February 15, 2000

Games-Workshop's Bretonnian Archer Command Group


The Bretonnian Archer Command Group was my first exposure to drybrushing, using flesh wash on the skin for face shading, creation of the standard, and an attempt at eyeballs. Completed in February of 2000.

Painting Instructions for Command Group:

Step 1: Undercoat model with white primer
Step 2: Use Elf Flesh on face and hands
Step 3: Use Blood Red on leather armor
Step 4: Use Enchanted Blue on under-garments
Step 5: Use Bestial Brown on knife handle
Step 6: Use heavily watered down Bestial Brown on hands and face
Step 7: Use Chaos Black on shoes, belt, bindings, sword, and helmet
Step 8: Use Chainmail on sword, helmet, and bits like end of belt, etc.
Step 9: Use Flesh Wash on banner pole
Step 10: Use Goblin Green on base
Step 11: Use watered down glue on base, then dip into fine ballast
Step 12: Use drybrushed Camo Green onto fine ballast
Step 13: Create banner using heavy white construction paper and paint prior to cutout using Enchanted Blue, Skull White, and Blood Red
Step 14: Glue banner around pole to create battle standard

Friday, December 31, 1999

Games-Workshop's Brettonian Archers


These figures are the very first miniatures that I painted. I purchased the starter kit which came with several of the plastic Bretonnian archers. This is the "paint by numbers" approach. Completed in November of 1999.

Painting Instructions for Archers:

Step 1: Undercoat models with white primer
Step 2: Use Elf Flesh on face and hands
Step 3: Use Blood Red on coats
Step 4: Use Enchanted Blue on under-garments and arrow fletchings
Step 5: Use Bestial Brown on bow & arrows
Step 6: Use heavily watered down Bestial Brown on hands and face (including eyes and mouth)
Step 7: Use Chaos Black on shoes, belt, bag, buttons, and helmet
Step 8: Use Chainmail on helmet, and bits like arrows, end of belt, etc.
Step 9: Use drybrushed Chainmail on arrow fletchings
Step 10: Use Goblin Green on base
Step 11: Use watered down glue on base, then dip into fine ballast
Step 12: Use drybrushed Camo Green onto fine ballast