Monday, November 18, 2002

TSR's Female Elf Magic User


This figure is an archived miniature from the 1983 TSR Official Advanced Dungeons & Dragons Magic-Users & Illusionists. The sculpt details aren't that great, but the figure was fun to paint in a simple color scheme. Finished in November 2002.

Painting Instructions for Female Elf Magic User

Step 1: Undercoat models with white primer
Step 2: Use Dark Angels Green on vest
Step 3: Use Bronzed Flesh on face and hands
Step 4: Wash face and hands with Flesh Wash and 50% water
Step 5: Use Elf Flesh on face and hands
Step 6: Use Golden Yellow on shirt and pants
Step 7: Use Scorched Brown on staff, belt, and boots
Step 8: Use Scab Red on crystal ball
Step 9: Use slightly watered down Vermin Brown on hair so as to seep into grooves
Step 10: Use Snakebite Leather on boot top fur
Step 11: Use Red Gore to Blazing Orange and highlight crystal ball blending in the layers
Step 12: Use Bestial Brown on staff, belt, and boot
Step 13: Use Snakebite Leather on staff, belt, and boot
Step 14: Use Vomit Brown on staff, belt, and boot
Step 15: Wash Fiery Orange on shirt and pants
Step 16: Use Sunburst Yellow on shirt and pants
Step 17: Use Bad Moon Yellow on shirt and pants
Step 18: Add Skull White to Bad Moon Yellow for highlights on shirt and pants
Step 19: Continue to repeat by adding more Skull White until all highlights finished
Step 20: Use Snot Green on vest
Step 21: Use Scorpion Green on vest - start to highlight mix in with Snot Green a bit
Step 22: Use Bilious Green on vest for final highlights
Step 23: Use watered down Dark Flesh on hair as a wash
Step 24: Drybrush Leprous Brown on hair
Step 25: Mix Leprous Brown and Bleached Bone as highlight on hair

Sunday, November 17, 2002

Games-Workshop's Bretonnian Henchman


These four figures were painted in a single night for my warhammer skirmish battle board scenario - troll under the bridge. Not bad - mostly washes and dryrbrushing with a few highlight layers. Completed in November 2002.

Saturday, November 16, 2002

Reaper's Samantha of the Blade - 2047


Samantha of the Blade was an older Reaper figure that I had sitting around (still have one more) from an initial purchase I made two years ago for the first female chick challenge. This one was for this years chick challenge. Not bad, had lots of difficulties with the eyes and face on this figure.

Painting Instructions for Samantha of the Blade

Step 1: Undercoat model with White Primer
Step 2: Use Black Ink on all metal bits
Step 3: Use Dark Angels Green on legs and arms
Step 4: Use Scorched Brown on leather bits
Step 5: Use Scab Red on hair
Step 6: Use Dark Flesh on face
Step 7: Wet dry-brush Boltgun Metal on chain-mail, armor, and sword
Step 8: Wet dry-brush Tin Bitz onto decorated armor and crown
Step 9: Wet dry-brush Shining Gold onto decorated armor and crown
Step 10: Wet dry-brush Burnished Gold onto decorated armor and crown
Step 11: Use watered down Storm Blue on sword
Step 12: Use watered down Dark Green Ink on chainmail
Step 13: Highlight sword with Chainmail
Step 14: Wet dry-brush chainmail with Chainmail
Step 15: Highlight chainmail and sword with Mithril Silver
Step 16: Use Chestnut Ink on hair
Step 17: Use Snot Green on clothing
Step 18: Use mix of Snot Green and Scorpion Green for first highlights on clothing
Step 19: Keep blending up to pure Scorpion Green for final highlights on clothing
Step 20: Drybrush Blood Red on hair
Step 21: Highlight hair with Blazing Orange
Step 22: Use Bestial Brown on leather bits
Step 23: Use Snakebite leather on leather bits for first highlights
Step 24: Use Bubonic Brown on leather bits for second highlights
Step 25: Use mix of Bleached Bone and Bubonic Brown on leather bits for final highlights
Step 26: Use watered down Chestnut Ink as wash on boots
Step 27: Use Vomit Brown on tops of boots
Step 28: Use mix of Vomit Brown and Bleached Bone to highlight tops of boots
Step 29: Continue adding Bleached Bone and repeat for highlights on tops of boots
Step 30: Use Bronzed Flesh on face
Step 31: Blend up highlights on face mxing Elf Flesh into Bronzed Flesh
Step 32: Add final highlights by putting Pallid Flesh into mix
Step 33: Use Chaos Black on base
Step 34: Use Chaos Black on rocks
Step 35: Drybrush rocks with Shadow Grey
Step 36: Drybrush rocks with Space Wolves Grey
Step 37: Drybrush Camo Green on grass
Step 38: Mix some Skull White into Camo Green on grass and highlight

Monday, September 16, 2002

Games-Workshop's River Troll #1


This is the first river troll painted for the skirmish scenario - under the bridge. This model was actually a blast to paint - a big ol' nasty troll!

The painting technique used was layering up from dark angels green to bilious green mixed with white. Quite a dramatic change.

The first four views show the traditional front, side, rear views. The two below are a first layer wash base which I posted to the DC area mini-painting group as a bit of discussion regarding good enough to game with versus the pure artistic painting. Essentially this was the foundation and the discussion surrounds is the foundation good enough for the gaming board - if the foundation takes 20 percent of the effort do players really need another 80 percent to fill in all the details when your looking at a game from 3 to 10 feet away?


Finished in September 2002.

Painting Instructions for River Troll 1

Step 1: Undercoat model with White Primer
Step 2: Use Chaos Black on hairy bits and scale
Step 3: Use slight watered down Dark Angels Green on all skin and scale
Step 4: Use Hawk Turquoise on hairy bits
Step 5: Use watered down Chaos Black over hairy bits - repeat Step 4 where needed
Step 6: Use Scab Red on all bony protusions, nails, tongue, and eyes
Step 7: Use Scorched Brown on log club
Step 8: Use watered down Flesh Wash on teeth
Step 9: Drybrush Snot Green on scale
Step 10: Use Snot Green on all skin
Step 11: Use Red Gore on all bony protusions, nails, and eyes
Step 12: Use Warlock Purple on tongue
Step 13: Use Tentacle Pink and blend into Warlock Purple to highlight tongue
Step 14: Use slightly watered down Scorpion Green on all skin - start to highlight
Step 15: Repeat 14 for bolder highlighting areas
Step 16: Use Blood Red on all bony protusions, nails, and eyes
Step 17: Drybrush Bestial Brown on log club
Step 18: Drybrush Snakebite Leather on log club
Step 19: Drybrush Vomit Brown on log club
Step 20: Very light drybrush of Bleached Bone on highlight of log club
Step 21: Use half 60/40 mix of Bilious Green and Scorpion Green on all skin - continue to highlight
Step 22: Use Bilious Green on all skin for highlight
Step 23: Use Bilios Green and Skull White for final skin highlight
Step 24: Use mix of Hawk Turquoise and Skull White for drybrush on hairy bits
Step 25: Use Bleached Bone on teeth
Step 26: Use mix of Bleached Bone and Skull White to highlight teeth
Step 27: Use Skull White as final highlight on teeth
Step 28: Use Skull White, Fortress Grey, and Chaos Black on toothy spikes on club

Saturday, August 24, 2002

Reaper's Orc Warrior of Kargir - 2287


The Orc Warrior of Kargir is one of the coolest orc figures - not just Reaper, but everyone else's as well. Finished in August of 2002. This one sat on my desk for a while as I decided on color scheme. I wanted dark and moody - so I went with two different tones of brown - one for the skin and the other for the leather. Again, this figure was painted with the layering technique.

Painting Instructions for Orc Warrior

Step 1: Undercoat model with White Primer
Step 2: Use Chaos Black on chainmail and bag
Step 3: Use Dark Angels Green on tattered cloth
Step 4: Use Dark Flesh on skin
Step 5: Use Scorched Brown on leather
Step 6: Use Chaos Black on metal bits on leather
Step 7: Use Bestial Brown on leather
Step 8: Use Snakebite Leather on leather
Step 9: Use mix of Snakebite Leather and Bubonic Brown as highlight on leather
Step 10: Use Bubonic Brown as final highlight on leather
Step 11: Very light drybrushing of Bleached Bone
Step 12: Use Chestnut Ink on chain mail and teeth
Step 13: Use Boltgun Metal on chain mail and spiky metal bits
Step 14: Use Flesh Wash on shield
Step 15: Use watered down Flesh wash on spiky metal bits
Step 16: Drybrush Snakebite Leather on shield
Step 17: Highlight drybrush Vomit Brown on shield
Step 18: Highlight drybrush Chainmail on chain mail
Step 19: Drybrush Snot Green on tattered cloth
Step 20: Drybrush Scorpian Green on tattered cloth
Step 21: Highligh drybrush Bilious Green on tattered cloth
Step 22: Use watered down Dark Angels Green on tattered cloth and repeat Step 21 as needed
Step 23: Use Vermin Brown on skin - all around except edges and creases
Step 24: Use Vermin Brown mixed with Leprous Brown to start skin highlights
Step 25: Use Leprous Brown as final skin highlights
Step 26: Use Blood Red on eyeballs
Step 27: Use Chaos Black on pupils
Step 28: Use Skull White within center of pupils
Step 29: Use Codex Grey on bag
Step 30: Use Fortress Grey as highlight on bag
Step 31: Use Skull White as final highlight on bag
Step 32: Use Chaos Black on sides of base
Step 33: Drybrush Camo Green on base
Step 34: Use Chaos Black on rocks
Step 35: Drybrush rocks with Shadow Grey
Step 36: Drybrush rocks with Space Wolves Grey

Thursday, July 04, 2002

Wiz Kids' Noble Archer - WZK532


My first Mage Knight limited edition metal miniature. I really enjoyed working on this mini - the sculpt is great with great detail. The face was exquisite and a joy to bring out the models character.

My only disappointment was the base itself. Instead of giving the metal knight the stat base - they put in the box a limited edition base with the name of the model - no stats.

The front and rear scans came out well. The side scan I had to tack the model to the side of the box and I am afraid that the depth might have been too deep for the scanner. I really wanted to get a good scan of the face as it was nicely sculpted and easy to bring out the details.

Painting Instructions for Noble Archer

Step 1: Undercoat model with White Primer
Step 2: Use Chaos Black on all armor
Step 3: Use Regal Blue on all cloth
Step 4: Use Blood Red on scarf and bow
Step 5: Use Dark Flesh on skin and hair
Step 6: Use 2/3 Dark Flesh and 1/3 Elf Flesh on skin
Step 7: Use 1/2 Dark Flesh and 1/2 Elf Flesh on skin
Step 8: Continue adding Elf Flesh to mix on skin
Step 9: Use Pallid Flesh into mix on skin for final highlights
Step 10: Use 1/2 mix Enchanted Blue and Regal Blue on all cloth
Step 11: Keep adding Enchanted Blue to mix on all cloth
Step 12: Start adding Lightning Blue to mix on all cloth
Step 13: Continue to add Lightning Blue to final highlights of all cloth
Step 14: Use Blazing Orange watered down as a highlight to scarf and bow
Step 15: Use Golden Yellow to mix of watered down Blazing Orange as final highlight on scarf and bow
Step 16: Use Vermin Brown on hair
Step 17: Use Leprous Brown on hair
Step 18: Use Boltgun Metal on armor
Step 19: Wash armor with watered down chestnut Ink
Step 20: Use Chainmail on armor
Step 21: Wash armor with watered down Regal Blue
Step 22: Use Mithril Silver as highlight on armor
Step 23: Use Tin Bitz on edge of chest plate
Step 24: Use Shining Gold on edge of chest plate
Step 25: Use Burnished Gold on very top edge of chest plate
Step 26: Use watered down Flesh Wash on gold
Step 27: Use mix of Chaos Black and Codex Grey for highlight of strap around back of knee
Step 28: Use Red Gore on boots
Step 29: Use Blood Red on boots
Step 30: Use Blazing Orange as highlight on boots
Step 31: Use Golden Yellow as final highlight on boots

Thursday, May 23, 2002

TSR's Female Monk


This figure is an archived miniature from the 1983 TSR Official Advanced Dungeons & Dragon Monks, Bards, & Thieves. While an interesting model, I find it amazing how far sculpting has come within the fantasy line.

The model shows a lot of flow which made the robes enjoyable to paint. Again, I used the dark to light painting method whereby the basecoat of the model started at Dark Angels Green. Finished in May 2002.


Painting Instructions for Female Monk

Step 1: Undercoat models with white primer
Step 2: Use Dark Angels Green on robe
Step 3: Use Bubonic Brown on hood and leggings
Step 4: Use Scorched Brown on pouch and ropes
Step 5: Use Bestial Brown on pole
Step 6: Use Chaos Black on blade
Step 7: Use Dark Flesh on hair
Step 8: Use mix of Bronzed Flesh and Elf Flesh on skin
Step 9: Use mix of Dark Angels Green (2/3) and Snot Green (1/3)on robe
Step 10: Use mix of Bestial Brown and Snakebite leather on pole
Step 11: Keep lightening up mix with Bubonic Brown on pole
Step 12: Use mix of Snot Green (2/3) and Dark Angels Green (1/3) on robe
Step 13: Use watered down Snot Green on robe
Step 14: Add a glob of Scorpion Green to watered down Snot Green and put first highlight layers on robe
Step 15: Add a glob of Bilious Green to watered down mix and put final highlight onto robe
Step 16: Use Bubonic Brown and add a dab of Bleached Bone - highlight hood and leggings
Step 17: Continue Step 16 by adding more Bleached Bone to the mix until pure Bleached Bone highlight
Step 18: Use Elf Flesh as highlight on skin
Step 19: Use Pallid Flesh as final highlight on skin
Step 20: Drybrush Vermin Brown on hair
Step 21: Drybrush Leprous Brown on hair
Step 22: Use Bestial Brown on pouch and ropes
Step 23: Use Snakebite Leather as highlight on pouch and ropes
Step 24: Use Bubonic Brown as final highlight on pole
Step 25: Use Chaos Black on base

Friday, May 17, 2002

Emperors Choice Anna Streetshadow


Anna Streetshadow is from Box 1 of the Legends Eternal Fantasy Miniatures. Instead of the "blending" technique, this model was painted using the dark to light overstroke method.

Finished in May 2002.

Painting Instructions for Anna Streetshadow

Step 1: Undercoat models with white primer
Step 2: Use Bronzed Flesh on skin
Step 3: Use Dark Angels Green on cloak
Step 4: Use Bestial Brown on pants
Step 5: Use Chaos Black on all leather and metal
Step 6: Use Red Gore on belt
Step 7: Use Dark Flesh on hair
Step 8: Wash skin with watered down Flesh Wash
Step 9: Use mix of Bronzed Flesh and Elf Flesh on skin
Step 10: Use mix of Dark Angels Green (2/3) and Snot Green (1/3) cloak
Step 11: Use mix of Bestial Brown and Snakebite leather on pants
Step 12: Keep lightening up mix with Bubonic Brown on pants
Step 13: Use Scorched Brown on boots and leather straps - leave black edging and creases
Step 14: Use mix of Snot Green (2/3) and Dark Angels Green (1/3) on cloak
Step 15: Use watered down Snot Green on robe on cloak
Step 16: Add a glob of Scorpion Green to watered down Snot Green and put first highlight layers on cloak
Step 17: Add a glob of Bilious Green to watered down mix and put final highlight onto robe
Step 18: Use Bestial Brown as highlights on boot and leather straps
Step 19: Use mix of Bestial Brown (2/3) and Snakebite Leather (1/3) as final highlight on boots and leather straps
Step 20: Drybrush Boltgun Metal on sword and metal bracelets
Step 21: Drybrush highlight of Chainmail on sword
Step 22: Drybrush final highlight of Mithril Silver on sword
Step 23: Use a black wash on metal bracelets to dull down the metal
Step 24: Drybrush Codex Grey on bags
Step 25: Drybrush highlight Fortress Grey on bags
Step 26: Use a black wash on bags to dull down highlights
Step 27: Drybrush Vermin Brown on hair
Step 28: Drybrush highlight Leprous Brown on hair
Step 29: Final highlight drybrush of mix Leprous Brown and Bleached Bone on hair
Step 30: Use Blood Red as a highlight on lower part of belt
Step 31: Use Blazing Orange as a final highlight on belt
Step 32: Use Chaos Black on base

Tuesday, May 14, 2002

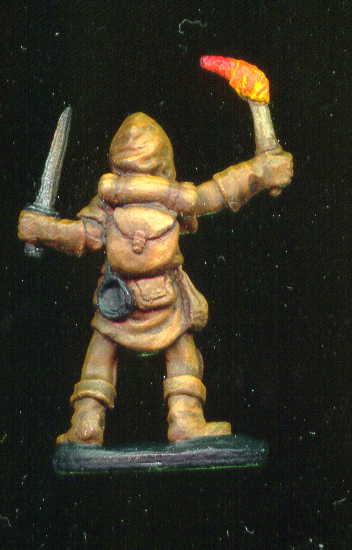
Ral Partha's Brown Thief


This figure is an archived miniature from Ral Partha circa 1984. I don't know much more about it other than that.

I have had this model sitting around staring at me on the table for awhile.
Every time it just kept saying brown. When I had some extra brown left over from another model I just went to town. My goal was to create "color" using various shades of brown. I kept highlighting or darkening my main color accordingly. My attempt at this was purely academic and the light source was the torch instead of the typical overhead lighting. Therefore the model should give a feeling of the yellow/red torch casting it's glow across the model.

I tried something else too that didn't quite work. When finished, I used a yellow/orange wash on the brown highlights to try and create a glow from the torch affect. It seemed to only dull the highlights down and therefore didn't really work as desired although if you look closely at the highlights you should be able to see the yellow/orange tint. I just thought it would be more profound of an affect.

Finished in May 2002.

Sunday, March 10, 2002

Reaper's Stern Kestrelman - 2338


Stern with the giant two handed sword is very cool. Complete in March 2002. This miniature was painted using the layered approach - starting with the darkest colors and layering the lighter colors until the final highlight. I also went to a lighter highlight in the hair than I normally do - I'm quite pleased with the result. Another first was the application of the silver on the armor was many trials of a dark metalic, wash, a bit lighter metalic, wash, and treating the metalics like any other part - shading and highlighting. There are several non-painting things about this mini - first, the base is one of Reaper's optional hexagonal bases - very cool. Second, use of static grass. Third - sculpting of the rocks - it's so basic, but my sculpting abilities suck - so this is a big deal.

Recently we've had some discussion regarding backgrounds for our scans in a local painting group - the theory was black is best. I have always used white in the past - so I did some experimenting with different backgrounds made from construction paper. Using a regular 8.5 x 11 piece of paper. I made a 45 degree cut in each corner so that the sides are 1.25" (that cut was 1.75"). I folded each side to make a box top and then placed over the mini. Scanned it on an HP 5P scanner - used the HP Deskcan II software to automatically calibrate and here are the results.

The end results are a test with black (as above), light blue/grey, green, white. Since the paper sits 1.25" off the scanner - it tends to darken a bit more than what the paper really is. Select each one and take a good look at big picture. Let me know which background you like best by posting your comments.


Painting Instructions for Stern Kestrelman

Step 1: Undercoat model with White Primer
Step 2: Use Dwarf flesh on face
Step 3: Use Bronzed Flesh on face
Step 4: Use Elf Flesh on face
Step 5: Use Dark Flesh on hair
Step 6: Use Chaos Black on all armor and steel
Step 7: Mix Chaos Black and Red Gore for cloak
Step 8: Use Scorched Brown on Leather
Step 9: Use Boltgun Metal on all metal armor
Step 10: Use watered down Flesh Wash and Regal Blue mix on armor
Step 11: Use watered down Chainmail on armor
Step 12: Highlight with watered down Mithril Silver
Step 13: Use Red Gore on cloak
Step 14: Use Red Gore and Blood Red mix for cloak highlights
Step 15: Use Red Gore and Blood Red mix for basecoat on sword
Step 16: Continue adding Blood Red to mix, then Blazing Orange, then Golden Yellow to cloak and sword
Step 17: Water down Golden Yellow and wash over sword
Step 18: Use Vermin Brown as first layer of highlight on hair
Step 19: Drybrush Leprous Brown on hair
Step 20: Drybrush mix of Leprous Brown and Bleached Bone on hair
Step 21: Use Bestial Brown on all leather
Step 22: Highlight leather with Snakebite Leather
Step 23: Final highlight leather with Bubonic Brown
Step 24: Wash final highlights with Snakebite Leather
Step 25: Use Chaos Black on sides of base
Step 26: Drybrush Camo Green on base
Step 27: Use Chaos Black on rocks
Step 28: Drybrush rocks with Shadow Grey
Step 29: Drybrush rocks with Space Wolves Grey

Friday, December 14, 2001

i-Kore's Male Fighter


This is a science fiction character given to me some time back by Jason Moses (Thanks Jason!) to try out some techniques.

So that's exactly what I did - I went with extreme darks and lows going a shade lighter and a shade darker than what I would normally utilize.

The paint job is also done in thin layers. Starting with the dark colors and moving to the lighter colors. In some areas I think I left too much dark and not enough mid-tones, but it makes the character jump off the table due to the high contrast.

Finished in December 2001.

Sunday, December 09, 2001

Games-Workshop's Dwarf


The dwarf was an interesting experiment in drybrushing as he's mostly hair, feathers, chain armor, and metal. When I drybrushed, the paint was a bit watered down to be more precise. The cloak on the back was blended starting with the medium blue and working down and then up the color scale. The axe handle shows that I need to learn how to make a wood texture when there is none in the mini. Finished in December of 2001.

Painting Instructions for Warhammer Quest Dwarf

Step 1: Undercoat model with White Primer
Step 2: Use Dwarf flesh on face
Step 3: Use Chaos Black on base, steel, beard, and helm feathers
Step 4: Use Scorched Brown on axe handlesword handle, sheeth, and pouch
Step 5: Use Enchanted Blue on cloack
Step 6: Use Golden Yellow on gloves
Step 7: Use mix of Dwarf Flesh and Elf Flesh on cheeks and nose
Step 8: Drybrush Codex Grey on beard and wings
Step 9: Drybrush Fortress Grey on beard and very lightly on wings
Step 10: Drybrush Skull White on beard and extremely lightly on top part of wings
Step 11: Wash beard with Chaos Black
Step 12: Re-drybrush beard lightly with Skull White
Step 13: Use Chainmail on all metal bits
Step 14: Use Mithril Silver on highlights of axe
Step 15: Use Shining Gold on all edges of metal highlights
Step 16: Use watered down Flesh Wash on all metal
Step 17: Use Dark Angels Green on cloth between hands and armor
Step 18: Use a Flesh Wash on the gloves - getting into grooves between fingers
Step 19: Use Golden Yellow on gloves
Step 20: Use Sunburst Yellow on gloves - sides and top
Step 21: Use Bad Moon Yellow on gloves - top
Step 22: Mix Bad Moon Yellow and Skull White - use to highlight gloves
Step 23: Add more Skull White to mix and finish highlights on gloves
Step 24: Add continued highlights on all Scorched Brown of Bestial Brown, Snakebite Leather, Bubonic Brown, and then Bleached Bone
Step 25: Use slightly watered down Snakebite Leather on top of markings in axe shaft
Step 26: Use Chaos Black with a drop of Codex Grey on boots - continue to add drop of Codex Grey - highlight final with Codex Grey
Step 27: Water down Chaos Black and wash over boots dulling the highlights
Step 28: Blend down to Regal Blue and up to Lightning Blue on cloak
Step 29: Drybrush stone base with Shadow Grey, Space Wolves Grey, and then final highlight of Ghostly Grey

Wednesday, November 21, 2001

Games-Workshop's Lahmian Vampire


This figure represents some new painting and basing techniques for me. Originally purchased for the Chick Challenge II - I didn't have time, but I did challenge myself with a new technique. This was done following the White Dwarf - Painting with the Average Joe article. What's different is that I started from dark to light and overlapped the paint instead of blending. Normally I start in the middle and blend down then up. Completed in November of 2001.

Painting Instructions for Lahmian Vampire:

Step 01: See White Dwarf 257
Step 02: Undercoat model with white primer
Step 03: Use Scorched Brown on the three skulls
Step 04: Use Chaos Black on trim and metal
Step 05: Use Dark Angels Green on dress
Step 06: Use mix of Dark Flesh and Elf Flesh on skin
Step 07: Use Scab Red on shoes and snake
Step 08: Use mix of Dark Angels Green and Snot Green on dress
Step 09: Use a bit more Elf Flesh in the mix of Dark Flesh on skin
Step 10: Use mix of Scab Red and Blood Red on shoes and snake
Step 11: Use Snakebite Leather on the three skulls
Step 12: Use Snot Green on dress
Step 13: Use Blood Red on shoes and snake
Step 14: Use a bit more Elf Flesh in mix of Dark Flesh on skin
Step 15: Use Bubonic Brown on the three skulls
Step 16: Use Burnished Gold on metal bits
Step 17: Use mix of Chaos Black and Fortress Grey for black highlights
Step 18: Use mix of Snot Green and Sunburst Yellow to highlight dress
Step 19: Wash metal bits with watered down brown ink
Step 20: Use Snakebite Leather and Bleached Bone on teeth
Step 21: Eyes - paint black and then dot on either side
Step 22: Use mix of Fiery Orange and Blood Red for final highlights on shoes and snake
Step 23: Use Pallid Flesh into skin mix for final highlights
Step 24: Use Shining Gold as highlight to metal bits
Step 25: Use mix of Shining Gold and Mithril Silver for final metal bits highlight
Step 26: Use thinned down Scab Red on lower lip
Step 27: Use Goblin Green on base

Sunday, September 02, 2001

Games-Workshop's Wizard


The wizard really turned out well for me. It was my first attempt at making a white cloak and using shades of grey to blend. I also used a very light wash of blue over the white. The gems on this model are getting better but there is still lots of room for improvement. Finished in September of 2001.

Painting Instructions for Warhammer Quest Wizard

Step 1: Undercoat model with White Primer
Step 2: Use Bronzed Flesh on skin
Step 3: Use Chaos Black on base, beard, and metal
Step 4: Use Enchanted blue on cape
Step 5: Use Blood Red on shoes, scarf, staff
Step 6: Use Fortress Grey on cloak
Step 7: Use Snakebite leather on belt, pouch, scrolls
Step 8: Use Snot Green on gems and potion bottle
Step 9: Use Sunburst Yellow on bottom of scarf - flames
Step 10: Blend Scab Red thru Golden Yellow on sword
Step 11: Drybrush Tin Bitz, Shining Gold, then Burnished Gold on staff and sword
Step 12: Blend various mix of Fortres Grey to Skull White on robes
Step 13: Wash robes with watered down Ice Blue
Step 14: Blend Cape from Regal Blue to Ice Blue
Step 15: Drybrush Codex Grey to Skull White on beard
Step 16: Blend Blood Red bits from Scab Red to Fiery Orange
Step 17: Finish Blood Red bits with highlight of Golden Yellow
Step 18: Highlight Yellow Flames with Bad Moon Yellow and Skull White
Step 19: Shade and highlight the green bag and gems with Dark Angels Green to Bilious Green
Step 20: Highlight hat with mix of Chaos Black and Codex Grey, then highlight with Codex Grey
Step 21: Shade flesh with Vermin Brown mixing with Bronzed Flesh and highlighting with Elf Flesh
Step 22: Drybrush base with Codex Grey and Fortress Grey