Sunday, November 14, 2010

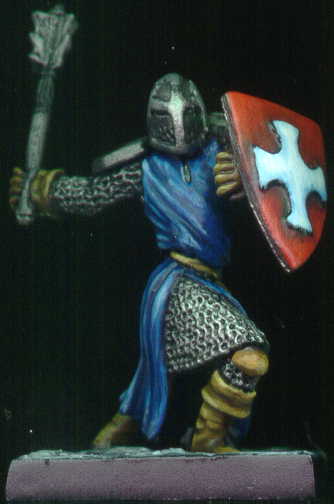
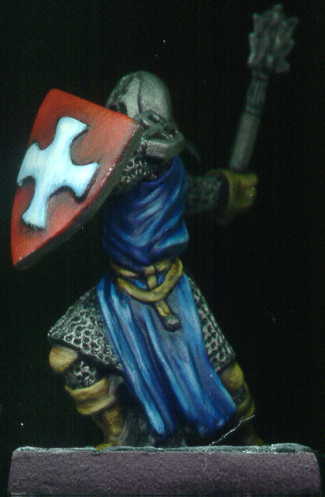
Reaper's Sir Justin, Templar Adventurer - 2715


While Reaper named him Sir Justin - I ran out of room and shortened it to Sir Jon. I used the same painting scheme as the two previous templar knights in my collection - 2330 and 2513.

I'm starting to feel more comfortable with each mini painted - I'd say this is as equivalent or maybe even better in some areas as the other two templar knights.

Saturday, October 23, 2010

Reaper's Unknown, Rogue (2677D)


2010-12-13 - UPDATE FROM REAPER'S RON HAWKINS:
Here's the deal. Originally, the pack was going to have the scimitar
wielding mini. But, the figure was replaced with a more "Bandit-y"
feel to it (the Pirate-y looking bandit was converted to the one with
hood and short sword).

I just replaced the photo online with the correct shot. And I looked
in our mold department - all 02677 D molds only have the "correct"
model (short sword).


** Please help in identifying this Reaper miniature - note that the dagger in the left hand was added by me **

Hmmmm... what to say about this miniature - first off it was a test bed for putting a name on the miniature - see below post - I added a scroll style on the front as the "official" name badge.

Then it was a test for some new Vallejo Game Color paints in the brown family which I picked up from Leesburg Hobbies. The matching colors were to GW's scorched brown, bestial brown, and bubonic brown to replace my dried up GW paint pots.

It started off alright as I primered in black. Then used a watered down scorched brown - the opacity was nice with the Vallejo and the results can be seen in the below post regarding the nameplates.

Next I used the bestial brown and I was rather disappointed with the coverage - it wasn't doing what I needed and required multiple layers - more effort than what I was wanting to give or expecting to have to do. I was hoping for more of a coverage experience that I was having with the scorched brown.

Building up to the next layer was bubonic brown and here's where I became really unhappy. If I watered down the paint, the opacity of the paint moved to the edges of the brush and I wasn't getting any coverage with the actual brush stroke - it looked like I was painting railroad tracks. I know it wasn't the brush as I'm painting with Windsor & Newton Series 7 - probably the finest line of brushes for miniature painting. Not watering down the paint is of course too thick and not a real option.

After battling with that for awhile I moved up and added a bit of Vallejo skull white to the mix and walla - beautiful brushstrokes - don't get it - but by that point in time I was overally frusturated - dabbed on some highlights and called it a day.

Sunday, October 10, 2010

Work In Progress


=======================

2010-10-11: update - added second picture showing use of scorched brown for lettering and an attempt at making a brass plate nametag - brass plate was done using bubonic brown for the base, then adding skull white and making a line through the top middle, then adding more skull white and adding another line on top of that - then adding black dots for the "rivets".

Additional sample - a plankwood - bubonic brown base with bestial brown on top with scorched brown lettering and holes with boltgun metal bolts.

Final additional sample? - two more pics - one using actual metallics - nope - looks awful - then back to using bubonic brown for the base, then bleached bone in the middle, finishing with a strip of skull white in the very middle (in essence the highlighlighting goes inwards - darkest on the outside and "shiniest" in the middle).

=======================

Didn't get a lot of painting done this weekend - simply a basecoat and a little test I'm working up.

The next project is going to be another Reaper of a rogue - this time I'm doing him up all in a single color - brown - but the real point of this post is to take a look and showcase the naming of a miniature. It's something I've been wanting to do for awhile and just haven't thought about how I want to go about doing it.

Two thoughts...

1st - is to put a signature on the model and a date - either year or month/year

2nd - when playing an rpg and plopping down a bunch of minis - it's difficult to keep track of all the minis on the table for the NPC (non-player characters - the ones being ran by the dungeon master / game master / judge) - typical conversation:

player: I'll attack the green orc
judge: which of the six
player: the one on the left side
judge: there's three on the left
player: the one with the sword
judge: there's two with a sword
player: the one that has the red doohicky thingy on his body

and so on... - whereas it's really easy to google up an orc name and finding a website - now if you dropped on the table Vrunk, Kridish, Bruuk, Hork, Hagdush, and Buulg; then the role playing will go a whole lot faster when the player announces they're going to attack Vrunk!

I've also thought about just putting numbers on them - or a little flag with a number on them, but how boring is it to say elf attacks number 7 when the player can say Calaitharnith attacks Vrunk.

I was also thinking about freehand white lettering the name on the base, but I thought it a bit boring and therefore never did anything.

So I recently came across the website of Glyn Evans who goes by the name Zaphod. About 2004 he started to sign his stylized name of Zaphod on the base of the miniature in what looks like a tattered scroll - he eventually gave that up for a stylized Z and the year - then on his latest minis painted for gaming he used the tattered scroll affect for putting the miniature name on the front - another example - I really like that idea and I gave it a try tonight.

I started out with a set of white lines to make a solid block. Then I "yellowed" them with some bleach bone in the middle. Followed that up with some black cutouts. Finally the lettering - my consulting is Zingodia Systems - Zingodia is a bit long to use - so I used Zing and the year.

For my first try:
- tattered edge is good - I think the cuts on top and bottom is a bit much
- lettering is too thick - need a bit more practice
- black lettering is too strong - probably a bestial brown would be better - aged lettering goes brown - can give scorched brown a try as well

Thursday, October 07, 2010

Hackmaster Human Magic-User male - K&C4080


Here's the end result of the WIP miniature - I was able to spend an hour here and there on it this week. This miniature is from the HackMaster line by Kenzer and Company. HackMaster was supposed to be a parody of the original D&D game. They did some rather strange stuff in the "old-school gaming" look.

With all the wackiness that was Hackmaster, the miniature is actually very good - right up there with any of the Reapers that I enjoy - which make sense as Kevin Contos sculpted this as well as a number of the early Reaper miniatures.

Monday, October 04, 2010

Work In Progress


Quick update on what I'm working on - had some time Friday night and Saturday night to do a little bit of painting each night. Just about finished - need to complete the eyes, beard (red, or red/brown, or brown, or grey), metalic bits, and stone base.

Thursday, September 30, 2010

Kids...

I was on the DC mini-painting Yahoo group tonight and happened across some old files from the first time we met back in summer of 2001 at the Chantilly Game Parlor (back then it was the only Game Parlor). These were posted by Jason Moses who was living in the DC area at the time. Oh my goodness - look at these pictures - the kids would have been 5 and 8.


That was nine years ago - they did some Warhammer, Warhammer 40k, Lord of the Rings, and a few Reaper's for a D&D game over the years - but both love the ballfield which is where they spend all their time. This is a pic from this summer - on a Saturday at the ballfield prior to them both having a game...


There's one more coming along - who knows when he'll be willing to sit down and paint with me. I have a feeling it will be awhile as he's a real handful and full of energy - doesn't sit still. He turned 4 this summer and is the main reason for my mini-painting hiatus these past five years (pre-baby year prior was spent painting bedroom and getting ready!) as it's hard to do anything with a baby in the house. A bit of family resemblance?

Tuesday, September 28, 2010

Hobby Desk...


Thought it would be fun to show off the hobby desk tonight.

* hobby room is the only unfinished room in the house - it's about 10'x12' in size located in the basement - I bought a piece of inexpensive carpet from home depot to cover the cement floor - desks are made from 2x4's and topped with that wood made from sawdust (it's cheap, light, but extremely sturdy).

Going from left to right...

* newish laptop computer - used to play cd's (not very often), pandora radio (very often), and update the blog.

* two shelves of opened and unpainted miniatures.

* old laptop computer - runs a custom piece of software I wrote to enter in step by step instructions as I'm painting, then a routine categorizes all the paint used, also displays a picture of the finished miniature - I use this for reference on past miniatures I've painted or experiments performed.

* a spotlight from Littlite (pronounced little light) - this is a company that I worked with when I was a consultant implementing enterprise software systems - the company has a very interesting history to it in that the company originally (and still does) made custom sound and light boards for rock bands (Emerson Lake and Palmer was first client). They needed a small and flexible light to see controls during the concert and the littlite was born. I use two daylight florescent bulbs hung from the ceiling but this puts a little spot light on the actual work without getting in the way.

* a shelf of spray paint, glue, and air canister.

* a shelf of painted miniatures (except for the pile of in the blister mage knight special editions).

* above that is a third shelf with years of dungeon, dragon, and white dwarf magazines.

* a paint color highlight/shading reference chart.

* three boxes of GW paints - most of them have gone bad - I'm trying to decide between reaper master or vallejo game color - problem is that I can't find anyone who stocks either in the area

* a pile of based miniatures - some are primered.

* water cup and folded paper towel for cleaning brushes.

* pop.

* Jim Beam barbeque sunflower seeds and spit cup - absolutely the best seeds.

* old version of how to paint citadel miniatures.

* paint brushes stuck upside down in styrofoam.

* paint sticks for whatever.

* roll of paper towels for cleanup.

* 2 old wireless g network cards that I need to get rid of - any takers?

* a clear, 3 drawer, fully loaded filing cabinet bursting to the seems with in the blister miniatures (it's clear so I can constantly be aware of how many unpainted minis there are!).

Sunday, September 26, 2010

Reaper's Dirk, Male Rogue - 2555


2010-09-27 - updated - thanks to comments from "bighara" - this is indeed a sculpt by Sandra Garrity from Reaper and is number 2555 - Dirk, Male Rogue.

======================

An old reaper fighter that was sitting on the shelf (probably early 2100/2200 series sculpted by Sandra Garrity) - my goal was to paint something Friday night (Saturday morning) to a nice tabletop standard within the few hours given of the evening after the family went to sleep - basically to push a time limit and get back some painting speed. To that end the color scheme is basic brown and green.

Overall I achieved what I was hoping to do - there's parts that came out which I'm very happy with and there's other areas I don't care for - but the success was getting the paint down in rapid succession for each layer.

Sunday, September 19, 2010

Games Workshop's Armoured Skeleton With Spear 3


This skeleton from Games Workshop is circa pre-2000 - I've always liked the strong look of GW's armoured (british spelling) skeletons. Long ago I went to a GW Games Day in Baltimore and picked up some bits including shields with skeletons on them - I used one of these instead of the boring round plastic shield. I also tossed out the tiny base and mounted him on GW's one inch base - then gave it my standard dungeon look.

There's no drybrushing on this model - all painting was layered from dark to light colors including the metal. I used a copper color on the breastplate to ease the brightness of the silver scale armor.

Wednesday, September 15, 2010

Wiz Kids' Wraith - WZK558


Finished something a bit different - I wanted to work up a mini where I could focus on layering to get back into a groove - therefore I found this Mage Knight Limited Edition piece and went for it! I already had done something similar with red, purple, blue, and green on other ghosts/wraiths in my collection - therefore yellow was chosen.

Using yellow was a good/bad choice. Yellow has to be the most difficult color to work with as it doesn't cover very well and needs many many many layers to get good looking results. Therefore I received numerous amounts of layering practice and in the end it turned out ok. Started with Fiery Orange and worked up to Bad Moon Yellow and then continued by adding Skull White to the mix.

Sunday, September 12, 2010

ZN Games Goblin Dungeon Scout - 23-004


Yahoo!! Another mini painted in 2010 - maybe I can get another one or two cranked out, but then I think the kids sports and projects at work are going to sap my time - but here's a miniature from ZN Games' Unearthed Hyperborean Age straight from the package - as you can see, it has the same 2d sculpting feel as the other goblin and fighter and uses the same hexagon 1" base. I'm fairly certain that the other two are from ZN Games as well.

2014/12/30 update - found the sculptor to be Chaz Elliot.

This is kind of a goofy miniature whereby the sword is twice the size of the figure - and how about them antlers. I kept with the same blue skin tone to match up with the other gobo. I'm starting to feel a bit more comfortable and the non-metalic parts are a slight step up from the previous figs. The metal armor - and there's a lot! - I painted on versus using a drybrush technique - I tried to leave blacklining between bits and used the metallics extremely watered down building up multiple layers.

A did a slight variation on the side of the base - instead of the striping as in the previous gobo, it was more of a drybrush - not sure if it really works - not bad, just different.

Painting Instructions for Goblin Dungeon Scout:

Step 01: Undercoat with black primer
Step 02: Use 50/50 mix of Dark Flesh and Blazing Orange on hair
Step 03: Use Blazing Orange as highlights on hair
Step 04: Use 50/50 Blazing Orange and Skull White for hair final highlight
Step 05: Wetbrush Dark Flesh on horns
Step 06: Add Bleached Bone - continue to white - then wash with Dark Flesh
Step 07: Use Enchanted Blue on skin
Step 08: Use mix of Enchanted Blue and Skull White on skin - continue adding Skull White until 2 parts Skull White to 1 part Enchanted Blue
Step 09: Use Boltgun Metal on all armor and sword
Step 10: Use Mithril Silver for armor and sword highlights
Step 11: Use Snakebite Leather for leather
Step 12: Use Vomit Brown for leather highlights
Step 13: Use mix of Vomit Brown and Bleached Bone for leather highlights
Step 14: Use drybrush of Codex Grey on stones
Step 15: Use drybrush of Fortress Grey on stones
Step 16: Use drybrush of Skull White as final highlights on stone

Thursday, September 09, 2010

ZN Games Goblin Dungeon Boyo - 23-006


Hey - another painted miniature within 8 days! More painting then I've done in 3 years.

I believe this is another ZN-Games model (2010-09-24 - I happened to come across one in the package at my local hobby/gaming store - it is the Goblin Dungeon Boyo number 23-006 - title has been updated) - they all have the same one inch octagonal base and what I call a 2d look - there's a front to the model and a back to the model but no real effort at making the model look good from the side. This is typical of the smaller casting shops that kept the mold making simple.

2014/12/30 - discovered that the sculptor is Kev Adams.

I've grabbed these two models as they're easy to paint and I figured that would be a good place to reshape my skills and a blue goblin with orange hair is a bit whimsical but hey - they're on opposite sides of the color wheel so I'm within good color theory!

The fighter below looked like he was a barbarian out of the north - so I modeled a bit of snow which was a first for me. For this base I went back to my traditional in the dungeon look - but I did a bit of what can be best called a drybrush swipe along the sides. I've seen this done previously by another painter to good affect and tried it way back when on a model of a small lizardman using blue and white on the base. It's a bit different and breaks up the monotony of a black base.

Painting Instructions for Archived Goblin:

Step 01: Undercoat with white primer (should have been black)
Step 02: Use Enchanted Blue on goblin skin (something different)
Step 03: Use Chaos Black on all armor and weapon bits as well as hair
Step 04: Use Boltgun Metal on all armor and weapon bits
Step 05: Use Dark Flesh on all leather and wood
Step 06: Use 50/50 mix of Dark Flesh and Blazing Orange on hair
Step 07: Use Blazing Orange as a wet drybrush on hair
Step 08: Use Snakebite Leather on all leather
Step 09: Use Bubonic Brown on all leather as highlight
Step 10: Use 50/50 Bubonic Brown and Bleached Bone as final on leather
Step 11: Use Bleached Bone on skull
Step 12: Use Skull White as highlight on skull
Step 13: Use Vomit Brown as wood highlight
Step 14: Use 50/50 Vomit Brown and Skull White as final wood highlight
Step 15: Use Blazing Orange as highlights on hair
Step 16: Use 50/50 Blazing Orange and Skull White for hair final highlight
Step 17: Wash of Regal Blue on skin with focus on crevices for shading
Step 18: Use 2:1 Enchanted Blue and Skull White for skin highlights
Step 19: Use 1:1 Enchanted Blue and Skull White for skin highlights
Step 20: Use Chainmail on metal highlights
Step 21: Use Mithril Silver on metal for final highlights
Step 22: Use Chaos Black on base
Step 23: Drybrush Codex Grey on rocks
Step 24: Drybrush Fortress Grey on rocks

Wednesday, September 01, 2010

ZN Games Human Hero - 23-014


2012-03-25: I came across a webstore today called Ahzz'z who happened to have a few of the Hyperborean Age miniatures and therefore this is no longer an unknown "archived" miniature - it is indeed from ZN-Games and is figure 23-014 the Human Hero.

==================================

The paints still live! Well sort of - it's been a couple of years and there's not much wet paint in the buckets - even the year or two prior to the past two years had only one mini - this is the post Matthew era. But nevertheless, I've managed to find a bit of time to paint a miniature this past weekend - yahoo!

Not my best work, but far better than I actually anticipated - between the dried up paint and the rusty skills, I'm surprised it doesn't look like a big blob. This miniature was hanging around and it had a black undercoat on it - additionally, it was a lot of chainmail armor - easy to drybrush as a welcome back. I think it's from ZN-Games and their Unearthed line - however, I no longer have the blister package and ZN-Games is defunct - I couldn't find a website out there with their products to match up a picture.

Might notice the pics are a bit different. I've tossed out my really old computer (it was 13 years old - one massive piece of iron - they don't make them that way no more!!) which had a SCSI card in order to run the HP scanner I was using. I'm now using laptops, so I'm not able to hook up the old scanner. Therefore the pictures were taken using a digital camera, tossed into ms paint, zoomed up to 400x, and edged out by hand.

Painting Instructions for Archived Fighter:

Step 01: Undercoat with Black Primer
Step 02: Use Dark Flesh on face
Step 03: Use Skull White mixed with Dark Flesh for highlights
Step 04: Continue adding white until final highlights on tip of nose
Step 05: Use Red Gore on beard
Step 06: Drybrush Blood Red on beard
Step 07: Use Boltgun Metal on all armor and helmet
Step 08: Use Snakebite Leather on leather bits
Step 09: Use Bubonic Brown as highlights on leather bits
Step 10: Use Bleached Bone on horns
Step 11: Wash horns with watered down Dark Flesh
Step 12: Highlight horns with Bleached Bone
Step 13: Use Snot Green on shirt and pants
Step 14: Use Skull White mixed with Snot Green on shirt/pants highlight
Step 15: Use Chaos Black on eyes and dot with Skull White
Step 16: Use Skull White on snow
Step 17: Wash snow with watered down mix of Skull White with a little drop of Enchanted Blue
Step 18: Drybrush Skull White on snow
Step 19: Use Chaos Black on base

Friday, January 04, 2008

Reaper's Carnessa, the Terrible - 2077


Wow!

First miniature painted for 2008! Actually I started this model and completed about 3/4 of the work throughout December and then put the finishing touches on it this first week of January.

I copied this paint scheme from an old miniature I did of a skeleton king called Golgath, Eradicator. This figure will match nicely as the queen.

Not too bad overall - still getting the paintstroke back as well as patience - I'm not as smooth and there really needs to be more layers building up from dark to highlights which you'll see is much better on the older model. Overall it's a good match and they'll look great on the gaming table together.

Unfortunately, the way this miniature is designed - the left side can't be scanned - so you get the front, right, and back sides.

Painting Instructions for Carnessa, the Terrible:

Step 01: Undercoat model with Chaos Black
Step 02: Use Nauseating Blue on cape
Step 03: Use Liche Purple on cape
Step 04: Use Warlock Purple on cape - start highlighting
Step 05: Use Tentacle Pink on cape as highlights
Step 06: Mix Skull White and Tentacle Pink - continue until final highligh
Step 07: Use Vomit Brown on bones
Step 08: Mix Bleached Bone into Vomit Brown on bones
Step 09: Use Bleached Bone on bones as highlights
Step 10: Mix Skull White into Bleached Bone on bones as final highlights
Step 11: Use Scaly Green on tattered clothing
Step 12: Mix Vile Green into Scaly Green on tattered clothing
Step 13: Continue to add Vile Green on tattered clothing - start highlight
Step 14: Mix Skull White to Vile Green on tattered clothing for highlight
Step 15: Continue to add Skull White for tattered clothing final highlight
Step 16: Use Leprous Brown on gloves and boots
Step 17: Mix Golden Yellow into Leprous Brown on gloves and boots as highl
Step 18: Mix more Golden Yellow into Leprous Brown on gloves and boots as
Step 19: Mix Skull White into Golden Yellow/Leprous Brown on gloves and bo
Step 20: Drybrush Shadow Grey on hair
Step 21: Drybrush Space Wolves Grey on hair for highlight
Step 22: Drybrush Ghostly Grey on hair for further highlights
Step 23: Drybrush Skull White on hair for final highlights
Step 24: Use Codex Grey on bat wings for highlight
Step 25: Use Fortress Grey on wings for final highlight
Step 26: Use Scorched Brown on staff
Step 27: Use Snakebite Leather for final highlights on staff
Step 28: Use Boltgun Metal on all metal bits
Step 29: Use Tin Bitz on helm
Step 30: Use Chainmail to highlight metal
Step 31: Use Brazen Brass to highlight helm decoration
Step 32: Use Mithril Silver as final highlight to metal
Step 33: Drybrush Codex Grey on base
Step 34: Drybrush Fortress Grey on base highlights
Step 35: Drybrush Skull White on base for final highlights

Friday, December 07, 2007

Maiden of the Blade #2...


I finally did it! A miniature painted in 2007. It's been a long time, but it's like riding a bike - once you get back on it's not too hard to get back in the groove. I picked a spare mini from a bag of stuff that I had in the drawer.

I'm not at all sure where I picked this mini up - nor do I have any idea of the company - I thought it might be i-Kore but I couldn't find this miniature on-line in any catalogs.

2014/12/31 - Update - found it! - this figure is from the Chronopia line produced by Heartbreaker - figure #2 from the warband box 20517 - Sons of Kronos Maidens of the Blade - most likely sculpted by Kevin White.

As it's been awhile, I modeled the paint scheme on the old Warhammer Quest Warrior model that I painted back in 2001 - nothing like going back a few years!

All in all I was happy with the end results - I think overall I've lost some patience - my drybrushing is a bit rushed and not as detailed. My layering technique is still good.

Painting Instructions for Archived War Maiden:

Step 01: Undercoat model with white primer
Step 02: Use Scorched Brown on all fur and leather
Step 03: Use mix of Scorched Brown and Blood Red on inside bearskin
Step 04: Use Snakebite Leather on all hair
Step 05: Use Enchanted Blue on loincloth
Step 06: Use Chaos Black on all metal bits
Step 07: Drybrush Chainmail on all metal bits
Step 08: Highlight drybrush Mithril Silver on sword
Step 09: Use Bronzed Flesh on skin
Step 10: Drybrush bear fur with Snakebite Leather, Bubonic Brown, and Bleached Bone - then over the Bubonic Brown very lightly over the Bleached Bone areas
Step 11: Highlight hair with Leprous Brown - then mix with Bleached Bone
Step 12: Use Vermin Brown on fur of boot
Step 13: Drybrush Leprous Brown and then mix of Bleached Bone on fur of boot
Step 14: Highlight boot and gloves using Snakebite Leather to Bubonic Brown
Step 15: Blend blue areas from Enchanted Blue to Lightning Blue with Ice B
Step 16: Use mix of Bronzed Flesh and Elf Flesh on skin
Step 17: Use Elf Flesh on skin
Step 18: Highlight skin with mix of Elf Flesh and Pallid Flesh then Pallid Flesh only
Step 19: Drybrush Codex Grey on base
Step 20: Drybrush Fortress Grey on base
Step 21: Highlight base with Skull White

Tuesday, November 07, 2006

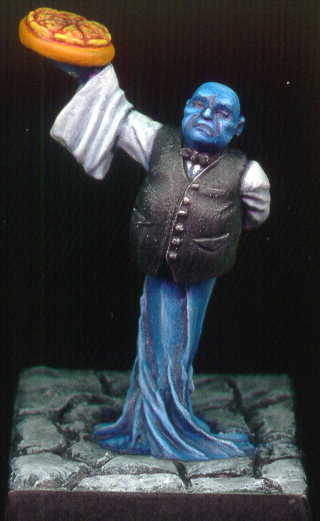
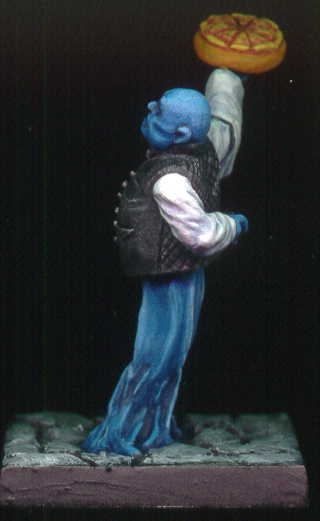
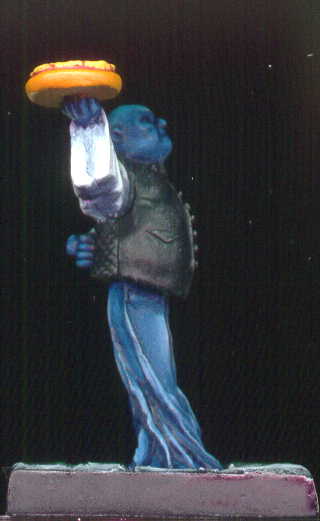
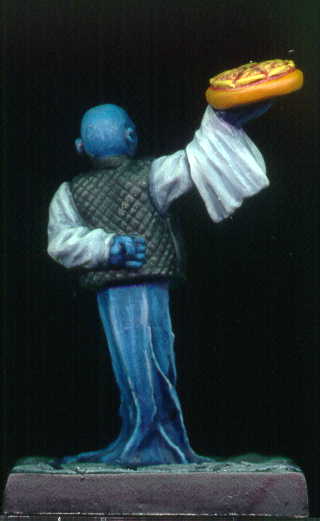
Ral Partha's (Iron Wind Metals) Aerial Servant w/Pizza


I started this miniature in hopes that I would finish in time for the Ral Partha (miniature molds now owned by Iron Wind Metals) painting contest. The contest was to paint any Ral Partha figure in their very long history (the history of Ral Partha goes back to I believe the 80's). I have a couple and the aerial servant was one that I thought would be fun to paint. Unfortunately the due date was the end of October and I didn't have time to complete the miniature until this weekend.

Painting Instructions for Aerial Servant w/Pizza
Step 01: Undercoat model with black primer
Step 02: Use Regal Blue as a base coat on everything except vest
Step 03: Use light coat of Shadow Grey to highlight shirt and towel
Step 04: Add Skull White to the Shadow Grey and continue highlights
Step 05: Use Leprous Brown on the pizza and stone plate
Step 06: Use watered down Red Gore on pizza slices
Step 07: Use mix of Leprous Brown and Skull White on pizza crust
Step 08: Use mix of Regal Blue and Skull White to highlight air and face
Step 09: Add Skull White to mix and continue highlights
Step 10: Drybrush Skull White on tuxedo for highlights
Step 11: Use a wash of Chaos Black on tuxedo (except for buttons)
Step 12: Drybrush Codex Grey on rocks
Step 13: Drybrush Fortress Grey on rocks
Step 14: Drybrush Skull White on rocks

Friday, September 15, 2006

Heartbreaker's Natural Selection...


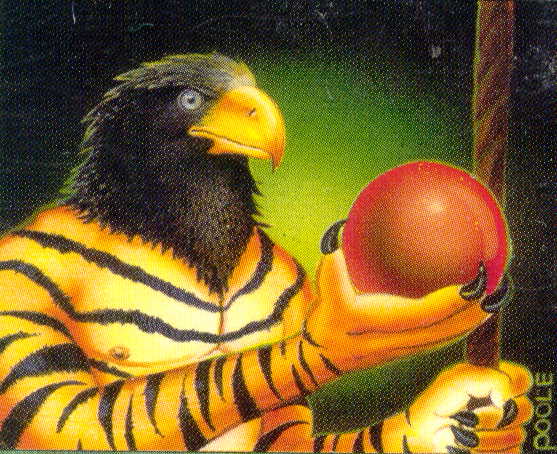
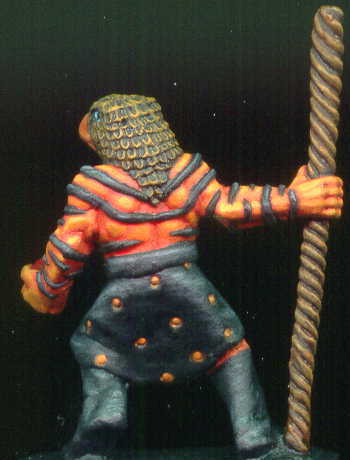
A long time ago a small company called Wizards of the Coast made a card game called Magic The Gathering. In 1994 they worked with Heartbreaker Hobbies to cast miniatures of their Deckmaster cards. I picked up a couple of these old miniatures a long time ago (about four years ago) in the discount bin. I then bought the card off of e-bay and copied the original Mark Poole picture onto the miniature. I've been working on/off this miniature for years - I kept tweaking with the highlighting and as of this weekend I'm declaring it finally finished!

Painting Instructions for Natural Selection (works better in a few hours instead of a few years):
Step 01: Undercoat models with white primer
Step 02: Use Chaos Black on base, staff, skirt, and feathered head
Step 03: Use Blazing Orange on beak
Step 04: Use Blood Red on fur
Step 05: Use Chaos Black on stripes and nails
Step 06: Use Scab Red on ball in hand
Step 07: Use Blazing Orange on fur
Step 08: Use mix of Blazing Orange and Fiery Orange on fur
Step 09: Use Fiery Orange on fur for highlight
Step 10: Use mix of Fiery Orange and Skull White on fur for further highlights
Step 11: Use Golden Yellow - add to mix and perform final highlights - repeat 10 and 11 as needed
Step 12: Use Skull White as chest highlights blending into Fiery Orange
Step 13: Use Scorched Brown on bird feathers and staff
Step 14: Wet drybrush Snakebit Leather onto feathers
Step 15: Mix a bit of Fiery Orange, Skull White, and Snakebite Leather for drybrush highlights on feathers
Step 16: Use Bestial Brown on ridges of staff
Step 17: Use Snakebite Leather on ridges of staff
Step 18: Use Vomit Brown as final highlight on ridges of staff
Step 19: Use Chestnut Ink mixed with 60% water and wash staff
Step 20: Use mix of Chaos Black and Fortress Grey to highlight skirt
Step 21: Use Fortress Grey as final highlight on skirt
Step 22: Use Blood Red as highlight on ball in hand
Step 23: Use Blazing Orange to run a highlight stripe on ball in hand
Step 24: Use Skull White to place dot on top highlight of ball in hand

Wednesday, August 02, 2006

Reaper's Templar Knight - 2330


I finally managed to find some time to paint again. I chose to paint the templar knight because I had already done a similar templar knight from Reaper and could replicate the look while using the first miniature as a guide. I figured doing so would be the easiest way to remember once again how to paint.

I use GW's paints and have always taken good care of them. I've never been away from painting for the amount of time as current and knowing GW's reputation for dried paint due to caps with a faulty design; I was a bit worried. Good news and bad news - I did lose 2 paints - Scab Red and Bestial Brown. However, most of the others all made it through the drought alright. The best were GW's newly designed caps - right before my last stopping point GW had re-released their paints with the new cap design. Those paints made it through looking like day one from the hobby store.

Painting Instructions for Templar Knight:
Step 01: Undercoat model with Black primer
Step 02: Drybrush Boltgun Metal on all chainmail and metal bits
Step 03: Use Regal Blue on robes
Step 04: Use mix of Regal Blus and Ultramarines Blue on robes
Step 05: Use Ultramarines Blue on robes
Step 06: Use mix of Ultramarines Blue and Lightning Blue on robes
Step 07: Use Lightning Blue on robes
Step 08: Use Ice Blue on robes
Step 09: Use Skull White on robes
Step 10: Use Scab Red on shield
Step 11: Use Red Gore on shield
Step 12: Use Blood Red on shield
Step 13: Use Blazing Orange on shield
Step 14: Use Ice Blue on cross on shield
Step 15: Use mix of Ice Blue and Skull White on cross on shield
Step 16: Use Skull White on cross on shield
Step 17: Use Scorched Brown on leather bits
Step 18: Use Bestial Brown on leather bits
Step 19: Use Snakebite Leather on leather bits
Step 20: Use Buboninc Brown on leather bits
Step 21: Use mix of Bubonic Brown and Bleached Bone on leather bits
Step 22: Use Scorched Brown on back of shield
Step 23: Use Bestial Brown to make vertical lines on back of shield
Step 24: Use Vomit Brown to make vertical lines on back of shield
Step 25: Use Bleached Bone to make vertical line on back of shield
Step 26: Use Boltgun Metal around outside of and small line around back of shield
Step 27: Use Tin Bitz on sword pommel
Step 28: Mix Tin Bitx and Boltgun Metal for highlights on sword pommel
Step 29: Use Chainmail on metal highlights
Step 30: Use Mithril Silver as final metal highlights
Step 31: Drybrush Codex Grey on stone
Step 32: Drybrush Fortress Grey on stone
Step 33: Drybrush Skull White on stone