Wednesday, February 28, 2001

Games-Workshop's Blue Skink Musician


This figure is the musician for my blue skinks. The scan just does not do this one justice as the orange came out too dark. The drum strap was painted using a very fine point. Another note of interest is the shading of the skin on the drum to look like it has been well used. Completed in February of 2001.

Painting Instructions for Lizardmen Skink Musician:

Step 1: Undercoat models with white primer
Step 2: Use Lightning Blue on the skin - except bottom of head and belly
Step 3: Use Jade Green on the bottom of head and belly
Step 4: Use Bubonic Brown on the arrow pouch
Step 5: Use Snakebite Leather on the bag straps
Step 6: Use Chaos Black on eyeballs, and line in crease of the mouth
Step 7: Use Sunburst Yellow on upper eye
Step 8: Use Blood Red for loincloth
Step 9: Use Fiery Orange for the fin
Step 10: Use watered down Enchanted Blue on all areas of skin - let seep into creases
Step 11: Wash Snakebite Leather onto arrow pouch
Step 12: Use Blazing Orange in the creases of the fin
Step 13: Use watered down Scaly Green on chest
Step 14: Use watered down Red Gore on loin cloth and arrows
Step 15: Use Ice Blue as highlight on skin
Step 16: Drybrush Skull White on highlight creases
Step 17: Use Vomit Brown as highlight on arrow pouch
Step 18: Use Golden Yellow on raised areas of fin
Step 19: Use Vile Green as highlight on chest
Step 20: Use Blazing Orange as highlight on loin cloth - may want to go down to Fiery Orange as well
Step 21: Drybrush Bubonic Brown on bag straps
Step 22: Use Bleached Bone on claws
Step 23: Use watered down Flesh Wash on claws
Step 24: Use Burnished Gold on rings
Step 25: Use the Fiery Orange and Lightning Blue pattern on the drum strap
Step 26: Use Bleached Bone on drum up to Snakebite Leather in the middle
Step 27: Use Goblin Green on base
Step 28: Use watered down glue on base, then dip into fine ballast
Step 29: Use drybrushed Camo Green onto fine ballast

Monday, February 26, 2001

Games-Workshop's Blue Skink Champion


This figure is the champion for my blue skinks. I couldn't get the front view to sit on the glass correctly so I had to hold the base with my finger - that's why the black background. I really enjoyed this figure - some great detail - the mouth really sets it off. Completed in February of 2001.


Painting Instructions for Blue Skink Champion:

Step 1: Undercoat models with white primer
Step 2: Use Lightning Blue on the skin - except bottom of head and belly
Step 3: Use Jade Green on the bottom of head and belly
Step 4: Use Bubonic Brown on the arrow pouch
Step 5: Use Snakebite Leather on the arrow pouch straps and bow
Step 6: Use Chaos Black on axe
Step 7: Use Sunburst Yellow on upper eye
Step 8: Use Blood Red for loincloth and arrows
Step 9: Use Fiery Orange for the fin
Step 10: Use watered down Enchanted Blue on all areas of skin - let seep into creases
Step 11: Wash Snakebite Leather onto arrow pouch
Step 12: Use Blazing Orange in the creases of the fin
Step 13: Use watered down Scaly Green on chest
Step 14: Use watered down Red Gore on loin cloth and arrows
Step 15: Use Ice Blue as highlight on skin
Step 16: Drybrush Skull White on highlight creases
Step 17: Use Vomit Brown as highlight on arrow pouch
Step 18: Use Golden Yellow on raised areas of fin
Step 19: Use Vile Green as highlight on chest
Step 20: Use Blazing Orange as highlight on loin cloth and drybrush on arrows - may want to go down to Fiery Orange as well
Step 21: Drybrush Bubonic Brown on arrow pouch straps and bow
Step 22: Use Bleached Bone on claws
Step 23: Use Burnished Gold on rings
Step 24: Use watered down Flesh Wash on claws and rings
Step 25: Very lighty drybrush just a bit of Codex Grey on the sword sheath
Step 26: Mix Blood Red and Tentacle Pink for top of tongue using more of the red further out
Step 27: Drybrush Codex Grey and Fortress Grey on axe
Step 28: Use Goblin Green on base
Step 29: Use watered down glue on base, then dip into fine ballast
Step 30: Use drybrushed Camo Green onto fine ballast

Thursday, February 08, 2001

WOTC's Male Fighter


2015-01-25 - model number update - this was WOC 40004.  I haven't been able to figure out the sculptor of this model.  Lost Minis Wiki has Mize, Wiebe, and Elliot as the sculptors on other models in the same range.

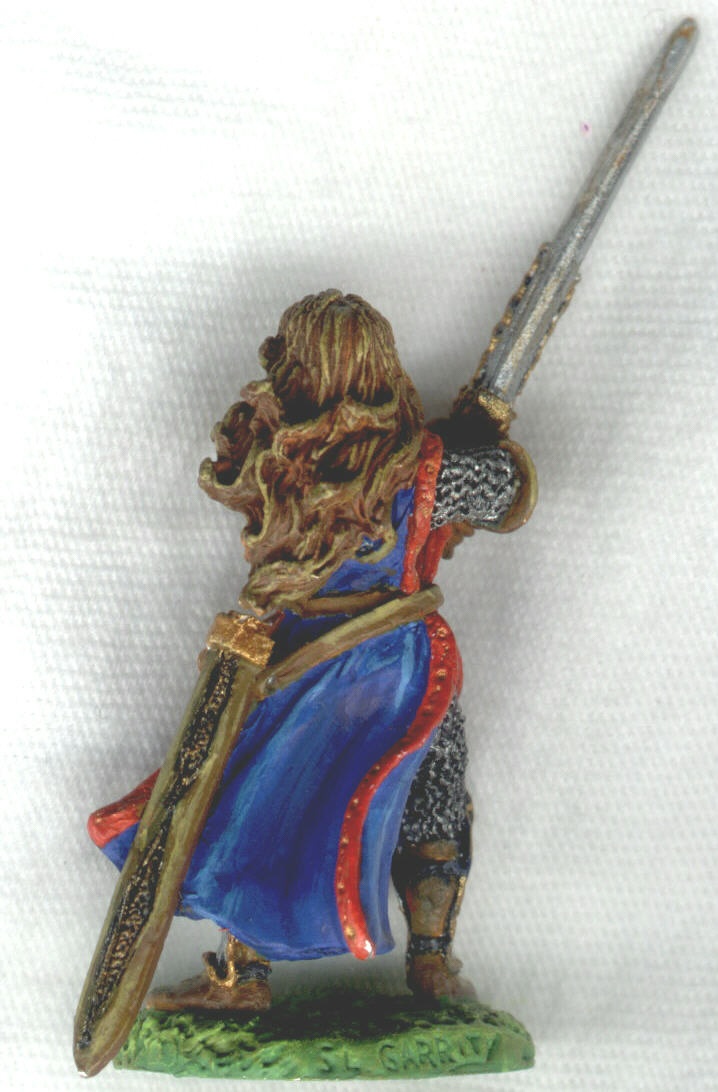
Dungeons and Dragons is the revamped AD&D system. To celebrate the 25th anniversary, WOTC came out with their own miniatures. This one is the male fighter. I painted this fighter in February of 2001.

The sword is bright, but I just had to do something with it in order to represent a magical sword. I also put a shield on this fighter as he just looked naked without one.

My first attempt at modeling! Nothing dramatic, but I put the two straps on between the glove and the shield. Took me an entire hour - I have new respect for all those craftsman that are making these miniatures.

Painting Instructions for Wizard of the Coast Male Fighter

Step 1: Undercoat models with white primer
Step 2: Use Bronzed Flesh on face
Step 3: Use Snakebite Leather on gloves, shoes, belt, and chest
Step 4: Use Snot Green on outside of cloak
Step 5: Undercoat all steel Chaos Black
Step 6: Use Sunburst Yellow on inner coat
Step 7: Use Dark Angels Green on inside of cloak and leggings
Step 8: Drybrush Boltgun Metal on steel
Step 9: Drybrush Chainmail on steel
Step 10: Watered down wash of Regal Blue on steel
Step 11: Use Bestial Brown on hair
Step 12: Shade cloak with Dark Angels Green
Step 13: Highlight cloak with Scorpian Green
Step 14: Shade inner coat Golden Yellow and Fiery Orange
Step 15: Highlight inner coat with Bad Moon Yellow
Step 16: Highlight leather with Bubonic Brown
Step 17: Use watered down Flesh Wash on face
Step 18: Use Bronzed Flesh on main facial features
Step 19: Highlight face with Elf Flesh
Step 20: Blend onto sword starting with Fiery Orange on base going to Bad Moon Yellow on tip
Step 21: Blend onto gem starting with Bilious Green going to Dark Angels Green
Step 22: Use Skull White for dot on gem
Step 23: Use Chaos Black on base
Step 24: Drybrush onto base with Codex Grey, Fortress Grey, then Skull White
Step 25: Use Snot Green on shield
Step 26: Highlight shield with Scorpion Green
Step 27: Use Sunburst Yellow on shield emblem
Step 28: Shade shield emblem with Fiery Orange
Step 29: Wash shield with Sunburst Yellow
Step 30: Highlight shield with Bad Moon Yellow
Step 31: Use Bestial Brown on back of shield
Step 32: Drybrush back of shield with Snakebite Leather, then Bubonic Brown
Step 33: Wash back of shield with Flesh Wash

Saturday, January 27, 2001

Ral Partha's Archers of Lanis


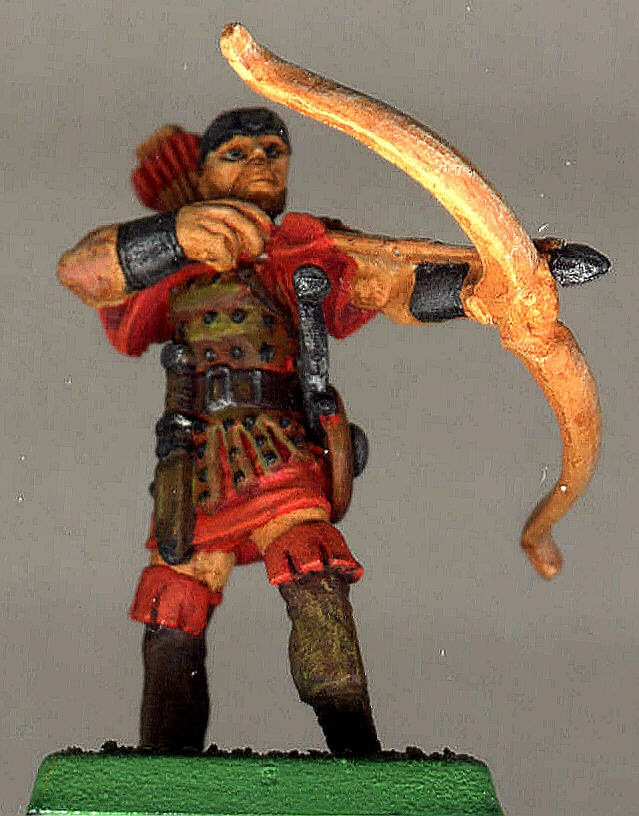
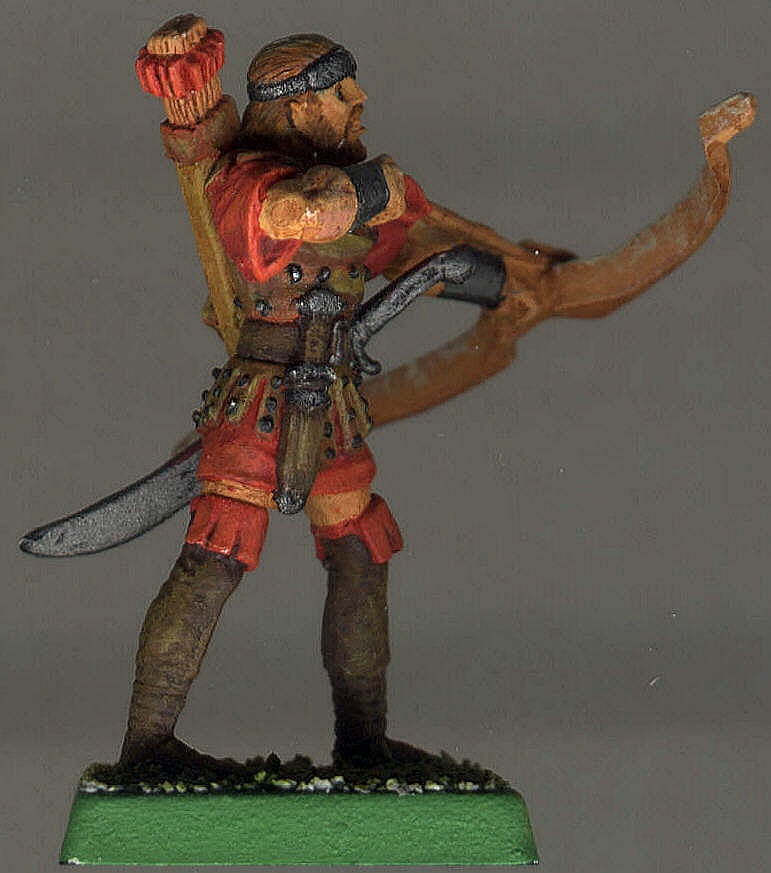
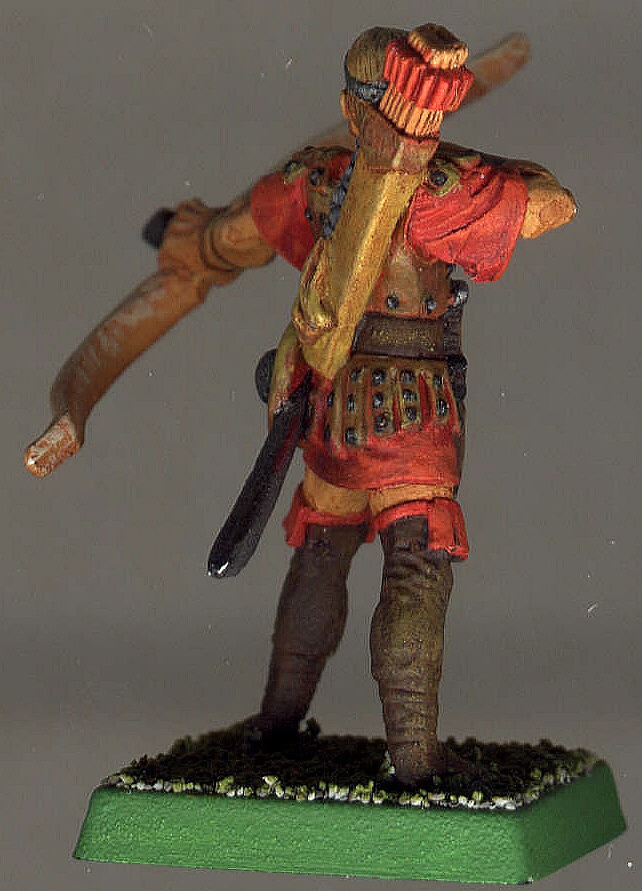
Crucible was the new fantasy tabletop game developed by Ral Partha. At the time of the painting contest conclusion it is unknown as to the status of Ral Partha and the Crucible game - very sad indeed. I finished these two figures at the end of January of 2001.

These scans are a bit different than the others I've done previously. Upon recommendation from others I have placed a box over the figure instead of a cloth. This helps eliminate the shadows. However I used the WarHammer box lid and probably need to find something that isn't so deep as the scans are a bit dark.

I'm very happy with the figures themselves. I probably should have put a darker wash into the arrow shafts. Favorite part is the stud detail - took a long time and a steady hand.

Painting Instructions for Archers of Lanis

Step 1: Use Bronzed Flesh on skin
Step 2: Use Blood Red on all leather and garments
Step 3: Use Snakebite Leather on leather armor, hair, and eye socket
Step 4: Use Scorched Brown on leather boots and belt
Step 4: Use Chaos Black on metal
Step 5: Use Vomit Brown on bow
Step 6: Use Bubonic Brown on quiver
Step 7: Use a watered down Flesh Wash over everything
Step 8: Drybrush Boltgun Metal on metal
Step 9: Shadow Bestial Brown on leather
Step 10: Shadow Red Gore on garments
Step 11: Highlight/drybrush Bleached Bone on bow
Step 12: Use Bleached Bone on eyes
Step 13: Highlight skin with Bronzed Flesh then highlight that with Elf Flesh
Step 14: Highlight leather with Bubonic Brown
Step 15: Highlight garment with Blazing Orange
Step 16: Highlight boots and belt with Bestial Brown
Step 17: Drybrush Snakebite Leather on boots and belt
Step 18: Use Codex Grey on braids
Step 19: Watered down Chaos Black into braid
Step 20: Drybrush Fortress Grey on braids

Thursday, January 18, 2001

Ral Partha's Ogre Ballista


Crucible is the new fantasy tabletop game developed by Ral Partha. In order to get into the spirit, they decided to have an on-line painting contest. I painted this ogre in January of 2001.

You can see mine and many others at the Crucible painting contest web site hosted by the Goblin King.

This miniature was quite large - I did not realize how large it was until I had it in my hands. I thought this figure was rather cool as it had some very nice features.

I did my first bit of terrain - the "rock" is made out of styrofoam which I painted black, two shades of grey and then a final drybrushing of white. Finally, I let some of the grass grow on the rock in the grooves. I like the end result.

Painting Instructions for Ogre Ballista

Step 1: Use Snakebite Leather on all leather armor
Step 2: Use Bronzed Flesh on skin
Step 3: Use Chaos Black as an undercoat on all metal bits
Step 4: Use Regal Blue on all cloth and arrow feathers
Step 5: Use Scorched Brown on ballista
Step 6: Use Bubonic Brown on arrows
Step 7: Drybrush Boltgun Metal on metal bits
Step 8: Drybrush Chainmail on metal bits
Step 9: Drybrush Mithril Silver on metal bits very lightly as a highlight
Step 10: Shade all metal bits with watered down Flesh Wash
Step 11: Wash all cloth with watered down Midnight Blue
Step 12: Highlight all cloth with Ultramarines Blue
Step 13: Drybrush all cloth with Lightning Blue
Step 14: Wash all skin with watered down Flesh Wash
Step 15: Shade skin with Dwarf Flesh - slighty watered down
Step 16: Highlight skin with Elf Flesh
Step 17: Wash all leather with Bestial Brown
Step 18: Highlight Balista with Bestial Brown
Step 19: Drybrush Snakebite Leather on balista
Step 20: Light drybrush Bubonic Brown on balista
Step 21: Highlight all leather with Bubonic Brown
Step 22: Light drybrush Bleached Bone onto leather edges
Step 23: Use Bleached Bone on fingernails and toe claws
Step 24: Use Goblin Green on base
Step 25: Drybrush base with Camo Green

Sunday, December 24, 2000

FanPro's Orc Lord


The second VIC (Visions In Color) that I participated in was for VIC#5. I painted this orc in December of 2000.

You can see mine and many others at the miniature painting web site hosted by Dominic.

This was my first conversion to a miniature and I really liked the way this turned out. The original had a spear between the top hand and the bottom hand. I replaced the spear with a battle axe and a shield. I used the skull decoration from the spear on the shield.

I was also very pleased with the blending of colors on the horns and the plume. The cloak was allright - it was a very big piece to blend and I'm not sure if I put the shading and highlights in all the right spots - it's close.

Wednesday, November 22, 2000

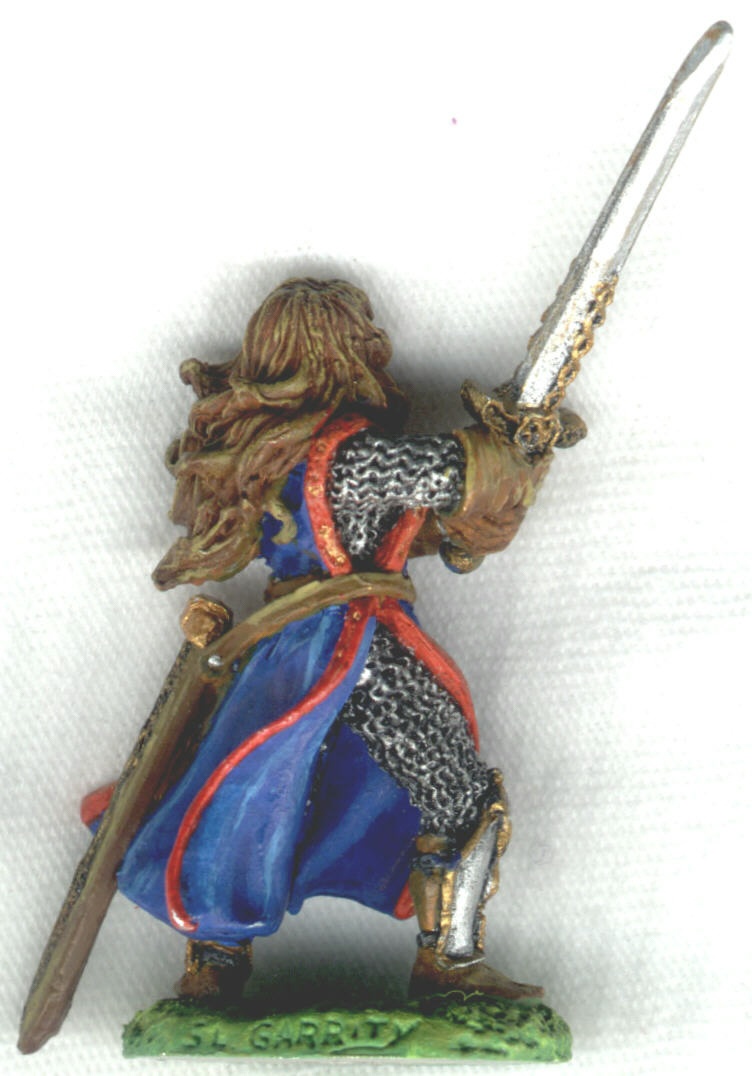
Reaper's Shaedra, Heroine - 2393


Shaedra was done for Jason Moses Challenge Page in November of 2000. This mini had a combination of features from the first two - therefore was the most challenging and time consuming.

Painting Instructions for Shaedra, Heroine

Step 1: Undercoat model with White Primer
Step 2: Use Bronzed Flesh on face
Step 3: Use Bestial Brown on hair
Step 4: Drybrush Snakebite Leather on hair
Step 5: Drybrush Bubonic Brown on hair
Step 6: Drybrush Vomit Brown on hair
Step 7: Use Enchanted Blue on robe
Step 8: Wash Chaos Black on sword and chainmail
Step 9: Use Chaos Black on eyes
Step 10: Use Skull White on eyes
Step 11: Use Chaos Black on eye centerline
Step 12: Use Snakebite Leather on gloves, belts, and shoes
Step 13: Use Blood Red on fringe of robe
Step 14: Drybrush Chainmail on chainmail and sword
Step 15: Drybrush Mithril Silver on plate and sword
Step 16: Drybrush Shining Gold on edges of plate mail, sword handle
Step 17: Wash Shining Gold in decorations on fringe
Step 18: Shade Bestial Brown on gloves, belts, and shoes
Step 19: Shade Regal Blue on robe
Step 20: Highlight Bubonic Brown on gloves, belts, and shoes
Step 21: Highlight Lightning Blue on robe
Step 22: Highlight Blazing Orange on fringe of robe
Step 23: Use watered down Flesh Wash on face
Step 24: Highlight Elf Flesh on face
Step 25: Use Bleached Bone on teeth
Step 26: Use Goblin Green on base
Step 27: Drybrush Camo Green on base
Step 28: Drybrush Bilious Green on base

Tuesday, November 21, 2000

Reaper's Liarra Silverrain - 2155


Liarra was done for Jason Moses Challenge Page in November of 2000. Another S. Garrity sculpted mini (first three are her stuff) - I didn't like the elf ears sticking out - so I tried to camoflauge into her hair.

Painting Instructions for Liarra Silverrain

Step 1: Undercoat model with White Primer
Step 2: Use Elf Flesh on face, hands, legs, and arms
Step 3: Use Red Gore on hair
Step 4: Drybrush Blood Red on hair
Step 5: Drybrush Blazing Orange on hair
Step 6: Drybrush Fiery Orange on hair
Step 7: Use Snot Green on dress
Step 8: Use Bilious Green on cuffs/fringe of dress
Step 9: Use Bubonic Brown on bow
Step 10: Wash Chaos Black on arrow gaurd and sword
Step 11: Use Chaos Black on eyes
Step 12: Use Skull White on eyes
Step 13: Use Chaos Black on eye centerline
Step 14: Use Snakebite Leather on shoes and straps
Step 15: Use Vomit Brown on arrow bag
Step 16: Highlight Vomit Brown on bow
Step 17: Use Dark Angels Green on arrows
Step 18: Wash shading of Dark Angels Green on dress
Step 19: Highlight Bleached Bone on bow
Step 20: Drybrush Mithril Silver on arrow gaurd and sword
Step 21: Highlight Scorpian Green on dress
Step 22: Shade Bestial Brown on boots
Step 23: Highlight Bubonic Brown on boots
Step 24: Shade Bubonic Brown on arrow bag
Step 25: Highlight Bleached Bone on arrow bag
Step 26: Shade Bronzed Flesh on face
Step 27: Highlight with Elf Flesh and Skull White
Step 28: Use Skull White on white dots of dress
Step 29: Use Goblin Green on base
Step 30: Drybrush Camo Green on base
Step 31: Drybrush Bilious Green on base

Monday, November 20, 2000

Reaper's Brianna of the Blade - 2267


Brianna was done for Jason Moses Challenge Page in November of 2000. Overall a great mini - was a real pleasure to paint. I still need to work on swords. The gold trim came out better than expected

Painting Instructions for Brianna of the Blade

Step 1: Undercoat model with White Primer
Step 2: Use Bronzed Flesh on face, right hand, legs, arms, and body
Step 3: Use Sunburst Yellow on hair
Step 4: Wash Vomit Brown on hair
Step 5: Drybrush Sunburst Yellow on hair
Step 6: Drybrush Bleach Bone on hair
Step 7: Drybrush Skull White on hair
Step 8: Medium wash Chaos Black on sword, shield, chainmail
Step 9: Use Chaos Black on eyes
Step 10: Use Skull White on eyes
Step 11: Use Chaos Black to center line on eyes
Step 12: Drybrush Boltgun Metal on sword
Step 13: Drybrush Chainmail on sword
Step 14: Drybrush Mithril Silver on sword
Step 15: Drybrush Mithril Silver on shield
Step 16: Wash Boltgun Metal to bottom of shield
Step 17: Drybrush Chainmail on chain skirt
Step 18: Drybrush Mithril Silver on plate
Step 19: Drybrush Shining Gold on edges of plating and shield decorations
Step 20: Use Snakebite Leather on boots, straps, belt, and glove
Step 21: Wash Bestial Brown on boots, straps, belt, and glove
Step 22: Highlight Bubonic Brown on boots, straps, belt and glove
Step 23: Use Goblin Green on base
Step 24: Drybrush Camo Green on base
Step 25: Drybrush Bilous Green on base

Friday, August 04, 2000

Ral Partha's Neo-Soviet Ursa Heavy Assault Suit


The first VIC (Visions In Color) that I participated in was for VIC#3. I painted this mech in August of 2000.

The idea of a VIC is that everyone paints the same model and then we all present at the same time. You can see mine and many others at the miniature painting web site hosted by Dominic.

This was the first time that I have ever tried to paint something that was this large. It was quite a challenge.

While the pictures are OK - I had to use my wife's digital camera and the images lost alot of their color (the shading and highlighting).

Thursday, July 27, 2000

Games-Workshop's Gui Le Gros


This figure is the equivalent of the musician of my Bretonnian Archers. Who are we really kidding - it's Friar Tuck from Robin Hood! The scan really doesn't show well due to the huge difference in contrasts between dark and light. This one always gets rave reviews from others when they visit. The pinstriping was the biggest challenge. Completed in July of 2000.

Painting Instructions for Gui Le Gros:

Step 1: Undercoat models with white primer
Step 2: Use Bronzed Flesh on face and hands
Step 3: Use Chaos Black on helmet, beer mugs and do eyes (along with Skull White)
Step 4: Use Bleached Bone on the leather hood
Step 5: Use Bestial Brown on cloak and pants and ropes - also on barrel
Step 6: Use Scorched Brown on shoes and arrow gaurd on arm
Step 7: Use Bubonic Brown on bow, arrows, and money pouch
Step 8: Drybrush Bubonic Brown on ropes
Step 9: Use watered down Scorched Brown to shade the robe
Step 10: Highlight Snakebite Leather on robe with just a bit of Bubonic Brown
Step 11: Highlight Bestial Brown on arrow bag with a bit of Snakebite Leather followed by Bubonic Brown
Step 12: Drybrush Flesh Wash on face, hands, barrel, and bow
Step 13: Shade hood with Vomit Brown
Step 14: Highlight hood with Skull White
Step 15: Use Bleached Bone to create trim around robe
Step 16: Use Bestial Brown to create trim around hood
Step 17: Use Bestial Brown to highlight shoes
Step 18: Use Snakebite Leather to highlight pants
Step 19: Use Burnished Gold on tips of bow - then go over with Flesh Wash
Step 20: Drybrush Chainmail on mugs, helmet, arrows, and barrel
Step 21: Use Goblin Green on base
Step 22: Use watered down glue on base, then dip into fine ballast
Step 23: Use drybrushed Camo Green onto fine ballast

Sunday, July 23, 2000

Games-Workshop's Hugo Le Petit


This figure is the standard bearer of my Bretonnian Archers. Who are we really kidding - it's lil' John! This was my first mini where I worked out how to shade and highlight skin and the wooden staff. Favorite part is the rabbit off the back - the detail is a little washed out in the scan but it looks great up close. Completed in July of 2000.

Painting Instructions for Hugo Le Petit:

Step 1: Undercoat models with white primer
Step 2: Use Bronzed Flesh on face and hands
Step 3: Use Snakebite Leather on staff and shoes
Step 4: Use Dark Angels Green on collar/hood and leggings
Step 5: Use Snot Green on coat
Step 6: Use Scorched Brown on belt and bag
Step 8: Use watered down Scorched Brown on shoes
Step 9: Use Bubonic Brown on bow & arrows
Step 10: Use drybrushed Bubonic Brown on shoes and staff
Step 11: Use watered down Snakebite Leather on the bow
Step 12: Use Bestial Brown on the bow straps and handle - highlight Scorched brown areas
Step 13: Use Bestial Brown on hair
Step 14: Use drybrushed Bubonic Brown on hair
Step 15: Use Snot Green to highlight collar/hood and leggings
Step 16: Use drybrushed Scorpion Green to highlight coat
Step 17: Use Burnished Gold on belt clip and tips of bow
Step 18: Use just a bit of Flesh Wash on the Burnished Gold
Step 19: Use Fortress Grey on the bunny - highlight with Skull White
Step 20: Use watered down Flesh Wash on hands and face (including eyes and mouth)
Step 21: Use Goblin Green on base
Step 22: Use watered down glue on base, then dip into fine ballast
Step 23: Use drybrushed Camo Green onto fine ballast

Thursday, July 13, 2000

Games-Workshop's Bertrand The Brigand


This figure is the leader of my Bretonnian Archers. Who are we really kidding - it's Robin Hood and his gang! This was my first metal mini where highlighting and shading techniques started to actually work. Unfortunately, the scan makes it difficult to see the white or the green/brown shades. Therefore tried to select a happy medium. Completed in July of 2000.

Painting Instructions for Bertrand The Brigand:

Step 1: Undercoat models with white primer
Step 2: Use Bronzed Flesh on face and hands
Step 3: Use Snot Green on collar/hood
Step 4: Use Snot Green on arrow fletching
Step 5: Use Dark Angels Green on coat and hat
Step 6: Use Bestial Brown on leggings and inner coat, belt, and bag
Step 7: Use Snakebite Leather on arrow box
Step 8: Use Bubonic Brown on bow & arrows
Step 9: Use Scorched Brown on shoes and arrow gaurd
Step 10: Use Skull White on sleaves
Step 11: Use drybrushed Chainmail on sword
Step 12: Use Snakebite Leather to highlight leggings
Step 13: Use Snot Green to highlight coat and hat
Step 14: Use drybrushed Scorpion Green to highlight arrow fletching
Step 15: Use Fortress Grey to shadow white sleaves
Step 16: Use watered down Flesh Wash on hands and face (including eyes and mouth)
Step 17: Use Enchanted Blue on the feather
Step 18: Highlight feather with Ice Blue
Step 19: Use Goblin Green on base
Step 20: Use watered down glue on base, then dip into fine ballast
Step 21: Use drybrushed Camo Green onto fine ballast